What Does A Blown Fusible Link Look Like
Fusible links: those unsung heroes of the automotive electrical system. We often overlook them until something goes wrong, and suddenly, they're the prime suspect. But how do you actually identify a blown fusible link? Unlike a standard fuse with its transparent window, a blown fusible link can be more subtle in its demise. This article will guide you through the process of identifying a failed fusible link, covering visual cues, testing methods, and real-world scenarios.
Understanding Fusible Links
Before diving into the symptoms, let’s briefly recap what a fusible link is. A fusible link is essentially a specialized type of electrical fuse, designed to protect a circuit from overcurrent. Unlike typical blade or cartridge fuses, fusible links are heavier-duty and typically used for circuits carrying higher amperage loads, such as the main power feed from the battery to the vehicle's electrical system. They are usually wire-like components encased in a non-flammable insulation material.
They're designed to "melt" or "fuse" and break the circuit when the current exceeds a predetermined threshold. This sacrificial action prevents damage to more expensive components, like the ECU (Engine Control Unit) or other critical modules.
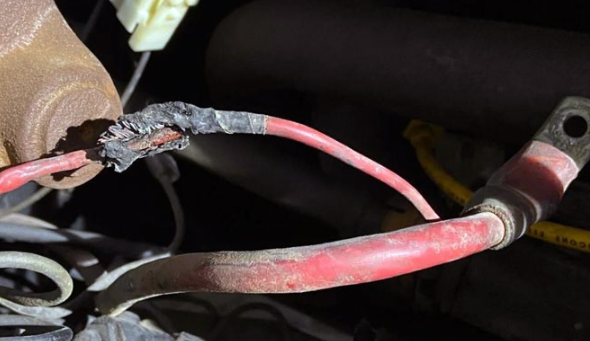
Visual Inspection: The First Line of Defense
The first step in diagnosing a potential fusible link issue is a thorough visual inspection. While a blown fusible link won't always present obvious signs, here's what to look for:
Blistered or Cracked Insulation
One of the most common indicators is a blistered, cracked, or swollen appearance of the insulation surrounding the fusible link wire. This occurs due to the heat generated when the link blows. The insulation material, often a rubber or plastic compound, can't withstand the extreme temperature and begins to degrade. Carefully examine the entire length of the fusible link, paying close attention to any areas that appear discolored or deformed.
Melted or Burned Insulation
In more severe cases, the insulation may exhibit signs of melting or burning. You might even see exposed wire where the insulation has completely disintegrated. This is a clear indication of a significant overcurrent event. Be cautious when handling a fusible link with melted insulation, as the exposed wire could still be energized if the underlying fault persists.
Separated or Broken Wire
Sometimes, the fusible link wire itself will physically break or separate within the insulation. This can be difficult to spot without a close inspection, as the insulation may remain intact. Look for any bulges or kinks in the insulation that might suggest a break underneath. Gently flexing the link might reveal a weakness or separation point.
Discoloration
Overheating can cause the fusible link wire and the surrounding insulation to discolor. You might see a darkening or browning of the insulation, or a change in the color of the wire itself. This discoloration is a sign that the link has been subjected to excessive heat, even if it hasn't completely failed yet. Consider replacing a discolored fusible link, even if it still appears to be functioning, as it may be weakened and prone to premature failure.
Testing with a Multimeter: Confirming the Diagnosis
Even if a visual inspection reveals potential issues, it's crucial to confirm your diagnosis with a multimeter. A multimeter allows you to measure the electrical continuity through the fusible link, verifying whether it's still intact.
Continuity Test
The most common method is a continuity test. Here's how to perform it:
- Safety First: Disconnect the negative battery cable before performing any electrical testing. This prevents accidental shorts and potential damage.
- Set Up the Multimeter: Set your multimeter to the continuity testing mode. This mode typically has a symbol that looks like a diode or a speaker.
- Connect the Probes: Place one probe of the multimeter on each end of the fusible link. Ensure you're making good contact with the metal terminals.
- Observe the Reading: If the fusible link is intact, the multimeter should beep or display a reading close to zero ohms, indicating a continuous circuit. If the multimeter displays an open circuit (OL) or a very high resistance, the fusible link is blown and needs replacement.
Voltage Drop Test
A voltage drop test can be used to identify a fusible link that is partially blown or corroded, even if it still shows continuity. This test measures the voltage difference across the fusible link while the circuit is under load. A significant voltage drop indicates excessive resistance, which can be caused by a partially blown or corroded link.
- Re-connect Battery: Reconnect the negative battery cable.
- Activate Circuit: Turn on the circuit that the fusible link protects (e.g., turn on the ignition if the fusible link protects the ignition circuit).
- Set Up the Multimeter: Set your multimeter to the DC voltage mode.
- Connect the Probes: Place one probe of the multimeter on each end of the fusible link.
- Observe the Reading: A healthy fusible link should have a very low voltage drop, typically less than 0.2 volts. A voltage drop significantly higher than this indicates excessive resistance and suggests the fusible link is compromised.
Real-World Examples and Troubleshooting Scenarios
Understanding how fusible links fail in real-world scenarios can help you diagnose problems more effectively. Here are a few examples:
Scenario 1: Starter Motor Problems
A common problem is a blown fusible link in the starter motor circuit. Symptoms might include:
- The starter motor failing to engage when the key is turned.
- A clicking sound from the starter solenoid, but no cranking.
- Complete silence when attempting to start the car.
In this case, visually inspect the fusible link for the starter circuit. If it appears damaged, test it with a multimeter. If the fusible link is blown, investigate the cause of the overcurrent. A faulty starter motor solenoid or a short circuit in the starter motor wiring are common culprits.
Scenario 2: Alternator Issues
The alternator charging circuit is another area where fusible links are often used. A blown fusible link in this circuit can lead to:
- The battery not charging properly.
- The "battery" warning light illuminating on the dashboard.
- Dimming headlights or other electrical accessories due to a discharged battery.
Check the fusible link protecting the alternator output. A common cause of failure in this scenario is a faulty alternator regulator that allows excessive current to flow.
Scenario 3: ECU or Module Failure
Fusible links often protect critical electronic control units (ECUs) and other modules. A blown fusible link protecting these components can result in a variety of symptoms, depending on the specific module affected. For example:
- The engine refusing to start.
- Transmission shifting problems.
- Malfunctioning anti-lock brakes (ABS).
- Failure of airbags to deploy.
If you suspect a blown fusible link is affecting an ECU or module, consult the vehicle's wiring diagram to locate the relevant fusible link. After replacing a blown fusible link protecting an ECU, consider checking for diagnostic trouble codes (DTCs) with an OBD-II scanner to identify any underlying issues.
Important Considerations When Replacing Fusible Links
Replacing a blown fusible link is a straightforward task, but it's crucial to follow these guidelines:
- Use the Correct Amperage Rating: Always replace a blown fusible link with one of the same amperage rating. Using a lower amperage rating will cause the link to blow prematurely, while using a higher amperage rating could allow excessive current to flow, potentially damaging other components.
- Inspect the Wiring: Before replacing a blown fusible link, thoroughly inspect the wiring in the circuit for any signs of damage, such as frayed insulation, corrosion, or loose connections. Address any wiring issues before installing a new fusible link to prevent a recurrence of the problem.
- Identify the Root Cause: A blown fusible link is a symptom of an underlying problem. It's essential to identify and correct the root cause of the overcurrent before replacing the fusible link. Otherwise, the new link will likely blow again.
- Secure Connections: Ensure that all connections to the fusible link are clean and secure. Loose or corroded connections can create resistance, which can generate heat and contribute to fusible link failure.
Conclusion
Identifying a blown fusible link involves a combination of visual inspection and electrical testing. By understanding the common symptoms and following the diagnostic procedures outlined in this article, you can effectively troubleshoot and resolve fusible link-related issues in automotive electrical systems. Remember to always prioritize safety and use the correct replacement parts to ensure a reliable and lasting repair. Knowing what a blown fusible link looks like is the first step to solving the problem.