Wheel Bearing Replacement Nissan Altima
Nissan Altima Wheel Bearing Replacement: A Comprehensive Guide
The Nissan Altima, a popular mid-size sedan, is known for its reliability and comfortable ride. However, like any vehicle, it's susceptible to wear and tear, particularly when it comes to components like wheel bearings. A failing wheel bearing can lead to noise, vibration, and even safety issues. This guide provides a detailed look at diagnosing and replacing wheel bearings on various Nissan Altima generations.
Understanding Wheel Bearings and Their Function
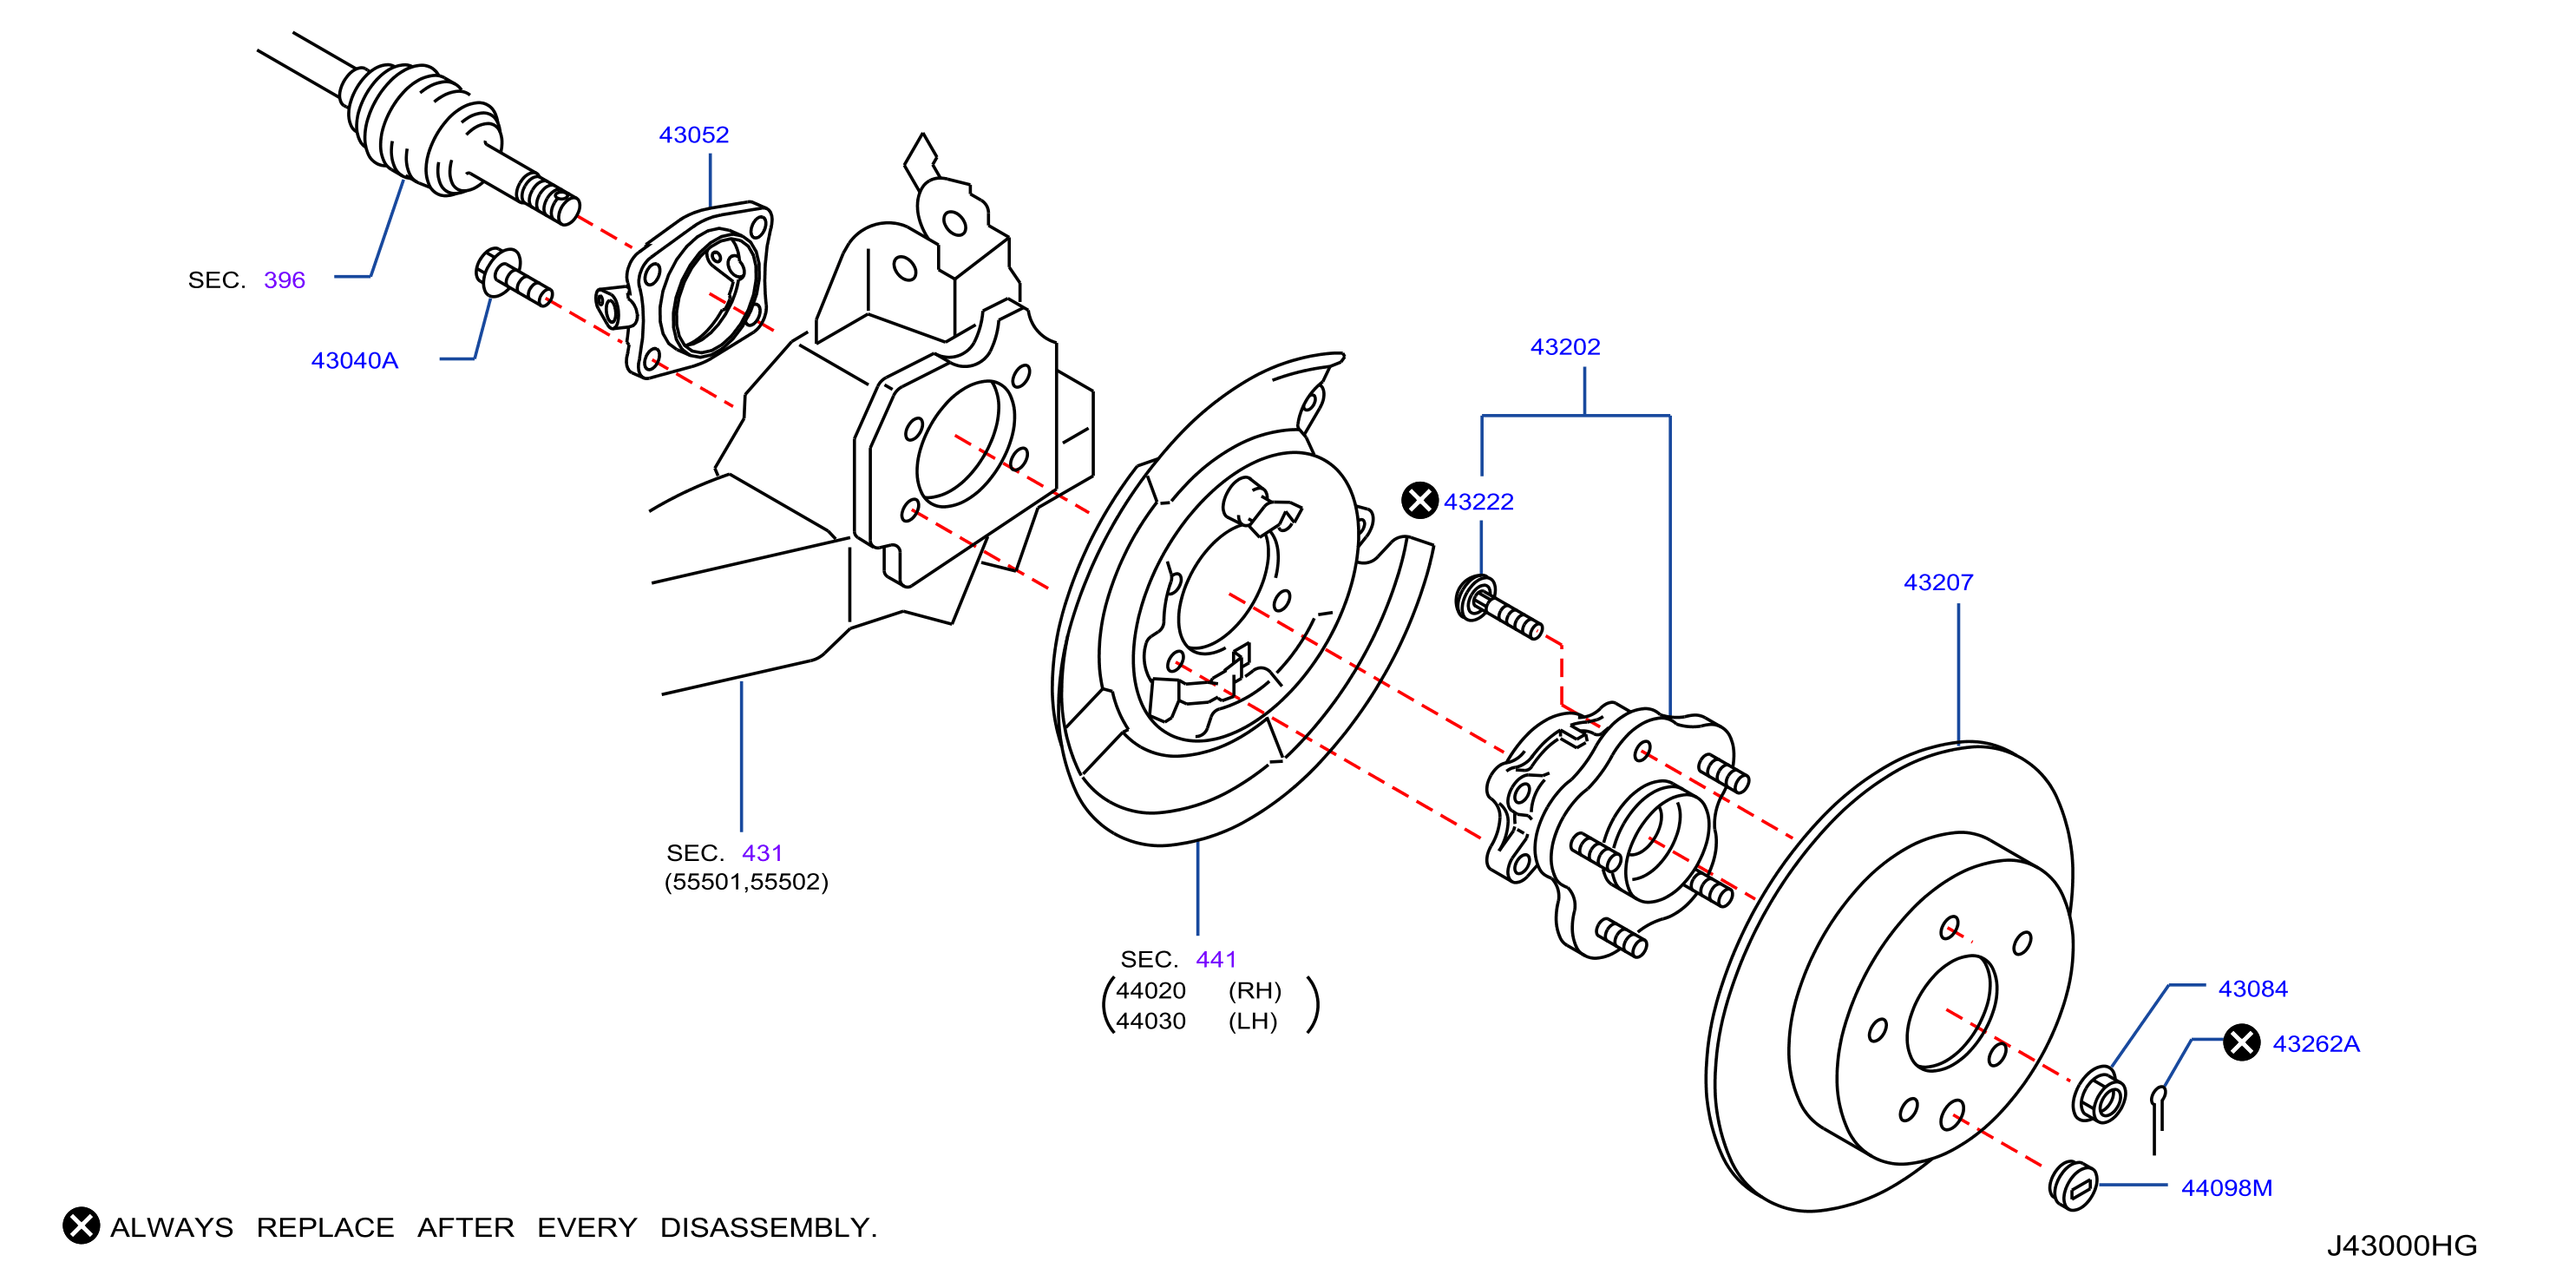
Wheel bearings are critical components that allow your Altima's wheels to rotate smoothly. They are typically sealed units, containing ball or tapered rollers lubricated with grease, encased between inner and outer races. These races sit snugly within the hub and the spindle (or knuckle, depending on the vehicle's design). Over time, the grease can degrade, the bearing surfaces can wear, or contaminants can enter, leading to bearing failure.
Identifying a Failing Wheel Bearing on Your Altima
Early detection of a failing wheel bearing can prevent more significant damage and potential safety hazards. Here are common symptoms to watch for:
- Noise: A grinding, humming, or roaring sound emanating from one or more wheels. The noise often changes with vehicle speed or when turning. This is usually the most noticeable symptom.
- Vibration: A vibration felt through the steering wheel or the floorboard, especially at higher speeds.
- Looseness: Excessive play in the wheel when you try to rock it back and forth with the vehicle lifted. This requires careful inspection, as some play is normal.
- Uneven Tire Wear: A failing bearing can cause misalignment, leading to uneven wear patterns on your tires.
- ABS Issues: In some cases, a severely damaged wheel bearing can interfere with the ABS sensor signal, triggering the ABS warning light.
To pinpoint the affected wheel, listen carefully while driving. The noise usually increases when weight is shifted to the failing bearing during a turn. You can also lift each wheel individually and spin it by hand, listening for any unusual sounds or feeling for roughness. Remember, safety is paramount – always use jack stands when working under a vehicle.
Tools and Materials Required
Before embarking on a wheel bearing replacement, ensure you have the necessary tools and materials:
- New Wheel Bearing Assembly: Ensure you purchase the correct part for your specific Altima model year and trim. Consult your VIN or a reputable auto parts supplier.
- Wheel Bearing Press Kit: Essential for pressing the old bearing out and the new bearing in without damaging the hub or bearing. Some kits include adapters specific to certain vehicle models.
- Socket Set: Including a range of metric sockets and wrenches. A breaker bar may be necessary for stubborn bolts.
- Torque Wrench: To properly tighten fasteners to the manufacturer's specifications. Critical for wheel bearing longevity and safety.
- Hammer and Punch: For removing stuck components.
- Penetrating Oil: To loosen corroded bolts and fasteners.
- Jack and Jack Stands: For safely lifting and supporting the vehicle.
- Gloves and Safety Glasses: For personal protection.
- Brake Cleaner: To clean components before reassembly.
- Grease: For lubricating the bearing and hub surfaces.
- New Cotter Pins/Locking Nuts: Replace these with new ones for safety and proper fastening.
Step-by-Step Wheel Bearing Replacement Procedure (Front Wheel)
While the process can vary slightly depending on the Altima's model year and front or rear wheel drive, here's a general guide for replacing a front wheel bearing:
- Loosen Lug Nuts: Before lifting the vehicle, loosen the lug nuts on the wheel you'll be working on.
- Lift and Secure the Vehicle: Use a jack to lift the vehicle and securely support it with jack stands. Never work under a vehicle supported only by a jack.
- Remove the Wheel: Remove the lug nuts and take off the wheel.
- Disconnect ABS Sensor (if applicable): Carefully disconnect the ABS sensor wiring from the hub assembly. Secure the sensor out of the way to prevent damage.
- Remove the Brake Caliper and Rotor: Unbolt the brake caliper and support it with a wire hanger to avoid straining the brake hose. Remove the brake rotor.
- Remove the Hub Nut/Axle Nut: This is often the most challenging step. Use a breaker bar and the appropriate socket to loosen and remove the hub nut. It may be necessary to use penetrating oil and allow it to soak for some time.
- Separate the Steering Knuckle/Spindle: Disconnect the steering knuckle from the lower control arm and, if necessary, the strut assembly. Pay close attention to the order and orientation of the components for reassembly.
- Remove the Hub Assembly: With the steering knuckle free, carefully remove the hub assembly from the vehicle.
- Press Out the Old Bearing: Using a wheel bearing press, carefully press the old bearing out of the hub. Ensure you are using the correct adapters to support the hub and bearing races properly.
- Clean and Inspect the Hub: Clean the hub thoroughly and inspect it for any damage or corrosion.
- Press In the New Bearing: Using the wheel bearing press and the correct adapters, carefully press the new bearing into the hub. Ensure the bearing is seated correctly and flush with the hub surface.
- Reassemble the Hub Assembly: Reassemble the hub assembly onto the vehicle, reversing the disassembly steps.
- Torque Fasteners: Torque all fasteners to the manufacturer's specifications. Pay particular attention to the hub nut, ball joint nut, and brake caliper bolts.
- Reconnect ABS Sensor: Reconnect the ABS sensor wiring.
- Reinstall the Brake Rotor and Caliper: Reinstall the brake rotor and caliper.
- Reinstall the Wheel: Reinstall the wheel and tighten the lug nuts to the proper torque specification.
- Lower the Vehicle: Lower the vehicle and remove the jack stands.
- Final Torque: Double-check the lug nut torque after driving a short distance.
Rear Wheel Bearing Replacement Considerations
Replacing rear wheel bearings on an Altima can be slightly different, especially if the vehicle has rear disc brakes or a rear drum brake setup. Some Altima models have rear wheel bearings that are integrated into the hub assembly, requiring replacement of the entire hub. Others have separate bearings that can be pressed in and out similar to the front. Refer to your vehicle's service manual for specific instructions.
Common Mistakes to Avoid
Wheel bearing replacement can be challenging, and several mistakes can lead to premature failure or safety issues:
- Using Incorrect Parts: Always verify you have the correct wheel bearing for your Altima's model year and trim.
- Damaging the Hub: Using excessive force or incorrect press adapters can damage the hub, requiring its replacement.
- Improper Bearing Installation: Ensure the bearing is pressed in straight and seated fully in the hub.
- Over- or Under-Torquing Fasteners: Use a torque wrench to tighten all fasteners to the manufacturer's specifications.
- Reusing Old Hardware: Replace cotter pins and locking nuts with new ones to ensure proper fastening.
- Neglecting ABS Sensors: Handle ABS sensors with care to avoid damage.
Post-Replacement Checks and Maintenance
After replacing a wheel bearing, perform the following checks:
- Test Drive: Take the vehicle for a test drive and listen for any unusual noises or vibrations.
- Wheel Alignment: Consider getting a wheel alignment after replacing a front wheel bearing, as it can affect steering geometry.
- Regular Inspection: Periodically inspect the wheel bearings for any signs of looseness or noise.
Conclusion
Replacing a wheel bearing on a Nissan Altima requires patience, the right tools, and a thorough understanding of the procedure. While some experienced DIY mechanics may be comfortable tackling this task, it's essential to assess your skill level and comfort zone. If you're unsure about any aspect of the process, it's always best to consult a qualified mechanic. Proper wheel bearing replacement ensures a safe and comfortable driving experience, preserving the reliability and performance of your Nissan Altima.
Disclaimer: This guide provides general information and should not be substituted for professional advice. Consult your vehicle's service manual and a qualified mechanic for specific instructions and safety precautions.