Which Caliper Pin Goes On Top
Alright, let's talk caliper pins. This is a question that comes up surprisingly often, and while it might seem trivial, getting it wrong can lead to uneven brake wear, noise, and even reduced braking performance. We're assuming you're already comfortable with basic brake service – removing wheels, calipers, pads, etc. This isn't a guide on *how* to do a brake job; it's a deep dive into the specific nuance of caliper pin placement.
Understanding Caliper Pins: More Than Just Bolts
First, a quick recap. Caliper pins (also sometimes called guide pins, slide pins, or bolts) are the crucial components that allow the caliper to float or slide smoothly as the brake pads wear. This floating action ensures even pressure is applied to both sides of the rotor, maximizing braking efficiency and preventing premature pad wear. If these pins get stuck or seize, the caliper can bind, causing one pad to wear much faster than the other, overheating the rotor, and generally making your braking experience unpleasant.
The key takeaway here is that not all caliper pins are created equal. While they might look similar at first glance, many vehicles use different types of pins, and their placement *does* matter.
Common Types of Caliper Pins
Before we get into which pin goes where, let's identify the common types you might encounter:
- Solid Pins: These are the simplest type – just a straight, solid metal pin. They're generally interchangeable, though you should still ensure they're properly lubricated and free of corrosion.
It's rare to find two solid caliper pins that are different. But if you do encounter it, treat them as the following:
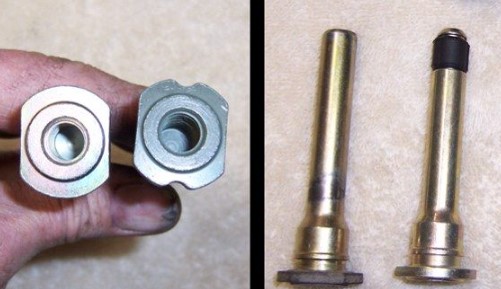
- Pins with Rubber Bushings or Sleeves: These pins feature a rubber bushing or sleeve, usually near the end. This bushing is designed to dampen vibrations and reduce noise. The rubber bushing also absorbs some of the impact to smooth out the braking operation.
- Pins with a Flat or Shoulder: Some pins may have a flattened side or a shoulder near the head. This feature is designed to prevent the pin from rotating in the caliper bracket.
- Pins with Different Lengths or Diameters: Occasionally, the top and bottom pins might have slightly different lengths or diameters. This is usually a design feature to ensure proper caliper alignment or to accommodate different brake pad thicknesses.
The Golden Rule: Rubber on Top (Usually)
Here's the general rule of thumb, and it applies to the vast majority of vehicles:
The caliper pin with the rubber bushing or sleeve goes on top.
Why? Because the upper pin is typically responsible for handling more of the braking force. The rubber bushing helps to dampen vibrations and prevent noise that can be generated as the caliper slides along the bracket during braking. The top pin often experiences more load and stress as the weight of the caliper wants to rotate under deceleration. This principle helps isolate that vibration.
However, and this is a *big* however: This isn't a universal law. Always, always consult your vehicle's service manual or a reliable online database (like Alldata or Mitchell OnDemand) to confirm the correct pin placement for your specific make and model. Never assume – a wrong assumption can lead to problems.
What Happens If You Get It Wrong?
If you install the pins incorrectly, especially if the rubber-bushed pin is placed on the bottom, you might experience the following:
- Brake Noise: The absence of the rubber bushing on the top pin can lead to increased vibrations and squealing noises during braking.
- Uneven Pad Wear: Incorrect pin placement can contribute to uneven pad wear, as the caliper might not be able to slide freely and apply even pressure to both sides of the rotor.
- Reduced Braking Performance: In severe cases, incorrect pin placement can affect braking performance, as the caliper might bind or stick.
- Premature Pin Wear: The wrong pin placed on the top location can cause premature wear.
Practical Steps for Correct Pin Placement
Here's a step-by-step approach to ensure you get it right:
- Disassemble and Observe Carefully: Before removing the old caliper pins, take a close look at their positions and note any differences. Take photos or make a sketch if needed. Pay attention to any markings or labels on the pins themselves.
- Clean and Inspect: Thoroughly clean the caliper pins and the caliper bracket using brake cleaner. Inspect the pins for any signs of damage, wear, or corrosion. If the pins are heavily corroded or damaged, replace them.
- Lubricate Properly: Apply a generous amount of high-temperature brake grease to the caliper pins before installation. Use a grease specifically designed for brake components, as other types of grease can degrade the rubber bushings. Silicone based grease is typically best.
- Consult the Service Manual: This is the most crucial step. Your vehicle's service manual will provide the definitive answer on the correct pin placement. Look for diagrams or instructions that specifically identify which pin goes on top and which goes on the bottom.
- Install Correctly: Based on your observations, the service manual, and the "rubber on top" rule of thumb (unless otherwise specified), install the caliper pins in their correct positions.
- Verify Proper Function: After installing the calipers, pump the brake pedal several times to seat the pads against the rotor. Ensure the caliper slides freely on the pins without binding or sticking. If you encounter any resistance, double-check the pin placement and lubrication.
Dealing with Stubborn Caliper Pins
Sometimes, caliper pins can become seized in the caliper bracket due to corrosion or lack of lubrication. Here are a few tips for dealing with stubborn pins:
- Penetrating Oil: Apply a generous amount of penetrating oil (like PB Blaster or Kroil) to the pin and let it soak for several minutes or even hours.
- Heat: Use a heat gun (carefully!) to heat the caliper bracket around the pin. The heat can help to loosen the corrosion and allow the pin to be removed. Be careful not to overheat the bracket or damage any surrounding components.
- Hammer and Punch: Use a hammer and punch to gently tap the pin out of the bracket. Be careful not to damage the pin or the bracket.
- Caliper Pin Removal Tool: There are specialized tools available that are designed to remove seized caliper pins. These tools can provide more leverage and control than a hammer and punch.
Important Safety Note: When working on brakes, always wear appropriate safety gear, including eye protection and gloves. Be careful when handling brake cleaner and other chemicals. And, of course, never work under a vehicle that is only supported by a jack – always use jack stands.
Conclusion
While the question of which caliper pin goes on top might seem simple, the answer can have a significant impact on your braking performance and the longevity of your brake components. Remember to always consult your vehicle's service manual, observe carefully during disassembly, and lubricate properly. By following these guidelines, you can ensure that your caliper pins are installed correctly and that your brakes are functioning optimally. Happy wrenching!