Wiring Fog Lights With Relay
So, you're looking to add some fog lights to your vehicle, or maybe your existing ones just aren't cutting it anymore? A common and reliable way to wire them up is using a relay. While it might sound intimidating, wiring fog lights with a relay is a manageable DIY project, especially if you break it down into steps. This article will walk you through the process, troubleshooting common issues, and offering practical advice to ensure a smooth installation. Think of me as your service advisor, guiding you through the process!
Why Use a Relay for Fog Lights?
Before we dive in, let's quickly cover why a relay is so important. Fog lights, like most aftermarket accessories, draw a considerable amount of power. Directly connecting them to your existing headlight circuit, or even a spare accessory wire, can overload that circuit. This can blow fuses, damage your wiring harness, or even worse, cause a fire. A relay acts like a gatekeeper. It uses a low-current signal from your existing wiring to switch on a separate, high-current circuit dedicated solely to the fog lights. This provides a safer and more stable power supply.
The Problem: Common Issues and Symptoms
Let's say you've attempted to wire your fog lights already, or you're experiencing some issues with your existing setup. Here are some telltale signs that you're having a problem:
- Fog lights don't turn on at all: This could indicate a blown fuse, a faulty relay, poor grounding, or incorrect wiring.
- Fog lights turn on but are very dim: This often points to a voltage drop, potentially due to undersized wiring, a corroded ground connection, or a weak battery.
- Fog lights flicker or turn off intermittently: This suggests a loose connection, a faulty relay, or a problem with the switch controlling the relay.
- The fuse for your fog lights blows repeatedly: This indicates a short circuit somewhere in the fog light wiring. Do not simply replace the fuse with a higher amperage one; this is a serious fire hazard.
- Other electrical components malfunction when fog lights are activated: This clearly signals that your fog light circuit is interfering with other vehicle systems, indicating an improper wiring job or an overloaded circuit.
The Solution: Step-by-Step Wiring Guide
Here's a step-by-step guide to properly wiring your fog lights with a relay. Remember to always disconnect the negative battery terminal before working on any electrical components. Safety first!
Step 1: Gather Your Tools and Materials
Before you start, make sure you have everything you need. This will save you a lot of time and frustration.
- Fog lights: Obviously! Choose lights that are appropriate for your vehicle and intended use.
- Relay: A standard 12V automotive relay (usually a 4 or 5-pin relay) with a corresponding connector.
- Wiring: Automotive-grade wire (stranded copper) of appropriate gauge (usually 14-16 gauge for most fog lights). Red and black wires are helpful for distinguishing positive and negative.
- Inline fuse holder and fuse: Choose a fuse amperage appropriate for your fog lights (check the manufacturer's specifications).
- Wire connectors: Crimp connectors, butt connectors, or solder and heat shrink tubing. Choose the method you are most comfortable with.
- Wire stripper/crimper: Essential for preparing and connecting wires.
- Electrical tape or heat shrink tubing: For insulating connections.
- Multimeter: For testing voltage and continuity (very helpful for troubleshooting).
- Screwdrivers and wrenches: To mount the fog lights and connect wiring.
- Drill (optional): If you need to drill holes for mounting or running wires.
- Zip ties: For securing wires and keeping them organized.
- Wiring diagram: Create a simple diagram or refer to online resources for your specific relay type.
Step 2: Plan Your Wiring Route
Carefully plan the route you will take for your wiring. Consider the following:
- Protect the wires: Avoid sharp edges, hot engine components, and moving parts. Use existing wiring channels or secure the wires with zip ties.
- Access to power: Determine where you will tap into a power source (usually directly from the battery with an inline fuse).
- Grounding point: Find a clean, unpainted metal surface on the vehicle chassis for grounding.
- Switch location: Decide where you want to mount your fog light switch inside the vehicle.
- Relay location: Mount the relay in a dry, protected location, such as under the hood or inside the passenger compartment.
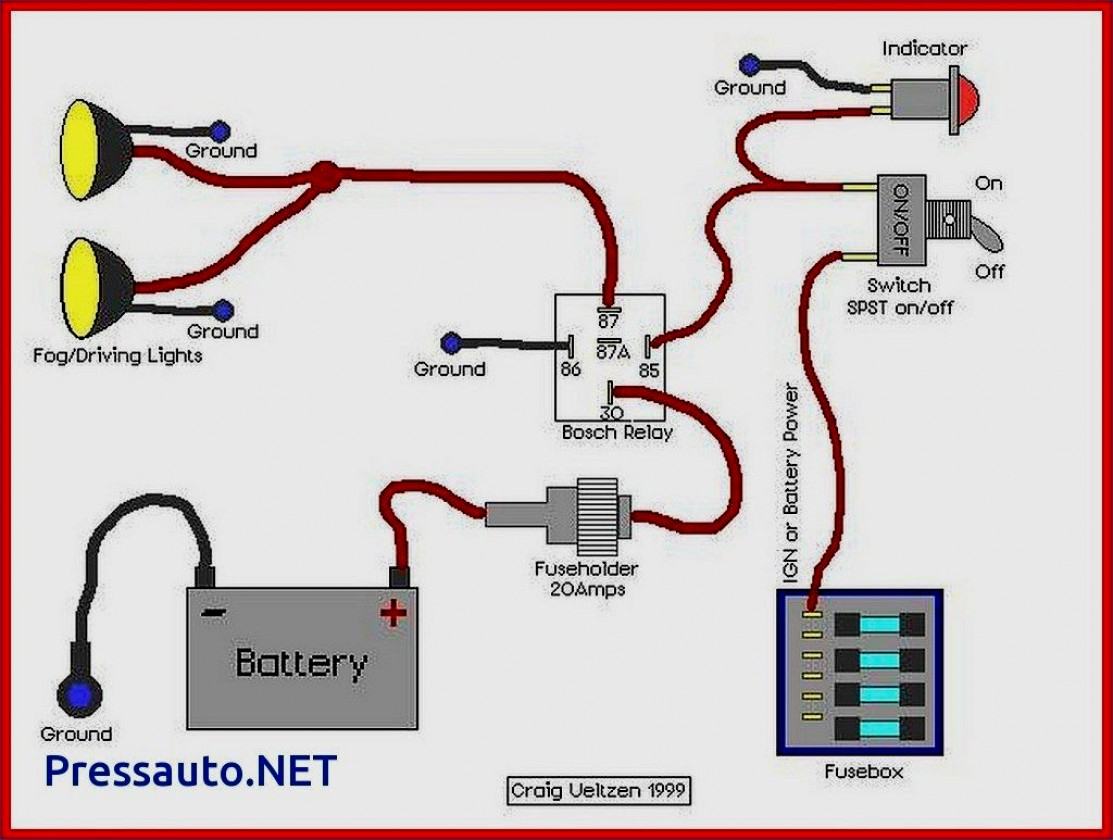
Step 3: Connect the Relay
This is the heart of the installation. Most automotive relays have five terminals (though some have only four). The terminals are typically numbered or labeled.
- Terminal 30: Connect this terminal directly to the positive (+) terminal of your vehicle's battery using an appropriately sized wire and an inline fuse (as close to the battery as possible). This is the main power source for the fog lights.
- Terminal 85: Connect this terminal to a ground point on the vehicle chassis.
- Terminal 86: Connect this terminal to the positive (+) wire from your fog light switch inside the vehicle. When you turn on the switch, it sends a signal to the relay to activate. If you want the lights only to turn on with the high beams, you would tap into the high beam circuit here.
- Terminal 87: Connect this terminal to the positive (+) wire of your fog lights.
- Terminal 87a (Optional, on 5-pin relays): This terminal is normally connected to Terminal 30 when the relay is not activated. It's typically not used for fog light applications unless you have a specific need for a "normally closed" circuit.
Important Notes on Relay Connections:
- Always use appropriate wire connectors to ensure a secure and reliable connection.
- Double-check your wiring diagram before making any connections.
- Protect all connections with electrical tape or heat shrink tubing.
Step 4: Wire the Fog Lights
Connect the positive (+) wire from your fog lights to Terminal 87 on the relay (as mentioned above). Connect the negative (-) wire from your fog lights to a clean, unpainted metal surface on the vehicle chassis for grounding. Ensure the ground connection is secure and free from corrosion.
Step 5: Wire the Switch
Mount your fog light switch in a convenient location inside the vehicle. Run a wire from the switch to Terminal 86 on the relay (as described in Step 3). You will also need to provide power to the switch itself. This can usually be tapped from an existing accessory wire that is only powered when the ignition is on (to prevent draining the battery when the vehicle is off). Refer to your vehicle's wiring diagram to find a suitable accessory wire.
Step 6: Test Your Connections
Before you button everything up, reconnect the negative battery terminal and test your fog lights. Turn on the switch and verify that the lights turn on and off correctly. If they don't, use a multimeter to check for voltage at various points in the circuit to isolate the problem.
Step 7: Secure and Protect Your Wiring
Once you've confirmed that everything is working correctly, secure all your wiring with zip ties to prevent it from dangling or rubbing against other components. Protect any exposed wires with electrical tape or heat shrink tubing. Make sure the wiring is routed away from any hot or moving parts.
Troubleshooting Tips
Even with careful planning, things can sometimes go wrong. Here are some troubleshooting tips:
- No power at the relay: Check the inline fuse near the battery. Use a multimeter to verify that you have 12V at Terminal 30 of the relay. Also, verify you have a good ground at terminal 85.
- Relay clicks but fog lights don't turn on: Check the wiring between Terminal 87 of the relay and the fog lights. Verify that the fog lights are properly grounded.
- Fog lights turn on but are dim: Check for voltage drop. Use a multimeter to measure the voltage at the battery and at the fog lights when they are turned on. A significant drop (more than 0.5V) indicates a problem with the wiring or grounding. Consider upgrading to a thicker gauge wire.
- Fog lights stay on even when the switch is off: The relay is likely faulty or the switch wire is shorted to ground. Disconnect the wire from the switch to the relay and see if the lights go off. If they do, the switch wire is shorted, otherwise it is likely a bad relay.
Cost Considerations
The cost of wiring fog lights with a relay can vary depending on the quality of the components you choose and whether you hire a professional. Here's a rough estimate:
- DIY: $50 - $150 (for the relay, wiring, fuse holder, switch, and connectors).
- Professional Installation: $150 - $400 (including parts and labor). This can vary significantly depending on the vehicle and the complexity of the installation.
Remember: While DIY can save you money, it's crucial to prioritize safety and follow best practices. If you're not comfortable working with electrical wiring, it's always best to consult a qualified mechanic.
Final Thoughts
Wiring fog lights with a relay is a straightforward process when broken down into manageable steps. By understanding the principles behind the wiring and following these guidelines, you can safely and effectively enhance your vehicle's visibility. And remember, if you run into any snags, don't hesitate to seek professional assistance. Happy driving!