1995 Nissan 240sx Alternator: Replacement And Troubleshooting
1995 Nissan 240SX Alternator: Replacement and Troubleshooting
The 1995 Nissan 240SX, a beloved sports coupe, is known for its reliability and performance. However, like any vehicle, it requires regular maintenance and occasional repairs. One critical component is the alternator, responsible for charging the battery and powering the electrical system while the engine is running. A failing alternator can leave you stranded, so understanding its function, potential problems, and how to replace it is essential.
Understanding the 1995 Nissan 240SX Alternator
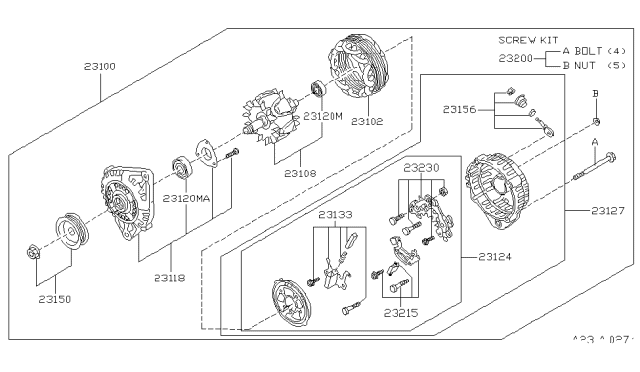
The alternator on your 240SX is an electromechanical device that converts mechanical energy from the engine's crankshaft into electrical energy. It achieves this through a process of electromagnetic induction. The alternator contains a rotor (with a magnetic field), a stator (a set of copper windings), a voltage regulator, and a rectifier. The rotor is driven by a belt connected to the engine's crankshaft. As the rotor spins, its magnetic field induces a voltage in the stator windings. The rectifier converts the AC voltage produced by the stator into DC voltage, which is then regulated by the voltage regulator to maintain a consistent output of around 13.5-14.5 volts. This regulated DC voltage is then used to charge the battery and power the various electrical components of the car, such as the headlights, radio, and ignition system.
Common Symptoms of a Failing 240SX Alternator
Recognizing the symptoms of a failing alternator is crucial for preventing breakdowns. Here are some common warning signs:
- Dim or Flickering Headlights: One of the most noticeable signs is dimming or flickering headlights, especially at idle or low speeds. This indicates that the alternator isn't providing enough power to the headlights.
- Warning Lights: The "battery" or "ALT" warning light on your dashboard illuminating is a clear indication of a potential charging system problem. Don't ignore this!
- Slow or No Start: A weak alternator can drain the battery overnight, leading to a slow or no-start condition. While a bad battery can also cause this, it's important to rule out the alternator.
- Unusual Noises: A failing alternator can produce whining, grinding, or rattling noises. These sounds often indicate worn bearings or other internal damage.
- Electrical Issues: Problems with other electrical components, such as the radio, power windows, or air conditioning, can also indicate alternator issues. These components may work intermittently or not at all.
- Stalling: In some cases, a failing alternator can cause the engine to stall, especially at low speeds. This is because the engine isn't receiving enough power to run properly.
Troubleshooting the 1995 Nissan 240SX Alternator
Before replacing the alternator, it's essential to troubleshoot the issue to confirm the alternator is indeed the problem. Here are some steps you can take:
- Visual Inspection: Inspect the alternator for any visible signs of damage, such as cracks, loose wires, or corrosion. Check the belt for proper tension and condition. A loose or worn belt can prevent the alternator from spinning at the correct speed.
- Battery Voltage Test: Use a multimeter to check the battery voltage with the engine off. A fully charged battery should read around 12.6 volts. Then, start the engine and check the voltage again. With the engine running, the voltage should be between 13.5 and 14.5 volts. If the voltage is significantly lower or higher than this range, it could indicate an alternator problem.
- Load Test: A load test checks the alternator's ability to produce current under load. Most auto parts stores offer free alternator testing services. This test will simulate the demands on the alternator and provide a more accurate assessment of its performance.
- Check Connections: Ensure all electrical connections to the alternator are clean and tight. Loose or corroded connections can cause voltage drops and affect alternator performance. Clean the terminals with a wire brush and apply dielectric grease to prevent corrosion.
Important Note: If you're not comfortable performing electrical tests, it's best to take your 240SX to a qualified mechanic for diagnosis.
Replacing the 1995 Nissan 240SX Alternator: A Step-by-Step Guide
If troubleshooting confirms that the alternator is faulty, you'll need to replace it. Here's a step-by-step guide to replacing the alternator on your 1995 Nissan 240SX:
Tools and Materials Required:
- New alternator
- Socket set
- Wrench set
- Screwdrivers (Phillips and flathead)
- Multimeter
- Battery terminal cleaner
- Dielectric grease
- Gloves
- Safety glasses
Step-by-Step Instructions:
- Disconnect the Battery: This is the most crucial step for safety. Disconnect the negative (-) battery terminal first, followed by the positive (+) terminal.
- Locate the Alternator: The alternator is typically located on the front of the engine, driven by a belt. Refer to your 240SX's service manual for the exact location.
- Remove the Drive Belt: Locate the tensioner pulley for the alternator belt. Use a wrench or socket to relieve tension on the belt and remove it from the alternator pulley. Make a note of the belt routing for reinstallation.
- Disconnect Electrical Connections: Disconnect the electrical connectors and wires attached to the alternator. There will typically be a large wire connected to the battery terminal on the alternator and a smaller connector for the voltage regulator. Be careful not to damage the connectors.
- Remove the Alternator Mounting Bolts: Remove the bolts that secure the alternator to the engine. These bolts can be tight, so use a penetrating oil if necessary.
- Remove the Alternator: Carefully remove the alternator from the engine compartment. You may need to wiggle it to clear any obstructions.
- Install the New Alternator: Position the new alternator in place and install the mounting bolts. Tighten the bolts to the specified torque according to your service manual.
- Reconnect Electrical Connections: Reconnect the electrical connectors and wires to the alternator, ensuring they are securely attached.
- Reinstall the Drive Belt: Route the drive belt around the alternator pulley and the other pulleys, following the original routing. Use the tensioner pulley to apply the correct tension to the belt.
- Reconnect the Battery: Reconnect the positive (+) battery terminal first, followed by the negative (-) terminal.
- Start the Engine: Start the engine and check the charging voltage with a multimeter. The voltage should be between 13.5 and 14.5 volts.
- Test Electrical Components: Test the headlights, radio, and other electrical components to ensure they are working properly.
Safety Precautions:
Warning: Working on electrical systems can be dangerous. Always disconnect the battery before working on the alternator or any other electrical component. Wear safety glasses and gloves to protect yourself from injury. If you are not comfortable performing this repair, it's best to take your 240SX to a qualified mechanic.
Choosing the Right Replacement Alternator
When replacing the alternator, it's important to choose a high-quality replacement that meets or exceeds the original equipment manufacturer (OEM) specifications. You have several options:
- New OEM Alternator: This is the most expensive option, but it guarantees the best quality and performance.
- Remanufactured OEM Alternator: Remanufactured alternators are rebuilt using original components and are typically less expensive than new OEM alternators. They often come with a warranty.
- Aftermarket Alternator: Aftermarket alternators are manufactured by companies other than the original equipment manufacturer. They can be a more affordable option, but the quality can vary. Research the brand and read reviews before purchasing an aftermarket alternator. Avoid extremely cheap options, as they may not last long.
Consider purchasing an alternator with a higher amperage rating if you have added electrical accessories to your 240SX, such as a high-powered stereo system or auxiliary lights. A higher amperage alternator will provide more power to support these accessories.
Preventative Maintenance for Your 240SX Alternator
While alternators eventually wear out, you can extend their lifespan with preventative maintenance:
- Regularly Inspect the Drive Belt: Check the belt for cracks, wear, and proper tension. Replace the belt if necessary.
- Keep the Battery Terminals Clean: Clean the battery terminals regularly to prevent corrosion, which can affect alternator performance.
- Avoid Overloading the Electrical System: Avoid using excessive electrical accessories simultaneously, especially for extended periods.
- Address Electrical Problems Promptly: If you notice any electrical issues, address them promptly to prevent further damage to the alternator.
Conclusion
A healthy alternator is essential for the reliable operation of your 1995 Nissan 240SX. By understanding the symptoms of a failing alternator, troubleshooting potential issues, and knowing how to replace it, you can keep your 240SX running smoothly for years to come. Remember to prioritize safety and consult a qualified mechanic if you're not comfortable performing the repair yourself. Regular maintenance and timely repairs will help you enjoy the performance and reliability that make the 240SX such a beloved classic.