2000 Nissan Frontier Cabin Air Filter
Alright, let's talk about replacing the cabin air filter in your 2000 Nissan Frontier. This isn't a complicated job, but doing it regularly is crucial for maintaining good air quality inside your truck and ensuring your HVAC system works efficiently. We'll cover everything you need to know, from locating the filter to choosing the right replacement and completing the installation. Even if you've tinkered with cars before, this detailed walkthrough should give you all the confidence you need.
Why Bother with the Cabin Air Filter?
Before we dive into the how-to, let’s understand why this seemingly minor filter is so important. The cabin air filter, sometimes referred to as a pollen filter or HVAC filter, serves a vital role in your vehicle’s ventilation system. Its primary function is to filter the air entering the passenger cabin, removing dust, pollen, mold spores, exhaust fumes, and other airborne contaminants. This has a couple of key benefits:
- Improved Air Quality: Obviously, a cleaner filter means cleaner air to breathe. This is especially important for individuals with allergies, asthma, or other respiratory sensitivities. A clogged filter can contribute to a stuffy cabin and exacerbate breathing problems.
- HVAC System Efficiency: A dirty cabin air filter restricts airflow to the evaporator core in your air conditioning system and the heater core in your heating system. This restriction forces your blower motor to work harder to push air through the vents. This increased workload reduces the overall efficiency of your HVAC system, potentially leading to decreased cooling/heating performance and premature blower motor failure.
- Odor Reduction: Some cabin air filters are impregnated with activated carbon (charcoal). This carbon layer helps to absorb odors from outside, such as exhaust fumes, roadkill smells, or agricultural odors.
Ignoring this filter can lead to a whole host of problems down the road, so it's a small investment that pays off big time.
Location, Location, Location: Finding the Cabin Air Filter
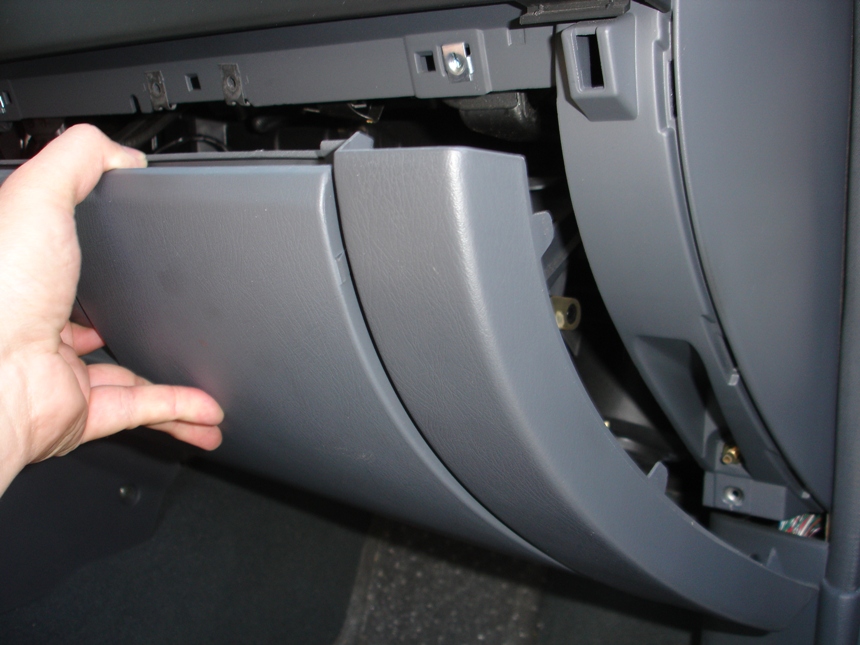
Now, for the million-dollar question: where is the cabin air filter located on a 2000 Nissan Frontier? This is where it gets slightly tricky because, *technically*, many 2000 Frontiers don't come standard with a cabin air filter installed. Yes, you read that right. However, the good news is that the provision to install one usually exists. Think of it as a pre-wiring situation.
The location you're looking for is typically behind the glove box. Here’s the detailed breakdown:
- Empty the Glove Box: The first step is simple: completely empty your glove box. This gives you the necessary room to maneuver.
- Detach the Glove Box Dampener (if equipped): Some Frontiers might have a small dampener arm on the right side of the glove box that slows its opening. If present, gently detach this arm. Usually, you can disconnect it by squeezing the end of the arm and pulling it away from the glove box housing.
- Release the Glove Box Stops: Look at the sides of the glove box. You'll see tabs or stops that prevent the glove box from swinging down completely. Gently push inwards on these tabs, one at a time, to release them. This will allow the glove box to pivot downwards further than normal.
- Locate the Filter Housing (or the space for it): With the glove box fully lowered, you should see a rectangular cover. This is the access panel to the cabin air filter housing. If your Frontier *did not* come with a filter installed from the factory, you might just see a blank plastic area where the housing *should* be. In this case, you'll need to purchase the filter housing as well as the filter itself. Fortunately, these are readily available online or at auto parts stores.
Important Note: If your Frontier has never had a cabin air filter installed, you may need to cut out a pre-scored section of the plastic housing to create the opening for the filter. Use a utility knife or similar tool, being careful not to damage any wiring or other components behind the housing.
Choosing the Right Replacement Filter
Selecting the correct replacement filter is crucial. There are several factors to consider:
- Correct Size: First and foremost, make sure the filter you purchase is the correct size for your 2000 Nissan Frontier. Check your owner's manual (if available) or consult with an auto parts store to confirm the proper dimensions. Look up the part number specific to your vehicle.
- Filter Media: Cabin air filters come in various materials:
- Particulate Filters: These are the standard type, made of pleated paper or synthetic fibers. They effectively trap dust, pollen, and other particulate matter.
- Activated Carbon Filters: These filters include a layer of activated carbon (charcoal) to absorb odors and gaseous pollutants. They offer superior air purification compared to standard particulate filters.
- Electrostatic Filters: These filters use an electrostatic charge to attract and trap particles. They can be more efficient at capturing smaller particles than standard filters.
- Brand Reputation: Stick with reputable brands known for producing high-quality filters. Popular brands include Fram, Purolator, Bosch, and Mann-Filter.
For most situations, a standard particulate filter is sufficient. However, if you are particularly sensitive to odors or live in an area with high levels of air pollution, an activated carbon filter might be a worthwhile investment.
Installation: Step-by-Step Guide
Now for the hands-on part. Here's how to install the new cabin air filter:
- Remove the Old Filter (if present): If there's an old filter installed, remove it carefully. Pay attention to the orientation of the filter (the direction of airflow) as you remove it. Many filters have an arrow printed on them indicating the airflow direction. Take note of this arrow as you'll need to install the new filter in the same orientation. The old filter will likely be quite dirty. Handle it carefully to avoid releasing the trapped dust and debris into the cabin.
- Inspect the Filter Housing: Before installing the new filter, take a moment to inspect the filter housing for any debris, leaves, or other contaminants. Use a vacuum cleaner or brush to clean out the housing if necessary.
- Install the New Filter: Insert the new cabin air filter into the housing, ensuring it is oriented correctly. The airflow arrow on the filter should point in the same direction as it did on the old filter. This is critical for proper filtration.
- Reinstall the Access Panel: Secure the access panel back onto the filter housing. Make sure it clicks or snaps into place properly.
- Reattach the Glove Box Stops: Push the glove box back into position and reattach the side stops. Make sure they lock into place securely.
- Reattach the Glove Box Dampener (if equipped): If your Frontier has a glove box dampener, reattach it to the glove box housing.
- Repopulate the Glove Box: Put all your stuff back in the glove box.
And that's it! You've successfully replaced the cabin air filter in your 2000 Nissan Frontier.
Maintenance Schedule and Best Practices
So, how often should you replace your cabin air filter? A general recommendation is to replace it every 12,000 to 15,000 miles, or once a year, whichever comes first. However, this can vary depending on your driving conditions. If you frequently drive in dusty or polluted areas, you may need to replace the filter more often. Similarly, if you notice a musty odor coming from your vents or a decrease in HVAC performance, it's a good idea to check the filter and replace it if necessary.
Here are a few best practices to keep in mind:
- Regular Inspections: Periodically inspect your cabin air filter, especially if you drive in harsh conditions. This will help you determine if it needs to be replaced more frequently than the recommended interval.
- Proper Disposal: Dispose of the old cabin air filter properly. Some auto parts stores may offer recycling programs for used filters.
- Upgrade for Improved Air Quality: If you suffer from allergies or asthma, consider upgrading to an activated carbon or electrostatic filter for improved air quality.
- Document the Replacement: Keep a record of when you replace your cabin air filter. This will help you stay on track with your maintenance schedule.
Troubleshooting
While the cabin air filter replacement is straightforward, you might encounter a few issues:
- Difficulty Removing the Glove Box Stops: Sometimes, the glove box stops can be a bit stubborn. Make sure you're pushing them inwards with sufficient force while simultaneously lowering the glove box.
- Stripped Screws on the Access Panel: If the screws holding the access panel are stripped, you may need to use a screw extractor to remove them. Alternatively, you can try using a rubber band or steel wool to create more grip between the screwdriver and the screw head.
- Incorrect Filter Size: If you accidentally purchase the wrong size filter, don't force it into the housing. Return it to the auto parts store and get the correct size. Forcing the wrong size filter can damage the housing and compromise its ability to filter air effectively.
Conclusion
Replacing the cabin air filter on your 2000 Nissan Frontier is a simple and rewarding DIY task. By following these steps and tips, you can ensure a cleaner, healthier, and more efficient driving experience. Remember to prioritize safety, double-check your work, and enjoy the fresh air!