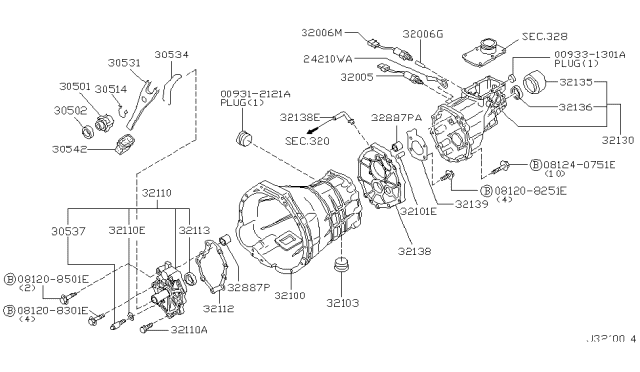
2001 Nissan Xterra Clutch Replacement
Alright, let's talk clutch replacement on your 2001 Nissan Xterra. This isn't a job for the faint of heart, but if you're comfortable wrenching and have tackled similar projects before, you can absolutely handle it. This guide assumes you have a decent understanding of basic automotive repair and safety procedures. Always disconnect the battery and use jack stands when working under the vehicle. Wear appropriate safety gear, including eye protection and gloves.
Tools and Parts You'll Need
Before you even think about touching a bolt, make sure you've got everything you need. Running to the parts store mid-project is a major buzzkill. Here's a comprehensive list:
- New Clutch Kit: This should include the clutch disc, pressure plate, throw-out bearing (also called a release bearing), and pilot bushing/bearing. Get a quality kit from a reputable brand.
- Flywheel: Inspect your flywheel. If it's heavily worn, scored, or cracked, replace it. If it's in good condition, you can have it resurfaced at a machine shop.
- Flywheel Bolts: Always use new flywheel bolts. They are often torque-to-yield (TTY) and designed for one-time use.
- Transmission Fluid: You'll need to drain and refill your transmission. Use the correct fluid type specified in your owner's manual (usually GL-4 gear oil).
- Clutch Alignment Tool: This is critical for centering the clutch disc during installation. The kit may include one, or you can purchase it separately.
- Penetrating Oil: PB Blaster or similar. You'll likely encounter some rusty fasteners.
- Jack and Jack Stands: Heavy-duty ones are a must.
- Wheel Chocks: For safety.
- Socket Set: Metric sizes, including deep sockets.
- Wrench Set: Metric sizes.
- Torque Wrench: Absolutely essential for properly tightening bolts.
- Breaker Bar: For stubborn bolts.
- Screwdrivers: Assorted sizes, including Phillips and flathead.
- Pliers: Needle-nose and regular.
- Hammer: Ball-peen and maybe a rubber mallet.
- Punch Set: For removing stubborn pins.
- Transmission Jack (highly recommended): Makes lowering and raising the transmission much easier and safer. A floor jack can be used in a pinch, but a transmission jack is much preferred.
- Gloves: Mechanics gloves to protect your hands.
- Eye Protection: Safety glasses or goggles.
- Drain Pan: For the transmission fluid.
- Rags: Lots of them.
- Brake Cleaner: For cleaning the flywheel and clutch disc.
- Grease: High-temperature grease for the throw-out bearing and pilot bushing.
- Threadlocker (Loctite): Blue (medium strength) for certain fasteners.
Step-by-Step Clutch Replacement
Alright, let's get to the meat of the job. Remember to take your time and double-check your work. Consult your Xterra's repair manual for specific torque specifications and diagrams.
1. Preparation
Start by disconnecting the negative battery terminal. Secure the vehicle with wheel chocks and raise the front end. Securely place the Xterra on jack stands. Make sure the jack stands are rated for the weight of your vehicle. Don't rely solely on the jack!
2. Disconnect Driveline and Exhaust Components
*Important:* Mark the position of the driveshaft relative to the rear differential flange before disconnecting it. This helps maintain proper driveline balance. Disconnect the driveshaft at the rear differential and slide it out of the transmission. Support the transmission tail shaft to prevent damage. Remove the exhaust system components that are in the way. This typically involves unbolting the exhaust from the exhaust manifold and removing any hangers. Spray penetrating oil on the exhaust bolts beforehand to help loosen them.
3. Disconnect Wiring and Cables
Locate and disconnect all wiring harnesses and cables connected to the transmission. This includes the reverse light switch, 4WD indicator (if applicable), and any other sensors. Disconnect the clutch cable from the clutch fork. Some models may have a hydraulic clutch system; in that case, disconnect the hydraulic line from the slave cylinder.
4. Remove the Starter
The starter motor is usually bolted to the transmission housing. Disconnect the wiring from the starter and unbolt it from the transmission. Store it safely out of the way.
5. Support the Engine
Before removing the transmission, you need to support the engine. You can use an engine support bar, or a floor jack with a block of wood placed under the oil pan (be careful not to damage the oil pan). The goal is to prevent the engine from tilting excessively when the transmission is removed.
6. Remove the Transmission Mount
The transmission mount connects the transmission to the vehicle's frame. Support the transmission with your transmission jack (or floor jack). Unbolt the transmission mount from the frame and then from the transmission itself.
7. Remove the Transmission
This is the trickiest part. Carefully lower the transmission using the transmission jack. You may need to wiggle it and pry gently to separate it from the engine. Watch out for any remaining wires or hoses that may be attached. Once the transmission is clear, carefully lower it to the ground.
8. Inspect the Flywheel
Now that the transmission is out, you have access to the flywheel. Inspect it for wear, cracks, and heat damage. As mentioned earlier, if it's damaged, replace it. If it's in good condition, have it resurfaced.
9. Remove the Clutch Assembly
Loosen the pressure plate bolts gradually in a star pattern to avoid warping the pressure plate. Once the bolts are loose, remove them completely and carefully remove the pressure plate and clutch disc. Note the orientation of the clutch disc; it's important to install the new one the same way.
10. Remove the Pilot Bushing/Bearing
The pilot bushing/bearing is located in the center of the crankshaft. Use a pilot bearing puller or a slide hammer to remove it. Alternatively, you can pack the cavity behind the bushing with grease and use a punch of the correct size to hydraulically push it out, repeat this until the bushing pops out. Be patient and careful not to damage the crankshaft.
11. Install the New Pilot Bushing/Bearing
Lightly grease the outside of the new pilot bushing/bearing and install it using a pilot bearing installation tool or a socket that matches the outside diameter of the bushing. Drive it in until it's flush with the crankshaft. Be careful not to damage the bushing.
12. Install the Flywheel
If you're using a new or resurfaced flywheel, clean it thoroughly with brake cleaner. Install the new flywheel bolts with a drop of blue Loctite on each bolt. Torque the bolts to the manufacturer's specified torque in a star pattern. *Crucially important:* Use the correct torque specification and tightening sequence. These are usually TTY bolts, so follow the instructions precisely.
13. Install the Clutch Disc and Pressure Plate
Clean the flywheel surface with brake cleaner. Using the clutch alignment tool, center the clutch disc against the flywheel. Install the pressure plate and tighten the bolts gradually in a star pattern to the manufacturer's specified torque. Remove the clutch alignment tool.
14. Install the Throw-Out Bearing
Lightly grease the input shaft splines of the transmission and the inside of the throw-out bearing. Install the throw-out bearing onto the transmission input shaft. Make sure it moves smoothly.
15. Reinstall the Transmission
This is the reverse of removal. Carefully raise the transmission into position using the transmission jack. Align the input shaft with the clutch disc and flywheel. You may need to rotate the crankshaft slightly to get the input shaft to slide in. Once the transmission is in place, install the transmission bolts and torque them to the manufacturer's specified torque. Reinstall the transmission mount.
16. Reconnect Everything
Reconnect all the wiring harnesses, cables, starter, exhaust system, and driveshaft in the reverse order of removal. Remember to align the driveshaft with the marks you made earlier. Refill the transmission with the correct type and amount of transmission fluid.
17. Final Checks
Double-check all your connections and torque specifications. Lower the vehicle and remove the jack stands. Reconnect the negative battery terminal.
18. Test Drive
Start the engine and test the clutch engagement. Make sure the clutch pedal feels normal and that the transmission shifts smoothly. Take the Xterra for a test drive and check for any unusual noises or vibrations.
Troubleshooting
Here are a few common issues you might encounter:
- Clutch Pedal Feels Spongy: Could be air in the hydraulic system (if applicable). Bleed the system. Also could be a misadjusted clutch cable.
- Clutch Slipping: Could be a contaminated clutch disc (oil or grease).
- Difficulty Shifting: Could be a misaligned clutch disc or a worn pilot bushing. Could also be low transmission fluid.
- Noisy Throw-Out Bearing: Could be a lack of lubrication or a worn bearing.
Important Considerations:
- Break-In Period: A new clutch needs a break-in period. Avoid aggressive driving for the first 500 miles.
- Torque Specifications: These are critical. Always use a torque wrench and follow the manufacturer's specifications.
- Safety First: Never work under a vehicle supported only by a jack. Always use jack stands.
Replacing the clutch on your 2001 Nissan Xterra is a challenging but rewarding project. With careful planning, the right tools, and a methodical approach, you can save yourself a lot of money and gain a deeper understanding of your vehicle. Good luck!