2002 Nissan Xterra Ac System Diagram
Okay, so your 2002 Nissan Xterra's AC isn't blowing cold air like it used to? Don't sweat it (pun intended!). The AC system on these Xterras, while generally reliable, can develop issues over time, especially given their age. A common starting point for troubleshooting is understanding the system's layout, which is where an AC system diagram comes in handy. Let's break down common problems, how the diagram can help, and some solutions you can explore.
Understanding the 2002 Xterra AC System
Before diving into specifics, let's recap the core components of your Xterra's air conditioning:
- Compressor: The heart of the system, responsible for pressurizing the refrigerant.
- Condenser: Located at the front of the vehicle, it dissipates heat from the compressed refrigerant.
- Evaporator: Found inside the dashboard, it absorbs heat from the cabin air, cooling it down.
- Expansion Valve (or Orifice Tube): Controls the flow of refrigerant into the evaporator, causing it to expand and cool.
- Receiver Drier (or Accumulator): Filters the refrigerant and removes moisture.
- Refrigerant Lines: The hoses and pipes that connect all the components.
- Blower Motor: Circulates air through the evaporator and into the cabin.
- Controls & Sensors: Switches, relays, and sensors that regulate the AC system's operation.
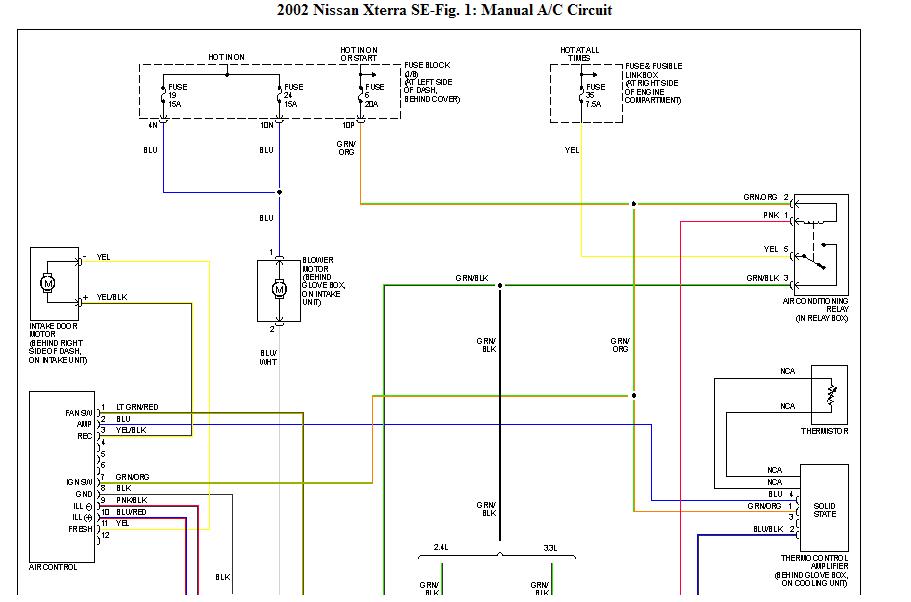
An AC system diagram is essentially a roadmap of these components and their connections. It shows you where each part is located, how they're connected by refrigerant lines, and the electrical wiring involved. Without it, troubleshooting can feel like groping in the dark. You can usually find a diagram in your Xterra's factory service manual (a worthwhile investment if you plan on doing more than just basic maintenance) or sometimes online through reputable automotive forums or databases.
Common 2002 Xterra AC Problems and How the Diagram Helps
Here are some typical AC issues with these older Xterras and how the diagram aids in diagnosing them:
1. Leaking Refrigerant
Symptom: Weak or no cold air, hissing sound (potentially), oily residue near AC components.
How the Diagram Helps: The diagram shows the location of all refrigerant lines and connections. This allows you to visually inspect them for leaks. Pay close attention to joints, fittings, and the areas around the compressor, condenser, and evaporator. The diagram will help you trace the lines and identify potential leak points.
Solution: A UV dye test is often used to pinpoint leaks. The dye is injected into the system, and a UV light reveals the location of the leak. Depending on the severity, you might need to replace a hose, fitting, or even a major component like the condenser or evaporator. A refrigerant leak *must* be repaired by a qualified technician who can safely recover and recharge the system. Important: Refrigerant is harmful to the environment; never release it into the atmosphere.
Estimated Cost: A simple hose replacement might cost $100-$300, while replacing the condenser or evaporator can easily run $500-$1000+ depending on parts and labor.
2. Compressor Issues
Symptom: AC not engaging, loud noises from the compressor, no cold air.
How the Diagram Helps: The diagram details the electrical connections to the compressor, including the clutch relay and pressure switches. It helps you check if the compressor is receiving power and if the clutch is engaging. Also, you can trace the lines to the compressor to check for restrictions.
Solution: First, check the AC clutch relay and the related fuses (refer to your owner's manual for locations). If those are good, you might have a faulty compressor clutch or a failing compressor itself. A mechanic can use a multimeter to check for voltage at the compressor and test the clutch's resistance. If the compressor is faulty, replacement is usually the best option. Sometimes, just the clutch can be replaced, but it's often more cost-effective to replace the entire unit.
Estimated Cost: Replacing the compressor can cost $400-$800 or more, including parts and labor. Replacing just the clutch, if possible, might save you a couple hundred dollars, but it's not always a long-term solution.
3. Clogged Expansion Valve or Orifice Tube
Symptom: AC blows warm air on one side and cold air on the other, or fluctuating cold air.
How the Diagram Helps: The diagram shows the location of the expansion valve (usually near the evaporator core) or the orifice tube (found in the refrigerant line). Knowing the location is crucial for inspection and replacement. It is important to note if your model has a expansion valve or orifice tube.
Solution: If the expansion valve or orifice tube is clogged, it restricts refrigerant flow, leading to uneven cooling. Diagnosis typically involves checking the refrigerant pressure on both sides of the component. Replacement is usually required. Since the system needs to be evacuated and recharged, it's best left to a professional.
Estimated Cost: Replacing the expansion valve or orifice tube is usually a few hundred dollars, including parts and labor, due to the need for refrigerant recovery and recharge.
4. Electrical Problems
Symptom: AC not working at all, intermittent operation.
How the Diagram Helps: The diagram is essential for tracing the wiring of the AC system. It shows the location of relays, switches, and sensors that control the AC. You can use it to identify potential shorts, open circuits, or faulty components.
Solution: Start by checking the fuses and relays related to the AC system. Then, use a multimeter to test the voltage and continuity of the wiring. Common culprits include a faulty AC pressure switch, a bad blower motor resistor, or a broken wire. Identifying and repairing electrical issues can be tricky, so if you're not comfortable with electrical work, it's best to consult a qualified electrician or mechanic.
Estimated Cost: Electrical repairs can vary widely in cost, from a few dollars for a fuse replacement to several hundred dollars for a more complex wiring issue or component replacement.
5. Blower Motor Issues
Symptom: No air blowing from the vents, weak airflow, or noisy blower motor.
How the Diagram Helps: While not directly related to the cooling *performance*, the blower motor is essential for circulating the cooled air. The diagram shows the wiring to the blower motor and the location of the blower motor resistor (which controls fan speed). It also depicts the air intake for the fan.
Solution: Check the blower motor fuse first. If that's good, test the blower motor resistor. If the resistor is bad, the fan will likely only work on one speed (usually high). If the blower motor itself is faulty, it will need to be replaced. Sometimes, debris can accumulate in the blower motor housing, causing noise and reduced airflow. Cleaning out the housing might resolve the issue.
Estimated Cost: Replacing the blower motor resistor is usually around $50-$150. Replacing the blower motor itself can cost $100-$300, including parts and labor.
Tools You'll Need
Depending on the specific problem, you might need some or all of the following tools:
- AC System Diagram: Absolutely essential!
- Multimeter: For testing electrical components.
- Manifold Gauge Set: For checking refrigerant pressures (requires knowledge of AC system operation and should only be used by experienced individuals).
- Vacuum Pump: For evacuating the AC system (requires knowledge of AC system operation and should only be used by experienced individuals).
- UV Light and Dye: For leak detection.
- Socket Set and Wrenches: For removing and replacing components.
- Screwdrivers: Assorted sizes and types.
- Pliers: For various tasks, including hose clamp removal.
- Safety Glasses and Gloves: Always wear safety gear when working on your vehicle.
Important Considerations
- Safety First: Always disconnect the negative battery cable before working on any electrical components.
- Refrigerant Handling: Refrigerant is harmful and must be handled properly. Never release it into the atmosphere. Hire a qualified technician to recover and recharge the system.
- System Contamination: If the AC system has been open to the atmosphere for an extended period, moisture and debris can enter, contaminating the refrigerant and damaging components. A proper system flush and evacuation are essential before recharging.
- Professional Help: If you're not comfortable working on AC systems, it's best to consult a qualified mechanic. AC systems are complex, and improper repairs can lead to further damage and costly repairs.
Troubleshooting your 2002 Nissan Xterra's AC system can be a challenging but rewarding experience. By understanding the system's components, using the AC system diagram as your guide, and following safety precautions, you can diagnose and potentially fix the problem yourself. Remember, when in doubt, seek professional help. Good luck, and stay cool!