2003 Nissan Altima Exhaust System Diagram
So, you're having some trouble with the exhaust system on your 2003 Nissan Altima? That's a common issue, and thankfully, usually fixable. A good starting point is understanding how the whole system fits together, and that's where an exhaust system diagram comes in handy. We'll break down the diagram, common problems, and how you can troubleshoot them. Think of me as your friendly service advisor, guiding you through the process.
Understanding Your 2003 Altima Exhaust System
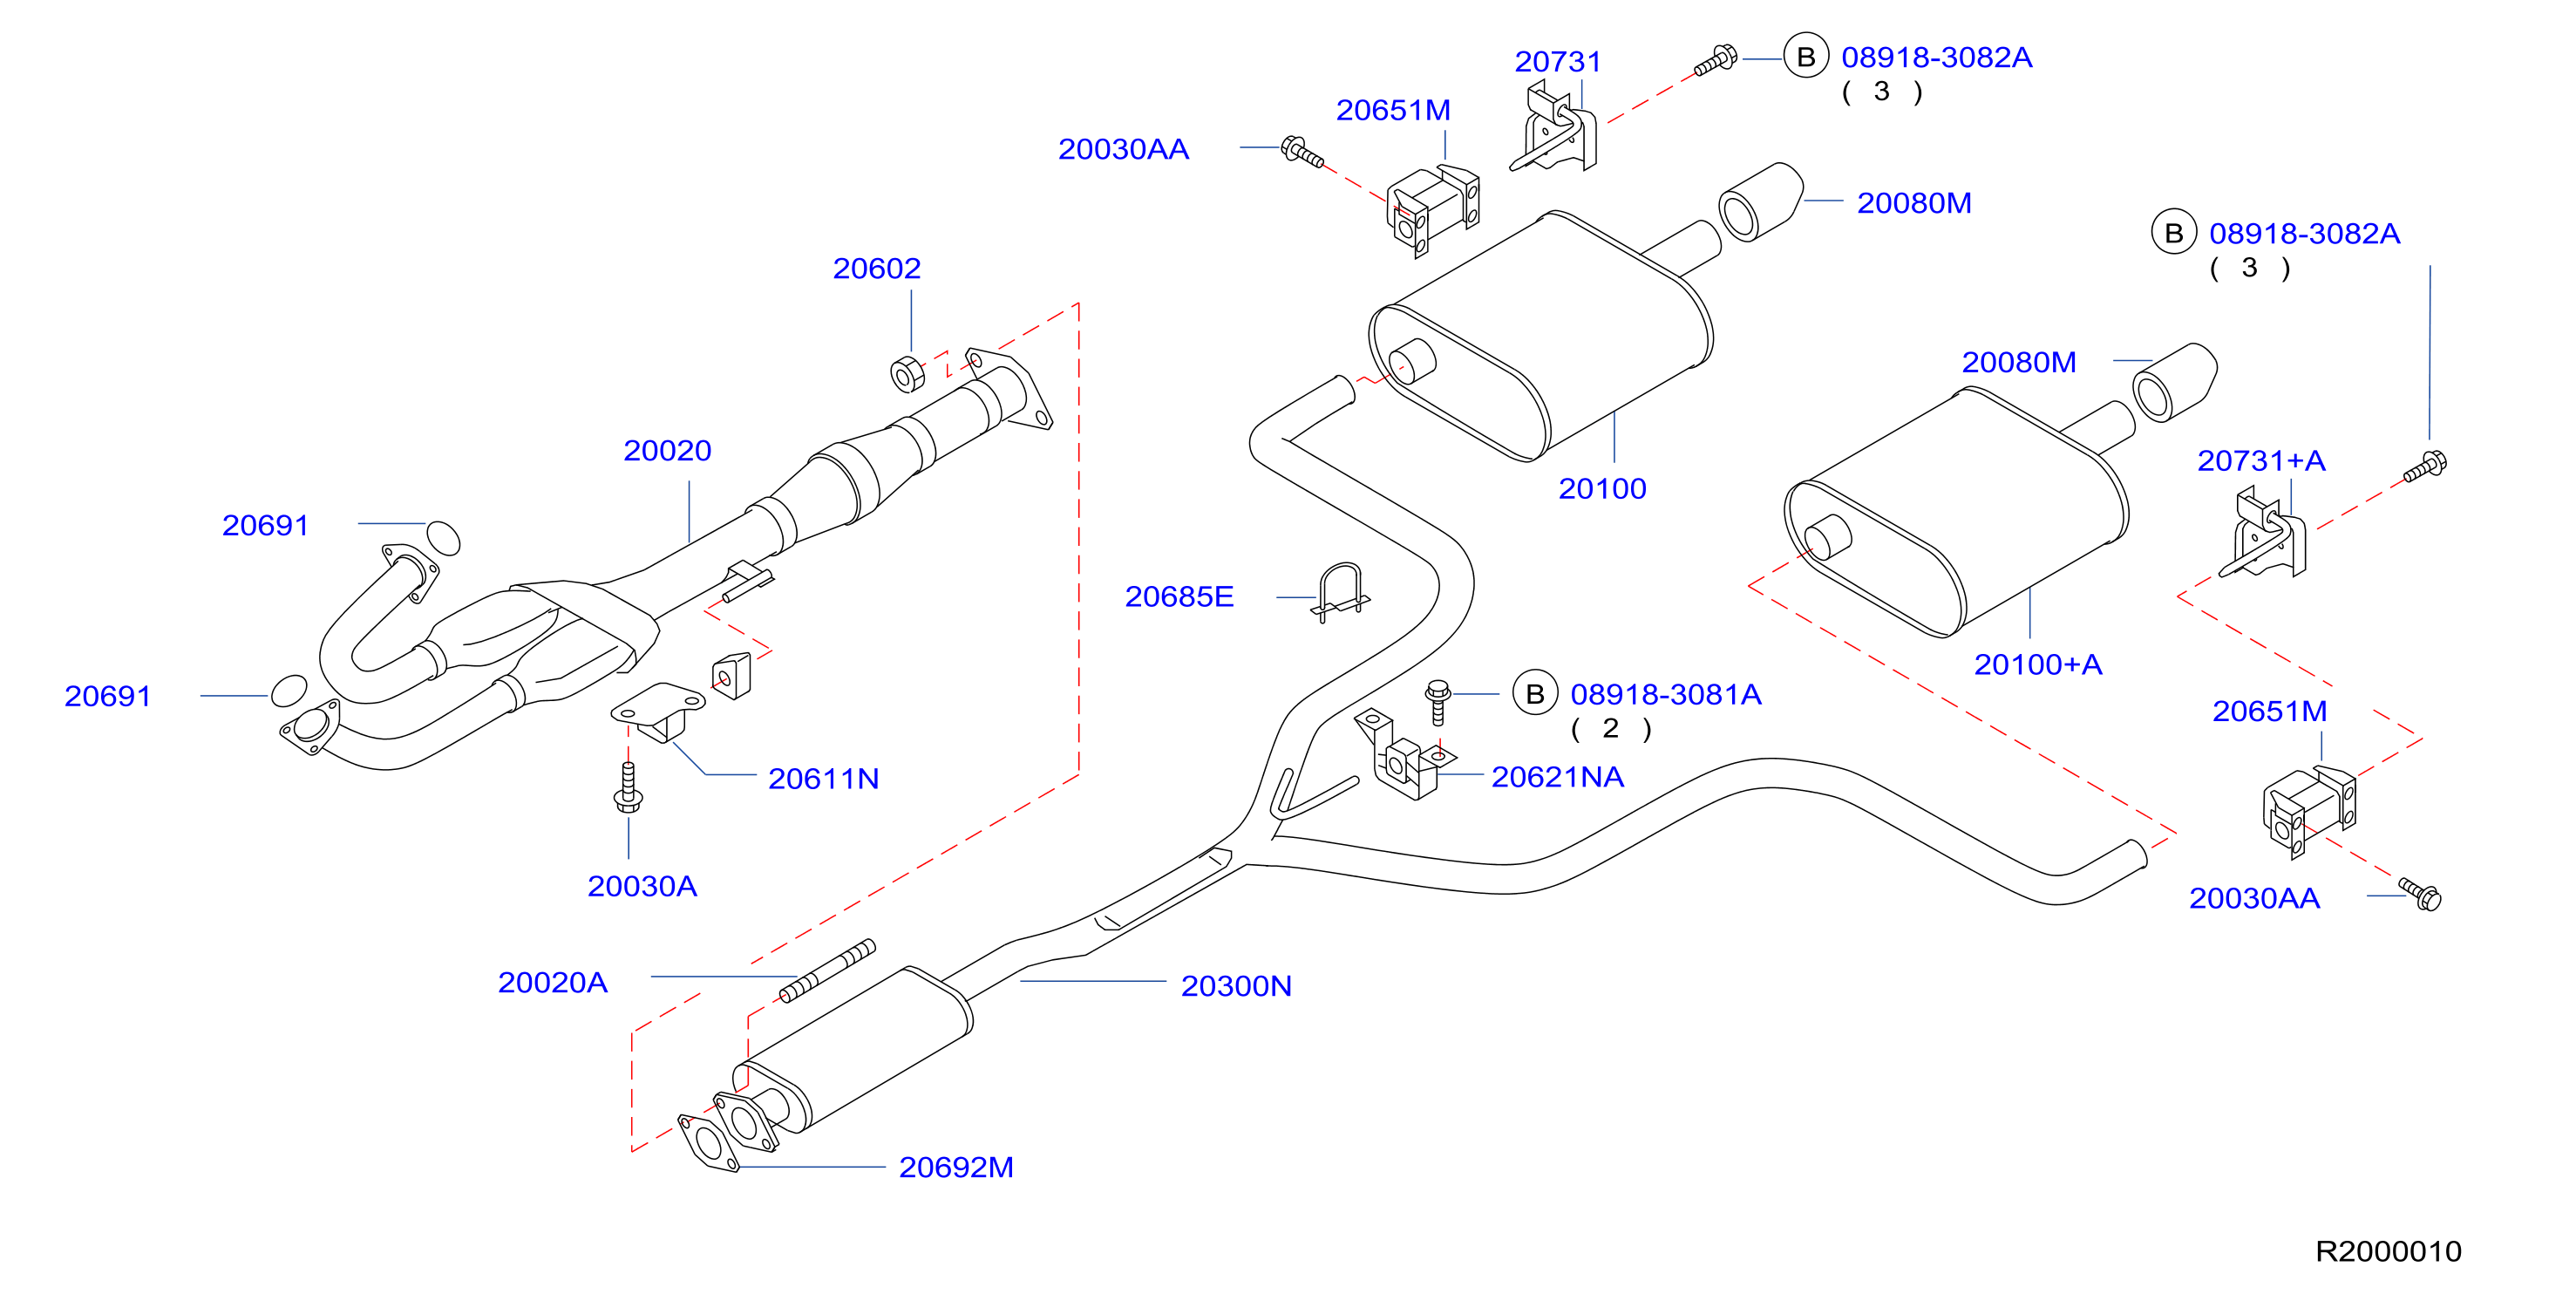
The exhaust system on your '03 Altima is responsible for channeling harmful gases away from the engine, reducing emissions, and dampening engine noise. It's a series of interconnected pipes, mufflers, and catalytic converters, all working in harmony. A typical diagram will show you the order of these components:
- Exhaust Manifold: Bolted directly to the engine, it collects exhaust gases from each cylinder.
- Catalytic Converter: This vital component reduces harmful pollutants like carbon monoxide, hydrocarbons, and nitrogen oxides. Your 2003 Altima might have one or two catalytic converters depending on the specific engine and emissions standards it was built to meet.
- Resonator (Optional): Some Altimas have a resonator, which further reduces noise and drone. It sits inline, typically after the catalytic converter.
- Muffler: The main noise reduction device in the exhaust system. It uses baffles and sound-absorbing materials to quieten the engine.
- Tailpipe: The final section of the exhaust, which vents the gases out the back of the vehicle.
- Piping: Connects all the components together. This is where leaks often occur, especially at joints and seams.
- Oxygen Sensors (O2 Sensors): These sensors monitor the oxygen content of the exhaust gases, providing feedback to the engine control unit (ECU) to optimize fuel-air mixture. You'll usually find one before the catalytic converter (upstream) and one after (downstream).
- Hangers and Mounts: Rubber or metal hangers that support the exhaust system and prevent it from rattling against the undercarriage.
Finding a reliable 2003 Nissan Altima exhaust system diagram is crucial. A quick online search for "2003 Nissan Altima exhaust system diagram" will yield several results. Websites like parts retailers (e.g., RockAuto) and repair information databases often provide detailed diagrams. Make sure the diagram matches your specific engine (2.5L 4-cylinder or 3.5L V6) for accurate information. You can usually find this information on a sticker in the driver's side door jamb or on your vehicle's registration.
Common Exhaust System Problems and Solutions
Let's dive into some of the most frequent issues you might encounter:
Exhaust Leaks
This is the most common problem. You'll typically notice a louder-than-normal exhaust sound, especially during acceleration. You might also smell exhaust fumes inside the cabin. Leaks can occur anywhere in the system, but they're most common at joints, welds, and where the exhaust manifold connects to the engine. Rusted-through piping is also a frequent culprit, especially in areas with road salt.
Diagnosis: Visually inspect the entire exhaust system for signs of rust, holes, or cracks. Pay close attention to the joints and welds. You can also try the "soap bubble test." With the engine running (and the exhaust system cool enough to touch!), spray soapy water onto suspected leak areas. Bubbles will form where exhaust gases are escaping.
Solution: Minor leaks might be patchable with exhaust sealant or wrap, but this is usually a temporary fix. For more significant leaks, you'll need to replace the affected section of pipe or component. Exhaust clamps can also sometimes loosen or corrode, leading to leaks. Replacing a clamp is a simple and inexpensive fix.
Approximate Repair Cost: A simple exhaust clamp replacement might cost around $10-$20. Welding a small hole could range from $50-$150, depending on the shop and the location of the hole. Replacing a section of pipe can cost anywhere from $100-$400, depending on the part and labor.
Catalytic Converter Failure
A failing catalytic converter can cause several problems, including reduced engine performance, poor fuel economy, and a check engine light. The code you'll most often see is P0420 (Catalyst System Efficiency Below Threshold). Over time, the internal components of the converter can become clogged or damaged, reducing its ability to convert harmful emissions.
Diagnosis: A mechanic can use a diagnostic scanner to check the efficiency of the catalytic converter. They can also perform an exhaust backpressure test to see if it's clogged. Sometimes, physical damage to the converter is visible.
Solution: Replacing the catalytic converter. This can be one of the more expensive repairs in the exhaust system. Make sure to use a quality replacement converter that meets EPA standards. Cheaper aftermarket converters may not last as long or perform as well.
Approximate Repair Cost: Catalytic converter replacement can range from $300 to $1000 or more, depending on the converter, labor, and whether you need to replace any associated components (like oxygen sensors).
Muffler Problems
A failing muffler can cause excessive noise, rattling, and even reduced engine performance if it becomes significantly clogged. Rust and corrosion are the most common causes of muffler failure.
Diagnosis: Listen for unusual noises coming from the muffler area. Visually inspect the muffler for rust, holes, or damage. A rattling noise might indicate that internal baffles have broken loose.
Solution: Replacing the muffler. This is usually a straightforward repair. You can either replace the entire muffler or, in some cases, just the damaged section. Aftermarket mufflers can offer a sportier sound, but make sure they comply with local noise regulations.
Approximate Repair Cost: Muffler replacement typically costs between $150 and $400, including parts and labor.
Oxygen Sensor Issues
Faulty oxygen sensors can negatively impact engine performance, fuel economy, and emissions. They can also trigger the check engine light. There are typically two oxygen sensors: one upstream (before the catalytic converter) and one downstream (after the catalytic converter). The upstream sensor primarily controls fuel mixture, while the downstream sensor monitors the catalytic converter's performance.
Diagnosis: Use a diagnostic scanner to read the oxygen sensor readings. Common codes related to O2 sensors include P0130-P0167. You can also visually inspect the sensors for damage or contamination.
Solution: Replacing the faulty oxygen sensor. It's generally recommended to replace both sensors at the same time, as they often fail around the same mileage. Be sure to use the correct type of oxygen sensor for your vehicle (heated or unheated, specific thread size and connector).
Approximate Repair Cost: Oxygen sensor replacement typically costs between $100 and $300 per sensor, including parts and labor.
Exhaust Hanger Problems
Broken or corroded exhaust hangers can cause the exhaust system to rattle against the undercarriage of the vehicle. This can be annoying and, in some cases, can lead to further damage to the exhaust system.
Diagnosis: Listen for rattling or banging noises coming from underneath the car, especially when driving over bumps. Visually inspect the exhaust hangers for cracks, breaks, or corrosion.
Solution: Replacing the damaged exhaust hangers. This is a relatively simple and inexpensive repair. You can usually purchase replacement hangers at an auto parts store. Make sure to use the correct type of hanger for your vehicle.
Approximate Repair Cost: Exhaust hanger replacement typically costs between $30 and $100, including parts and labor.
Tools You Might Need
If you're planning on tackling some of these repairs yourself, here's a list of tools you might need:
- Wrenches and sockets: Metric sizes, including a deep socket for oxygen sensors.
- Penetrating oil: To loosen rusted bolts and nuts. Apply liberally and let it soak for at least 30 minutes.
- Jack and jack stands: To safely lift and support the vehicle. Safety is paramount! Never work under a vehicle supported only by a jack.
- Hammer: For tapping stubborn parts loose.
- Exhaust pipe cutter or saw: If you need to cut sections of pipe.
- Welding equipment (optional): For repairing small leaks or fabricating custom exhaust sections. Only attempt welding if you are experienced and have the proper safety equipment.
- Oxygen sensor socket: A specialized socket for removing and installing oxygen sensors without damaging them.
- Diagnostic scanner: To read and clear diagnostic trouble codes (DTCs).
- Safety glasses and gloves: To protect your eyes and hands.
Important Considerations
- Safety First: Always wear safety glasses and gloves when working on your exhaust system. Exhaust systems can get extremely hot, so make sure the engine is completely cool before starting any work.
- Local Regulations: Be aware of local emissions regulations. Some areas require specific types of catalytic converters and mufflers. Check with your local DMV or a reputable auto parts store.
- Rust and Corrosion: Working with rusted exhaust components can be challenging. Be prepared to use penetrating oil and potentially cut stubborn bolts.
- Professional Help: If you're not comfortable working on your exhaust system, or if you're dealing with a complex problem, don't hesitate to take your Altima to a qualified mechanic.
- Don't Forget the Diagram: Always refer back to your 2003 Nissan Altima exhaust system diagram for correct parts placement and routing.
Fixing exhaust problems can range from simple bolt-on replacements to more complex welding and diagnostics. But with a little know-how, the right tools, and a good diagram, you can often save yourself some money and keep your 2003 Altima running smoothly. Good luck!