2003 Nissan Pathfinder Fuel Level Sensor
So, you're having some trouble with your 2003 Nissan Pathfinder's fuel gauge? You're not alone. The fuel level sensor is a common culprit in older vehicles, and the 2003 Pathfinder is no exception. A faulty sensor can lead to inaccurate readings, leaving you guessing how much gas you *really* have, and nobody wants to run out of gas unexpectedly. Let's break down the problem and explore some solutions.
Understanding the Problem: Fuel Level Sensor Issues
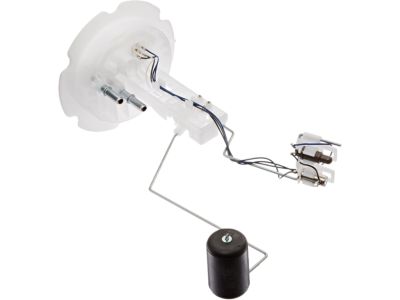
What exactly *is* the fuel level sensor, and what can go wrong? The fuel level sensor (sometimes referred to as the fuel sending unit) is a device located inside your fuel tank. It typically consists of a float attached to a metal rod (or arm) and a variable resistor. As the fuel level changes, the float rises or falls, moving the arm. This movement changes the resistance within the sensor, which is then interpreted by your car's computer (the Engine Control Module, or ECM) and displayed on your fuel gauge. Common problems include:
- Inaccurate Readings: The gauge might show empty when the tank is half full, or full when it's nearly empty. This is the most common symptom.
- Gauge Stuck: The gauge needle remains fixed at one position, regardless of the fuel level.
- Gauge Fluctuations: The gauge needle jumps erratically, providing inconsistent and unreliable readings. This can sometimes be caused by a loose connection, but it often indicates a failing sensor.
- Fuel Light Stays On: Even after filling the tank, the low fuel warning light persists.
- Check Engine Light: In some cases, a faulty fuel level sensor can trigger the check engine light. The code might specifically point to a fuel level sensor issue.
Why does this happen? Over time, the variable resistor can wear out, corrode, or become contaminated with deposits from the fuel. The float can also develop leaks and become less buoyant. Any of these issues can disrupt the sensor's ability to accurately measure the fuel level.
Diagnosing the Fuel Level Sensor
Before you jump to replacing the sensor, it's wise to rule out other potential causes. Here's a simple diagnostic process:
- Check the Fuel Cap: A loose or damaged fuel cap can cause pressure imbalances in the fuel tank, which *can* occasionally affect the fuel gauge reading. It's a long shot, but worth checking, and it's a cheap fix if that's the problem!
- Inspect Wiring and Connections: Look for any signs of damage, corrosion, or loose connections in the wiring harness leading to the fuel pump assembly (where the fuel level sensor is located). Pay close attention to the connector that plugs into the fuel pump. Use a multimeter to check for continuity and voltage at the connector. Refer to a wiring diagram for your 2003 Pathfinder (easily found online) to ensure you're checking the correct wires.
- Check the Ground Wire: A poor ground connection can cause all sorts of electrical gremlins. Make sure the ground wire for the fuel pump assembly is securely attached to the chassis and free from corrosion. Clean it with a wire brush if necessary.
- Use an OBD-II Scanner: Connect an OBD-II scanner to your Pathfinder's diagnostic port. Check for any trouble codes related to the fuel system. Codes like P0460 (Fuel Level Sensor Circuit Malfunction) or P0461 (Fuel Level Sensor Circuit Range/Performance) strongly indicate a fuel level sensor problem.
- Visual Inspection (if accessible): If you can safely access the top of the fuel tank (usually under the rear seat), you *might* be able to visually inspect the wiring and connections without dropping the tank. However, this is often difficult and not recommended unless you're experienced.
The Solution: Replacing the Fuel Level Sensor
If your diagnosis points to a faulty fuel level sensor, replacement is usually the best course of action. You have two main options:
- Replace the Entire Fuel Pump Assembly: This is often the easier and more reliable option. The fuel level sensor is typically integrated into the fuel pump assembly. Replacing the entire unit ensures that all components are new and working correctly. It's also less labor-intensive, as you only need to disconnect and reconnect the fuel lines and electrical connector once.
- Replace the Fuel Level Sensor Only: This option can be more economical if you're confident in your mechanical skills. However, it requires separating the fuel level sensor from the fuel pump assembly, which can be tricky and requires careful handling.
Tools Needed:
Whether you replace the entire assembly or just the sensor, you'll likely need these tools:
- Socket set and wrenches: Metric sizes.
- Screwdrivers: Phillips and flathead.
- Fuel line disconnect tool: This is essential for safely disconnecting the fuel lines without damaging them.
- Hammer and punch (optional): May be needed to loosen the fuel pump retaining ring.
- Multimeter: For testing wiring and connections.
- OBD-II Scanner: To read and clear trouble codes.
- Safety glasses and gloves: Always wear safety gear when working with fuel.
- Jack and jack stands: To safely raise the vehicle.
- Drain pan: To catch any spilled fuel.
- Penetrating oil: To loosen stubborn bolts and fittings.
- Rags: For cleaning up spills.
Step-by-Step Replacement (General Guide):
Important Safety Note: Working with fuel is dangerous. Always disconnect the negative battery cable before starting any work on the fuel system. Work in a well-ventilated area and avoid any sources of ignition. Have a fire extinguisher nearby.
- Depressurize the Fuel System: Consult your Pathfinder's repair manual for the proper procedure to depressurize the fuel system. This usually involves removing the fuel pump relay or fuse and starting the engine until it stalls.
- Disconnect the Battery: Disconnect the negative battery cable.
- Access the Fuel Pump: The fuel pump is typically located in the fuel tank, which is accessed from under the vehicle. You'll likely need to lower the fuel tank to remove the pump assembly. This involves supporting the tank with a jack, disconnecting any straps or brackets, and carefully lowering it. Sometimes, access is available through an access panel under the rear seat. Check your vehicle's repair manual.
- Disconnect Fuel Lines and Electrical Connector: Use the fuel line disconnect tool to carefully disconnect the fuel lines from the fuel pump assembly. Disconnect the electrical connector.
- Remove the Fuel Pump Assembly: Use a hammer and punch (if needed) to loosen the fuel pump retaining ring. Rotate the ring to release the fuel pump assembly. Carefully remove the assembly from the fuel tank.
- Replace the Sensor (if applicable): If you're only replacing the fuel level sensor, carefully separate it from the fuel pump assembly. Install the new sensor, ensuring it's properly connected.
- Install the New Fuel Pump Assembly: Install the new fuel pump assembly into the fuel tank, aligning it correctly. Secure the retaining ring.
- Reconnect Fuel Lines and Electrical Connector: Reconnect the fuel lines and electrical connector to the fuel pump assembly. Make sure they are securely attached.
- Reinstall the Fuel Tank: Carefully raise the fuel tank back into position and secure it with the straps or brackets.
- Reconnect the Battery: Reconnect the negative battery cable.
- Prime the Fuel System: Turn the ignition key to the "on" position (but don't start the engine) for a few seconds. Repeat this several times to allow the fuel pump to prime the fuel system.
- Start the Engine: Start the engine and check for any fuel leaks.
- Check the Fuel Gauge: Verify that the fuel gauge is now reading accurately.
- Clear Trouble Codes: Use an OBD-II scanner to clear any trouble codes related to the fuel system.
This is a general guide. Consult your 2003 Nissan Pathfinder repair manual for specific instructions and torque specifications.
Estimated Repair Costs
The cost of repairing a fuel level sensor issue on a 2003 Nissan Pathfinder can vary depending on several factors:
- DIY vs. Professional Repair: Doing the job yourself will save you on labor costs, but you'll need to factor in the cost of tools if you don't already have them.
- Fuel Pump Assembly vs. Sensor Only: Replacing the entire fuel pump assembly is generally more expensive than replacing just the sensor.
- Parts Quality: Aftermarket parts are typically cheaper than OEM (Original Equipment Manufacturer) parts, but OEM parts are generally more reliable.
- Labor Rates: Labor rates vary depending on the location and the mechanic's experience.
Here's a rough estimate:
- Fuel Level Sensor Only (Aftermarket): $30 - $80
- Fuel Pump Assembly (Aftermarket): $100 - $300
- Fuel Level Sensor Only (OEM): $50 - $150
- Fuel Pump Assembly (OEM): $200 - $500
- Labor Costs (if applicable): $150 - $400 (depending on the complexity of the job and the shop's hourly rate).
Therefore, you can expect to pay anywhere from $180 to $900+ for this repair, depending on your chosen approach and parts.
Preventative Measures
While you can't completely prevent fuel level sensor failures, there are a few things you can do to extend the life of your fuel system:
- Use Quality Fuel: Avoid using low-grade fuel that may contain contaminants.
- Keep Your Fuel Tank Relatively Full: Running your tank consistently low can cause the fuel pump to overheat and draw in sediment from the bottom of the tank.
- Address Problems Promptly: Don't ignore warning signs like inaccurate fuel gauge readings. Addressing problems early can prevent further damage.
Replacing a fuel level sensor on your 2003 Nissan Pathfinder can seem daunting, but with the right tools, knowledge, and a bit of patience, it's a manageable task. Remember to prioritize safety and consult your vehicle's repair manual for specific instructions. Good luck!