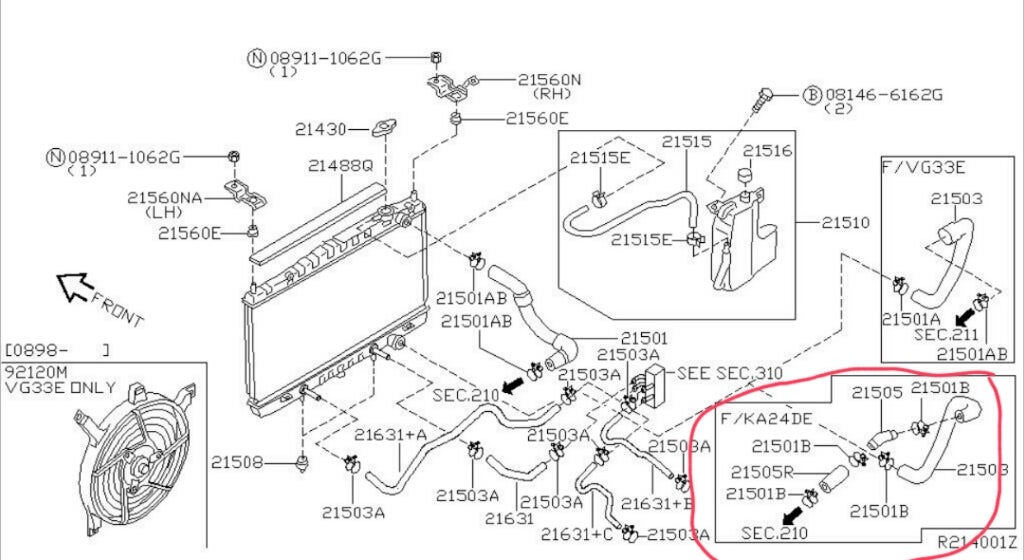
2004 Nissan Frontier Coolant Hose Diagram
The 2004 Nissan Frontier, a reliable workhorse of its era, utilizes a complex yet elegant cooling system to maintain optimal engine temperature. At the heart of this system lies a network of coolant hoses, each meticulously designed and positioned to circulate coolant between the engine block, radiator, heater core, and other crucial components. Understanding the coolant hose diagram for this particular model year is not just about replacing a worn hose; it's about grasping the fundamental principles of automotive thermal management.
The Closed-Loop Cooling System: An Overview
Before diving into the specific hose diagram, it's crucial to understand the overall function of the cooling system. The 2004 Frontier employs a closed-loop system, meaning the coolant circulates continuously within a sealed network. This system primarily aims to dissipate heat generated by combustion and friction within the engine. Excessive heat can lead to pre-ignition, detonation, oil breakdown, and ultimately, catastrophic engine failure.
The system's core components include:
- Engine Block: The source of the heat. Coolant passages within the block absorb heat directly from the cylinder walls and other critical areas.
- Radiator: A heat exchanger. As coolant flows through the radiator's core, air passing through the fins dissipates heat.
- Water Pump: A mechanical pump driven by the engine's accessory belt, responsible for circulating the coolant.
- Thermostat: A temperature-sensitive valve that regulates coolant flow to the radiator, maintaining a stable engine operating temperature.
- Heater Core: A miniature radiator located within the vehicle's dashboard, providing heat to the cabin.
- Coolant Reservoir (Overflow Tank): Accommodates the expansion and contraction of coolant due to temperature changes.
- Coolant Hoses: The conduits that connect all these components, facilitating coolant flow.
Decoding the 2004 Frontier Coolant Hose Diagram
While specific diagrams may vary slightly depending on the engine configuration (2.4L KA24DE inline-four or 3.3L VG33E V6), the fundamental principles remain the same. Let's break down the typical hose routing:
The Upper Radiator Hose
This is typically the thickest and most prominent hose. It connects the top of the radiator to the thermostat housing on the engine. Hot coolant, having absorbed heat from the engine block, flows into the radiator via this hose. The thermostat, located within the thermostat housing, plays a critical role here. When the engine is cold, the thermostat remains closed, preventing coolant from flowing to the radiator. This allows the engine to reach its operating temperature quickly. Once the engine reaches the desired temperature (typically around 195°F or 90°C), the thermostat opens, allowing coolant to circulate to the radiator for cooling.
The Lower Radiator Hose
This hose connects the bottom of the radiator to the water pump inlet on the engine block. Cooled coolant, having dissipated heat in the radiator, is drawn back into the engine by the water pump. This completes the primary cooling loop.
Heater Hoses
These are typically two smaller diameter hoses that connect the engine to the heater core. One hose carries hot coolant from the engine (often near the intake manifold) to the heater core. The other hose returns cooled coolant from the heater core back to the engine (often near the water pump or a dedicated return line). These hoses provide the heat needed for the vehicle's climate control system. The flow of coolant through the heater core is usually controlled by a valve, allowing the driver to regulate the amount of heat entering the cabin.
Bypass Hose (if applicable)
Some 2004 Frontier models may feature a small bypass hose connecting the thermostat housing to the water pump inlet. This hose provides a small amount of coolant flow even when the thermostat is closed. This helps to prevent localized overheating and ensure consistent temperature readings at the thermostat.
Overflow Hose
This thin hose connects the radiator neck to the coolant reservoir (overflow tank). As the coolant heats up, it expands. This expansion can create pressure within the cooling system. The overflow hose allows excess coolant to flow into the reservoir, preventing over-pressurization. As the coolant cools down, it contracts, creating a vacuum. This vacuum draws coolant back from the reservoir into the radiator, maintaining a proper coolant level.
Material Science and Hose Design
Coolant hoses are not simply tubes of rubber. They are engineered to withstand a harsh environment, including high temperatures, high pressures, and constant exposure to corrosive chemicals. The hoses are typically made from a multi-layered construction, including:
- An inner layer of synthetic rubber resistant to coolant chemicals and high temperatures.
- One or more layers of reinforcement fabric (typically nylon or polyester) to provide strength and prevent ballooning under pressure.
- An outer layer of weather-resistant rubber to protect the hose from ozone, UV radiation, and abrasion.
The specific type of rubber and reinforcement used will vary depending on the hose's location and operating conditions. High-pressure hoses, such as the radiator hoses, will typically have a more robust construction than low-pressure hoses, such as the overflow hose.
Troubleshooting Coolant Hose Issues
Coolant hoses are subject to wear and tear over time. Common problems include:
- Cracking and Dry Rot: Exposure to heat, ozone, and UV radiation can cause the rubber to crack and become brittle.
- Swelling and Softening: Exposure to incompatible coolants or contaminants can cause the rubber to swell and soften, leading to leaks.
- Leaks at Clamps: Over time, the clamps that secure the hoses to the fittings can loosen or corrode, leading to leaks.
- Hose Collapse: In rare cases, a hose can collapse internally, restricting coolant flow. This is more common in older hoses that have lost their structural integrity.
Regular inspection of the coolant hoses is crucial for preventing cooling system failures. Look for any signs of cracking, swelling, leaking, or softening. Squeeze the hoses to check for sponginess or collapse. Replace any hoses that show signs of damage.
Replacing Coolant Hoses: A Practical Guide
Replacing coolant hoses is a relatively straightforward task, but it's important to follow proper procedures to avoid injury and ensure a proper seal.
- Safety First: Allow the engine to cool completely before starting any work. Coolant can be extremely hot and can cause severe burns. Disconnect the negative battery terminal to prevent accidental electrical shorts.
- Gather Your Tools: You'll need a set of pliers, screwdrivers, a drain pan, new coolant hoses, and new hose clamps.
- Drain the Coolant: Locate the drain cock on the radiator (typically at the bottom). Open the drain cock and allow the coolant to drain into the drain pan. Dispose of the used coolant properly.
- Remove the Old Hose: Loosen the hose clamps using pliers or a screwdriver. Twist and pull the old hose to remove it from the fittings. Be prepared for some residual coolant to spill out.
- Install the New Hose: Slide the new hose onto the fittings. Ensure the hose is fully seated.
- Install New Clamps: Secure the hose with new hose clamps. Tighten the clamps securely, but avoid overtightening, which can damage the hose.
- Refill the Cooling System: Close the radiator drain cock. Refill the cooling system with the correct type and concentration of coolant.
- Bleed the System: Air can become trapped in the cooling system during refilling. Bleeding the system removes trapped air, ensuring proper coolant circulation. Locate the bleeder valve (typically on the thermostat housing or radiator). Open the bleeder valve and allow air to escape until coolant flows out. Close the bleeder valve.
- Check for Leaks: Start the engine and allow it to warm up. Check for leaks at all hose connections. Top off the coolant level as needed.
Conclusion
The coolant hose diagram for the 2004 Nissan Frontier represents a carefully engineered system designed to maintain optimal engine temperature. By understanding the function of each hose and the principles of automotive thermal management, you can effectively diagnose and repair cooling system issues, ensuring the longevity and reliability of your vehicle. Remember, regular inspection and preventative maintenance are key to avoiding costly repairs and keeping your Frontier running smoothly.