2004 Nissan Titan Timing Chain Replacement
Alright, let's talk timing chains on your 2004 Nissan Titan. This is a big job, no doubt about it, but if you're a seasoned DIYer and comfortable tackling complex engine work, it's definitely within your capabilities. We're going to walk through a complete timing chain replacement. Remember safety first: disconnect the negative battery terminal before you begin, and have a repair manual specific to your Titan handy. This guide is meant to supplement, not replace, that manual.
Understanding the Importance of the Timing Chain
Before we dive in, let's quickly recap why this is so important. The timing chain synchronizes the crankshaft (which turns the pistons) and the camshafts (which operate the valves). If the timing chain stretches or breaks, the valves can collide with the pistons, causing catastrophic engine damage. Think bent valves, damaged pistons, and potentially a ruined engine block. A stretched chain can also lead to poor engine performance, misfires, and a check engine light with codes related to camshaft/crankshaft correlation errors. The ECM (Engine Control Module) monitors this relationship closely. Pay attention to symptoms like a rattling noise coming from the front of the engine, especially at startup, as this is often a sign of a worn timing chain or tensioner.
Tools and Materials You'll Need
This isn't your basic oil change. You'll need a comprehensive set of tools and some specialized ones. Here's a rundown:
- Socket set (metric) - including deep sockets
- Wrench set (metric)
- Torque wrench
- Pry bars
- Screwdrivers (Phillips and flathead)
- Pliers
- Timing chain alignment tools (specific to the VK56DE engine) - This is absolutely critical! Without these, you risk improper timing and severe engine damage. Most auto parts stores will rent these.
- Harmonic balancer puller
- Crankshaft pulley holding tool (optional, but highly recommended)
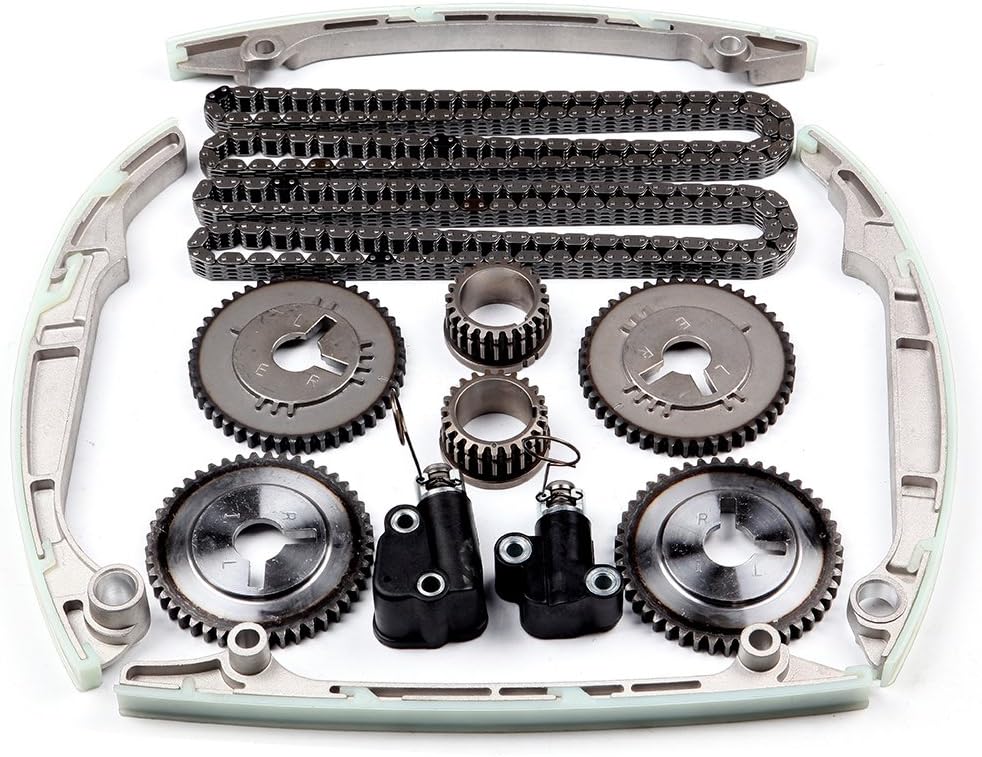
- New timing chain kit - includes timing chains (primary and secondary), chain guides, tensioners, sprockets, and oil pump chain. Don't cheap out on this! Buy a quality kit from a reputable brand.
- New water pump (recommended while you're in there)
- New thermostat (recommended while you're in there)
- Coolant
- Engine oil and filter
- RTV sealant (for the timing cover)
- Penetrating oil
- Shop towels
- Drain pan
- Jack and jack stands
- Wheel chocks
Step-by-Step Timing Chain Replacement
Here's a detailed breakdown of the process. Remember to consult your repair manual for specific torque specifications and any model-year-specific differences.
1. Preparation
a. Disconnect the negative battery terminal.
b. Jack up the front of the vehicle and secure it with jack stands. Remove the front wheels.
c. Drain the coolant and engine oil.
d. Remove the radiator fan shroud, fan, and radiator.
e. Remove the accessory drive belts. Take pictures or make a diagram of how they route to make reinstallation easier.
f. Disconnect and remove any components that will interfere with removing the timing cover, such as the power steering pump, alternator, and AC compressor. Do not disconnect the AC lines; simply move the compressor out of the way.
2. Removing the Front Cover
a. Remove the harmonic balancer using the harmonic balancer puller. This can be tricky; use penetrating oil and be patient. Do not use a hammer to force it off.
b. Remove the crankshaft pulley.
c. Disconnect any sensors or wiring harnesses attached to the timing cover.
d. Remove the timing cover bolts. There are usually a lot of them, and some may be hidden. Keep track of their locations, as they may be different lengths.
e. Use a pry bar (carefully!) to separate the timing cover from the engine block. Be careful not to damage the sealing surfaces. If it is stuck, double check that you removed all of the bolts. The front cover is sealed with RTV.
3. Setting the Engine to Top Dead Center (TDC)
a. This is absolutely critical! Rotate the crankshaft clockwise until the TDC mark on the crankshaft sprocket aligns with the mark on the engine block. The TDC mark is a small notch or indentation. This ensures the #1 cylinder is at Top Dead Center on the compression stroke.
b. Verify that the camshaft lobes for the #1 cylinder are pointing upwards and outwards. Refer to your repair manual for the exact position. This confirms that you are on the compression stroke.
4. Removing the Old Timing Chains and Components
a. Now that the engine is at TDC, install the timing chain alignment tools. These tools will lock the camshafts in their correct positions to prevent them from moving while you're working on the timing chains. DO NOT skip this step!
b. Carefully remove the old timing chains, chain guides, and tensioners. Inspect the sprockets for wear. If the sprockets are worn, replace them.
c. Disconnect the oil pump pick-up tube and remove the oil pump. Remove the oil pump chain and sprocket. Clean the oil pump thoroughly or replace as necessary.
5. Installing the New Timing Chains and Components
a. Install the new oil pump chain and sprocket. Install the oil pump.
b. Install the new timing chain sprockets (if applicable).
c. Install the new timing chain guides and tensioners.
d. Install the primary timing chain, aligning the timing marks on the chain with the timing marks on the crankshaft and camshaft sprockets. The chain often has colored links to help with alignment. Refer to your repair manual for the exact alignment procedure.
e. Install the secondary timing chains, aligning the timing marks on the chains with the timing marks on the camshaft sprockets. Again, consult your repair manual for the precise alignment.
f. Double-check that all timing marks are aligned correctly before releasing the tensioners.
g. Release the timing chain tensioners. They should automatically extend and tension the chains.
h. Very Carefully rotate the crankshaft by hand (clockwise) several revolutions, and then recheck the alignment of all timing marks. Make sure nothing binds or interferes. If the marks no longer align, you need to start over.
6. Reinstalling the Front Cover
a. Clean the mating surfaces of the engine block and timing cover thoroughly.
b. Apply a thin, even bead of RTV sealant to the timing cover.
c. Carefully reinstall the timing cover, making sure it is properly aligned.
d. Install the timing cover bolts and tighten them to the manufacturer's specified torque. Tighten in a star pattern in 2 steps to ensure even tightening.
e. Reinstall the crankshaft pulley and harmonic balancer. Torque the harmonic balancer bolt to the specified torque.
7. Final Assembly and Startup
a. Reinstall all the components you removed earlier, such as the power steering pump, alternator, AC compressor, accessory drive belts, radiator, radiator fan shroud, etc.
b. Reconnect all wiring harnesses and sensors.
c. Refill the engine oil and coolant.
d. Double-check all your connections and make sure everything is properly secured.
e. Reconnect the negative battery terminal.
f. Start the engine and let it idle for a few minutes. Listen for any unusual noises.
g. Check for leaks.
h. Drive the vehicle for a short distance and monitor its performance.
Important Considerations and Tips
- Cleanliness is crucial. Keep everything clean during the entire process to prevent contamination and ensure proper sealing.
- Take your time. This is not a job to rush. Double-check everything, and if you're unsure about something, consult your repair manual or seek advice from a qualified mechanic.
- Keep track of parts. Organize the parts you remove and label them to make reassembly easier.
- Torque specifications are critical. Use a torque wrench and tighten all bolts to the manufacturer's specified torque. Over-tightening or under-tightening can lead to problems.
- If you are replacing the water pump and thermostat, follow the torque specifications for those components as well.
- After completing the timing chain replacement, it's a good idea to perform an engine oil and filter change after the first 500 miles to remove any debris that may have been dislodged during the process.
- Consult a professional if you are not comfortable with any aspect of this procedure. It is better to pay a professional to do the job right than to risk damaging your engine.
Replacing the timing chain on your 2004 Nissan Titan is a challenging but rewarding project. By following these steps and consulting your repair manual, you can successfully complete the job and save yourself a significant amount of money. Good luck!