2004 Nissan Xterra Coolant Hose Diagram
Understanding Your 2004 Nissan Xterra Coolant Hose System
Maintaining the cooling system of your 2004 Nissan Xterra is crucial for its longevity and performance. The coolant hose system plays a vital role in regulating engine temperature, preventing overheating, and ensuring smooth operation. A clear understanding of the coolant hose diagram will empower you to identify potential issues, perform basic maintenance, and potentially save money on costly repairs.
This article provides a comprehensive overview of the 2004 Nissan Xterra's coolant hose system, helping you locate hoses, understand their functions, and troubleshoot common problems. We'll explore the key components and provide helpful information to keep your Xterra running cool.
Why is Coolant Hose Maintenance Important?
Coolant hoses are subjected to extreme temperatures and pressures. Over time, they can become brittle, cracked, or swollen. A damaged coolant hose can lead to coolant leaks, resulting in engine overheating, which can cause severe engine damage. Regular inspection and timely replacement of worn hoses are essential for preventing these issues. Ignoring these issues can lead to catastrophic engine failure, requiring very expensive repairs or even engine replacement.
Locating the 2004 Nissan Xterra Coolant Hoses
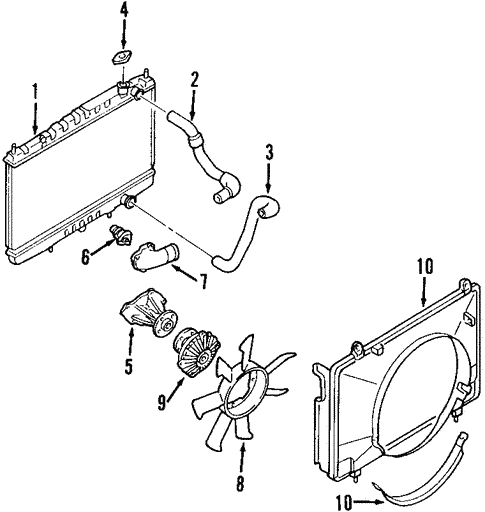
The 2004 Nissan Xterra coolant hose system consists of several hoses that circulate coolant throughout the engine, radiator, and heater core. Locating these hoses is the first step in diagnosing any potential problems. Here's a breakdown of the key hoses and their typical locations:
- Upper Radiator Hose: This hose connects the top of the radiator to the engine block (usually near the thermostat housing). It carries hot coolant from the engine to the radiator for cooling.
- Lower Radiator Hose: This hose connects the bottom of the radiator to the engine block (usually near the water pump). It carries cooled coolant from the radiator back to the engine.
- Heater Hoses: These hoses (usually two) connect the engine to the heater core inside the passenger compartment. They circulate hot coolant to provide heat for the cabin. One hose will be the inlet, and the other the outlet to the heater core.
- Bypass Hose: This smaller hose typically connects the thermostat housing to the water pump. It allows coolant to bypass the radiator when the thermostat is closed, helping the engine warm up quickly.
- Overflow Hose: This small hose connects the radiator neck to the coolant overflow reservoir. It allows excess coolant to expand and flow into the reservoir and be drawn back into the system as it cools.
Consulting a 2004 Nissan Xterra coolant hose diagram is highly recommended for accurate identification. These diagrams can be found in the vehicle's repair manual or online parts databases. Pay close attention to the routing of each hose, as incorrect installation can lead to leaks or other problems.
Interpreting a Coolant Hose Diagram
A coolant hose diagram is a visual representation of the coolant system. Understanding how to read the diagram is crucial for correctly identifying hoses and their connections. Here's a general guide:
- Hoses: Represented by lines connecting different components. Different line thickness can indicate the hose diameter.
- Components: Radiator, engine block, water pump, thermostat housing, heater core, and coolant reservoir are all shown as distinct shapes or symbols.
- Flow Direction: Arrows indicate the direction of coolant flow through the hoses and components.
- Labels: Each hose and component is typically labeled with a descriptive name.
When looking at a diagram, take your time and trace the path of each hose. Identify its connection points and understand its function within the cooling system. Many online resources offer detailed diagrams specifically for the 2004 Nissan Xterra coolant system. Searching for phrases like "2004 Nissan Xterra coolant hose diagram" or "2004 Xterra cooling system diagram" should yield helpful results.
Common Coolant Hose Problems and Troubleshooting
Several common problems can affect coolant hoses, leading to leaks and potential engine overheating. Regular inspection can help identify these issues early on.
- Cracks and Leaks: Cracks are a common sign of hose degradation. Look for small cracks, especially near the hose ends. Leaks may manifest as coolant dripping onto the ground or a persistent coolant smell.
- Swelling or Softness: Coolant hoses can swell or become soft over time due to chemical degradation from the coolant itself. These hoses are weak and prone to bursting.
- Clamps: Check the hose clamps for corrosion or looseness. Loose clamps can cause leaks, even if the hose itself is in good condition.
- Collapse: A collapsing lower radiator hose, especially under high engine speeds, can indicate a weak hose or a restricted coolant flow. This is less common but can lead to overheating.
Troubleshooting Tips
If you suspect a coolant hose problem, follow these troubleshooting steps:
- Visual Inspection: Carefully inspect all coolant hoses for cracks, leaks, swelling, and loose clamps.
- Pressure Test: A cooling system pressure tester can help identify leaks that are not readily visible.
- Coolant Level: Monitor your coolant level regularly. A consistently low coolant level can indicate a leak.
- Overheating Symptoms: Be aware of any overheating symptoms, such as a rising temperature gauge or steam coming from the engine compartment. These symptoms warrant immediate investigation.
Replacing a 2004 Nissan Xterra Coolant Hose
Replacing a coolant hose is a relatively straightforward task that many DIY mechanics can handle. However, it's essential to take proper precautions and follow the correct procedure.
Disclaimer: If you are not comfortable working on your vehicle, it's best to consult a qualified mechanic.
Steps for Coolant Hose Replacement
- Safety First: Allow the engine to cool completely before starting any work. Hot coolant can cause severe burns. Disconnect the negative battery terminal.
- Gather Supplies: You'll need the correct replacement hose, hose clamps, a drain pan, coolant, and basic hand tools.
- Drain Coolant: Partially drain the cooling system to a level below the hose you are replacing. This will minimize coolant spillage.
- Remove Old Hose: Loosen the hose clamps and carefully remove the old hose. Use a hose removal tool if necessary.
- Install New Hose: Install the new hose, ensuring it is properly seated and aligned.
- Secure Clamps: Tighten the hose clamps securely, but avoid overtightening, which can damage the hose.
- Refill Coolant: Refill the cooling system with the correct type of coolant.
- Bleed Air: Bleed any air from the cooling system. This may involve opening a bleed valve or squeezing the upper radiator hose.
- Test Drive: Start the engine and let it run for a few minutes. Check for leaks and monitor the temperature gauge. Take a short test drive and recheck for leaks.
Choosing the Right Coolant Hose
When replacing a coolant hose, it's crucial to choose a high-quality replacement that is designed for your 2004 Nissan Xterra. Using the correct hose ensures proper fit and performance.
- OEM (Original Equipment Manufacturer) Hoses: These hoses are made by the original manufacturer and are designed to meet the exact specifications of your vehicle. They are typically the most reliable option.
- Aftermarket Hoses: Several aftermarket brands offer coolant hoses for the 2004 Nissan Xterra. Choose reputable brands known for their quality and durability.
- Reinforced Hoses: Consider reinforced silicone hoses for improved durability and resistance to heat and pressure. These hoses are a good option for vehicles that are driven hard or experience extreme temperatures.
Preventative Maintenance for Coolant Hoses
Regular preventative maintenance can help extend the life of your coolant hoses and prevent costly repairs.
- Regular Inspections: Inspect your coolant hoses at least twice a year, paying close attention to cracks, leaks, and swelling.
- Coolant Flushes: Flush the cooling system every 30,000 to 50,000 miles to remove contaminants and prevent corrosion.
- Proper Coolant Mixture: Use the correct coolant mixture (typically 50/50 coolant and distilled water) to protect the cooling system from corrosion and freezing.
- Check Hose Clamps: Inspect and tighten hose clamps as needed.
By understanding your 2004 Nissan Xterra coolant hose diagram, performing regular maintenance, and addressing problems promptly, you can keep your cooling system in good condition and ensure the longevity of your vehicle. Remember to always prioritize safety and consult a qualified mechanic if you are unsure about any aspect of coolant hose maintenance or replacement. Proper cooling system maintenance will ultimately save you time, money and keep your Xterra running reliably for years to come.