2005 Nissan Altima Fuel Level Sensor
Alright, let's dive into the fuel level sensor on a 2005 Nissan Altima. We're going to cover how it works, common problems, troubleshooting steps, and replacement procedures. This guide is aimed at intermediate DIYers, so I'll assume you're comfortable with basic automotive tools and electrical concepts. We'll use some technical jargon, but I'll explain everything as we go. Prepare to get your hands a little dirty!
Understanding the Fuel Level Sensor System
The fuel level sensor, or fuel sending unit, isn't just one component. It's a small system that lives inside your fuel tank, working to give your instrument cluster an accurate reading of how much fuel you have left. This system communicates with the Engine Control Module (ECM), which then relays the information to your fuel gauge on the dashboard.
Components of the Fuel Level Sensor System
Here's a breakdown of the key players:
- Fuel Level Sensor (Sending Unit): This is the main component, typically consisting of a float, a metal rod (arm), and a variable resistor (also called a potentiometer).
- Float: A buoyant object (usually plastic) that floats on the surface of the fuel. Its position changes with the fuel level.
- Float Arm (Rod): Connects the float to the variable resistor. As the float moves up and down, the arm rotates.
- Variable Resistor (Potentiometer): This is the heart of the sensor. It's a resistor whose resistance changes depending on the position of the float arm. Think of it like a dimmer switch for electricity.
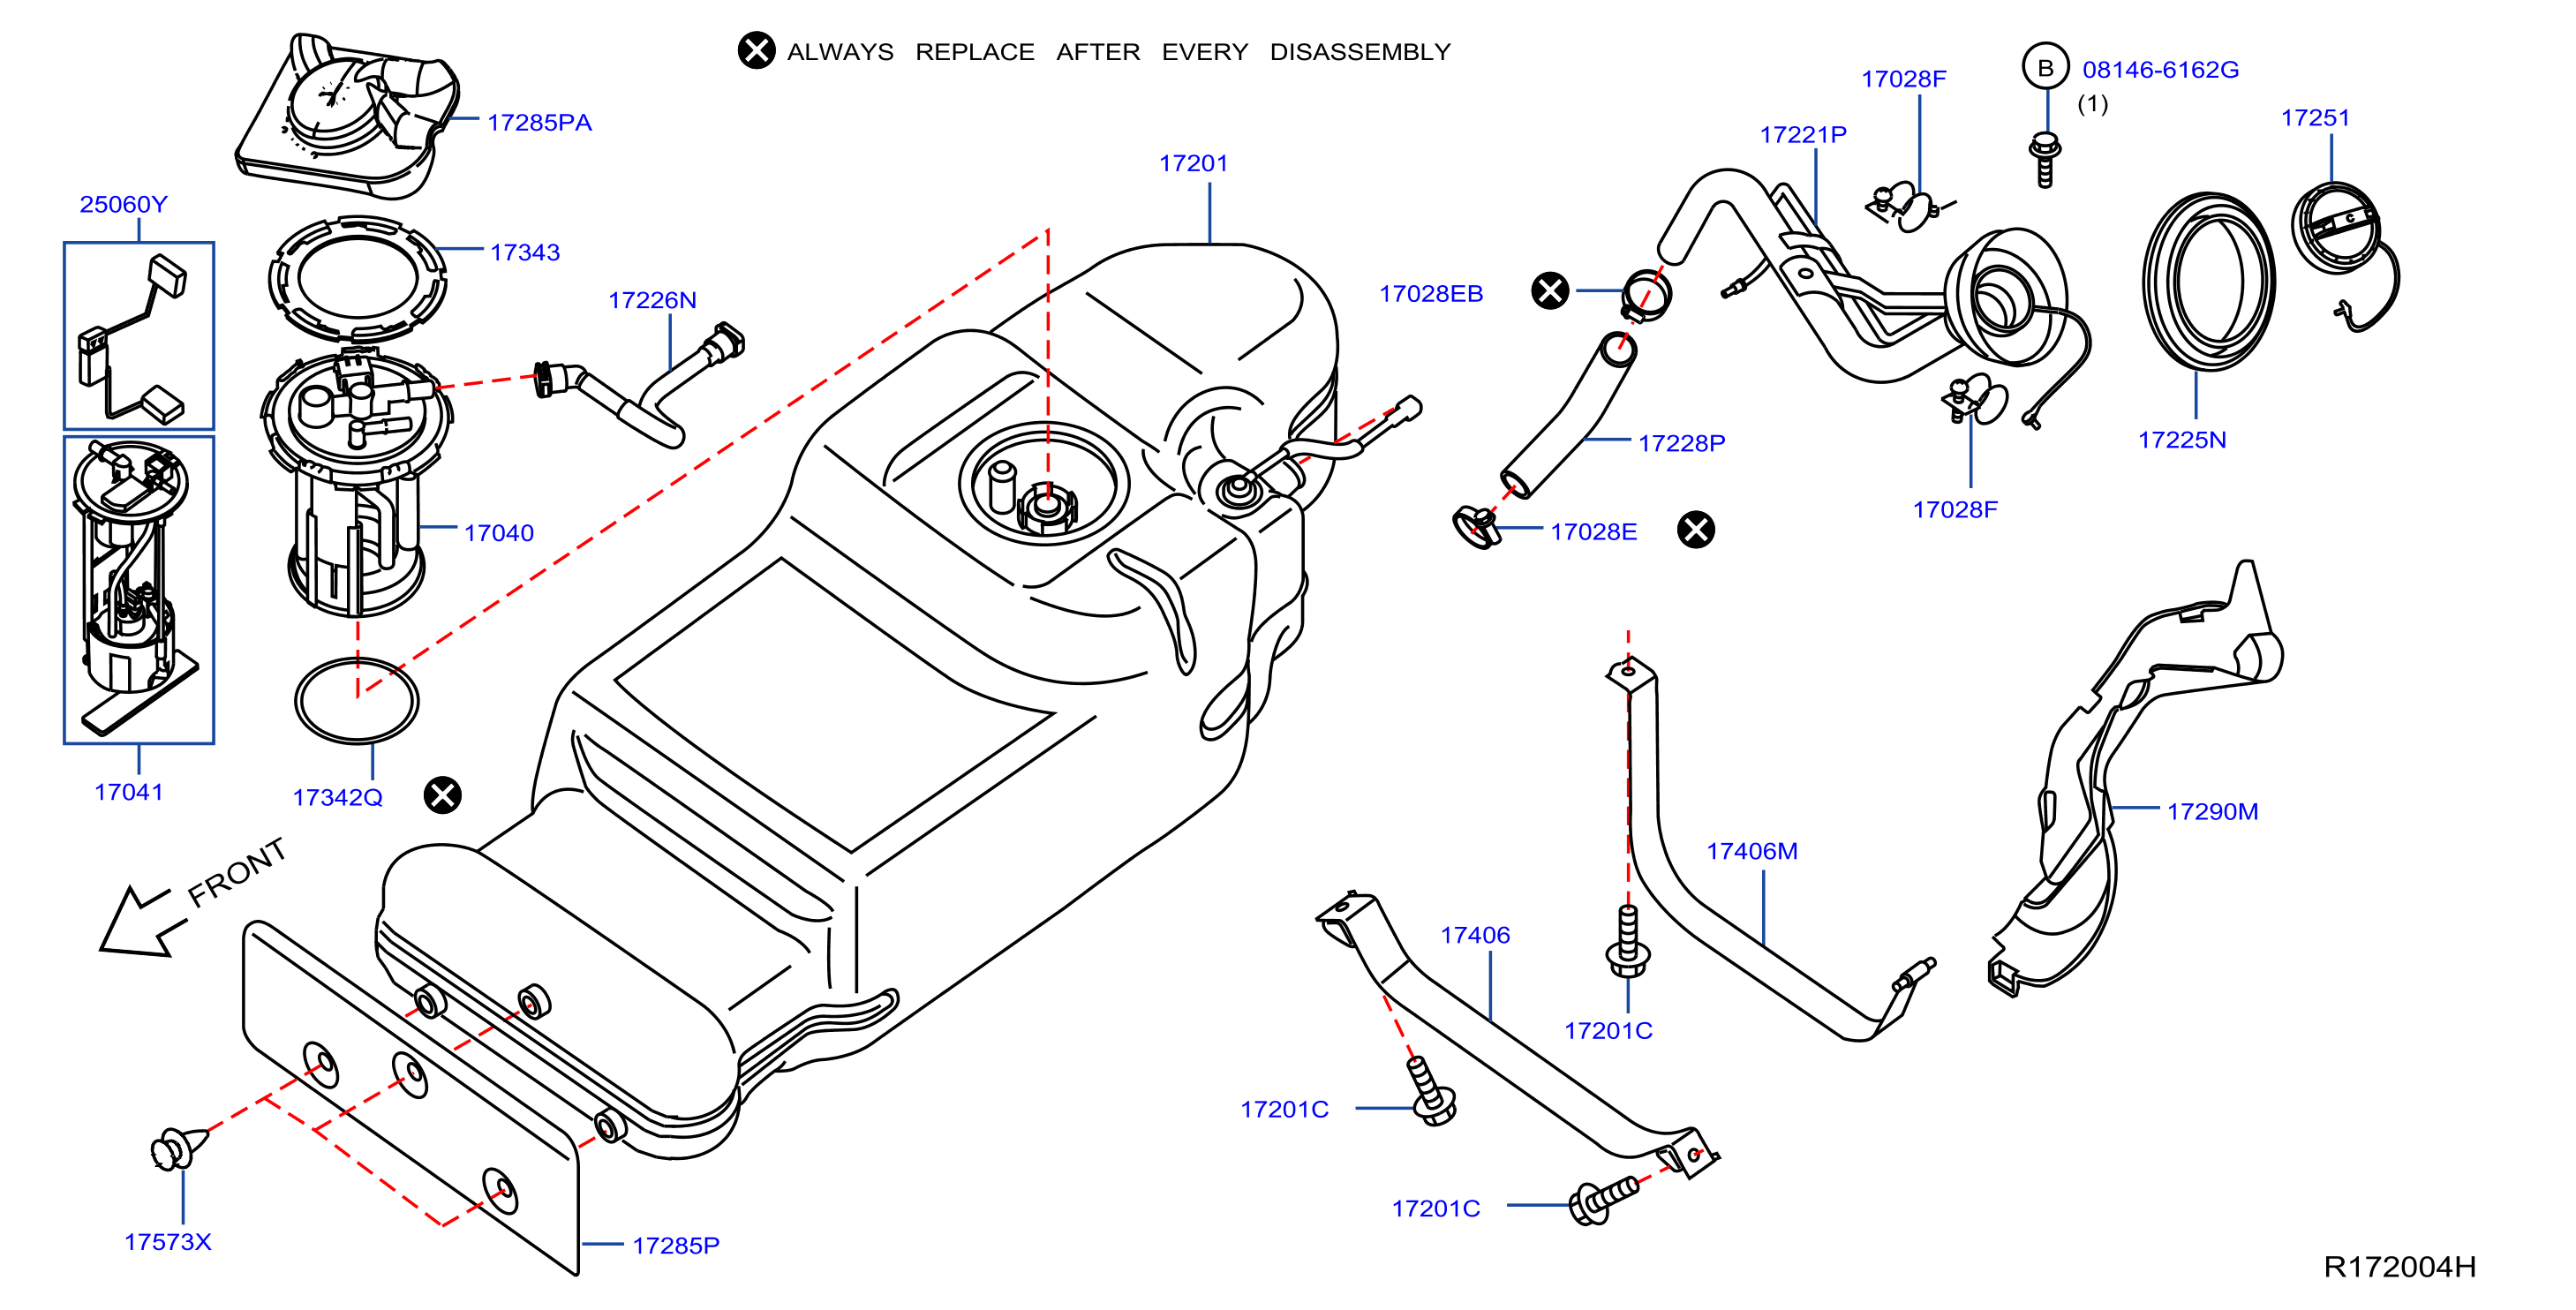
- Fuel Pump Assembly: In many modern cars, including the 2005 Altima, the fuel level sensor is integrated into the fuel pump assembly. This assembly also houses the fuel pump itself and often the fuel filter.
- Wiring Harness and Connector: These provide the electrical connection between the fuel level sensor and the vehicle's electrical system.
- ECM (Engine Control Module): The "brain" of the car. It receives the resistance signal from the fuel level sensor and interprets it to determine the fuel level.
- Instrument Cluster (Fuel Gauge): Displays the fuel level to the driver.
How it Works: Resistance is Key
The magic happens with the variable resistor. As the fuel level rises, the float rises, and the float arm rotates, changing the position of the arm on the variable resistor. This change in position alters the resistance. When the tank is full, the resistance is low (allowing more current to flow). When the tank is empty, the resistance is high (restricting current flow). The ECM reads this changing resistance as a voltage signal and translates it into a fuel level reading for your gauge.
In simple terms: High fuel = low resistance = gauge reads full. Low fuel = high resistance = gauge reads empty.
Common Problems with the 2005 Altima Fuel Level Sensor
Several things can go wrong with the fuel level sensor system. Here are some of the most common issues:
- Inaccurate Fuel Readings: This is the most frequent symptom. Your gauge might fluctuate wildly, read empty when you know you have fuel, or read full when you know you're low.
- Fuel Gauge Stuck at Empty: The gauge might stay on "E" even after filling the tank. This often indicates a problem with the sensor itself or a break in the wiring.
- Fuel Gauge Stuck at Full: The opposite problem – the gauge always reads full, even after driving for a while. This could be a short circuit in the wiring or a fault in the sensor.
- Intermittent Readings: The gauge works sometimes, but not others. This can be caused by a loose connection, a corroded connector, or a failing sensor.
- Check Engine Light (CEL): A faulty fuel level sensor can trigger a CEL, often accompanied by a Diagnostic Trouble Code (DTC) related to the fuel level circuit (e.g., P0460, P0461, P0462, P0463).
The most common culprits behind these issues are:
- Corrosion: Fuel tanks can accumulate moisture over time, leading to corrosion on the sensor's components, especially the electrical contacts.
- Wear and Tear: The float arm can become worn or bent over time, affecting its movement and the accuracy of the readings. The variable resistor itself can also degrade with age.
- Fuel Contamination: Dirty fuel can clog the sensor or damage the variable resistor.
- Electrical Problems: Loose connections, damaged wiring, or shorts in the wiring harness can disrupt the signal from the sensor to the ECM.
Troubleshooting the Fuel Level Sensor
Before replacing the fuel level sensor, it's important to troubleshoot the system to pinpoint the exact cause of the problem. Here's a systematic approach:
- Check for Obvious Problems: Start with the simple stuff. Look for any visible damage to the wiring harness or connector near the fuel tank. Make sure the connector is securely plugged in.
- Scan for Diagnostic Trouble Codes (DTCs): Use an OBD-II scanner to check for any trouble codes related to the fuel level sensor or fuel system. Write down the codes and research their meaning. Even if the CEL isn't on, there might be pending codes stored in the ECM.
- Inspect the Wiring: Carefully inspect the wiring harness leading to the fuel pump assembly. Look for any signs of damage, such as frayed wires, cracked insulation, or corrosion. Use a multimeter to check for continuity and shorts in the wiring. You'll need a wiring diagram for your specific year and model Altima to properly identify the wires.
- Check the Ground Connection: A bad ground connection can cause all sorts of electrical problems. Locate the ground point for the fuel pump assembly (it's usually a bolt or screw attached to the vehicle's chassis near the fuel tank) and make sure it's clean and secure.
- Test the Fuel Level Sensor Resistance: This is a crucial step. You'll need a multimeter and a wiring diagram to identify the correct terminals on the fuel level sensor connector. With the connector unplugged from the fuel pump assembly, measure the resistance between the appropriate terminals. Then, manually move the float arm up and down and observe the resistance reading. The resistance should change smoothly and consistently as you move the arm. If the resistance is erratic, jumps around, or doesn't change at all, the sensor is likely faulty. Refer to your vehicle's service manual for the correct resistance specifications for a full and empty tank.
- Check the Float: If possible (sometimes it's difficult to access the float without removing the fuel pump assembly), visually inspect the float for any signs of damage, such as cracks or leaks. A damaged float can sink, leading to inaccurate fuel readings.
Safety First! When working around fuel, always disconnect the negative battery cable to prevent sparks. Work in a well-ventilated area and avoid smoking or using open flames. Have a fire extinguisher nearby.
Replacing the Fuel Level Sensor
If your troubleshooting points to a faulty fuel level sensor, you'll need to replace it. On the 2005 Altima, as mentioned earlier, the fuel level sensor is typically integrated into the fuel pump assembly. This means you'll likely need to replace the entire fuel pump assembly.
- Gather Your Tools and Parts: You'll need a new fuel pump assembly (make sure it's the correct one for your vehicle), a fuel line disconnect tool (usually a set of special pliers), a socket set, a wrench set, a screwdriver set, a hammer, a punch, safety glasses, gloves, and shop rags.
- Depressurize the Fuel System: Before disconnecting any fuel lines, you need to relieve the pressure in the fuel system. Consult your vehicle's service manual for the correct procedure. Typically, this involves disconnecting the fuel pump relay and running the engine until it stalls.
- Disconnect the Negative Battery Cable: This is essential for safety.
- Access the Fuel Pump Assembly: The fuel pump assembly is usually accessed through an access panel located under the rear seat. Remove the rear seat cushion (usually by releasing a couple of clips or bolts). Then, remove the access panel.
- Disconnect the Fuel Lines and Electrical Connector: Carefully disconnect the fuel lines from the fuel pump assembly using the fuel line disconnect tool. Be prepared for some fuel spillage, so have shop rags handy. Disconnect the electrical connector.
- Remove the Fuel Pump Assembly: There's usually a retaining ring that holds the fuel pump assembly in place. Use a hammer and punch to gently tap the retaining ring counterclockwise until it's loose enough to remove. Carefully lift the fuel pump assembly out of the fuel tank. Be careful not to bend the float arm or damage any of the components.
- Install the New Fuel Pump Assembly: Install the new fuel pump assembly in the reverse order of removal. Make sure the fuel lines are securely connected and the electrical connector is properly seated. Tighten the retaining ring securely.
- Reconnect the Fuel Lines and Electrical Connector: Reconnect the fuel lines to the new fuel pump assembly, ensuring they click into place. Reconnect the electrical connector.
- Reinstall the Access Panel and Rear Seat: Reinstall the access panel and secure it with the screws or bolts. Reinstall the rear seat cushion and secure it in place.
- Reconnect the Negative Battery Cable: Reconnect the negative battery cable.
- Prime the Fuel System: Turn the ignition key to the "on" position (but don't start the engine) for a few seconds to allow the fuel pump to prime the fuel system. Do this several times.
- Start the Engine: Start the engine and check for any fuel leaks. Let the engine run for a few minutes and monitor the fuel gauge. It should now be reading accurately.
- Check for DTCs: Use an OBD-II scanner to clear any trouble codes that may have been triggered during the replacement process.
Important Notes:
- Always replace the fuel pump assembly with a high-quality aftermarket or OEM part.
- When installing the new fuel pump assembly, make sure the fuel lines are not kinked or twisted.
- If you're not comfortable performing this repair yourself, it's best to take your vehicle to a qualified mechanic.
By following these steps, you should be able to successfully troubleshoot and replace the fuel level sensor in your 2005 Nissan Altima. Good luck, and happy wrenching!