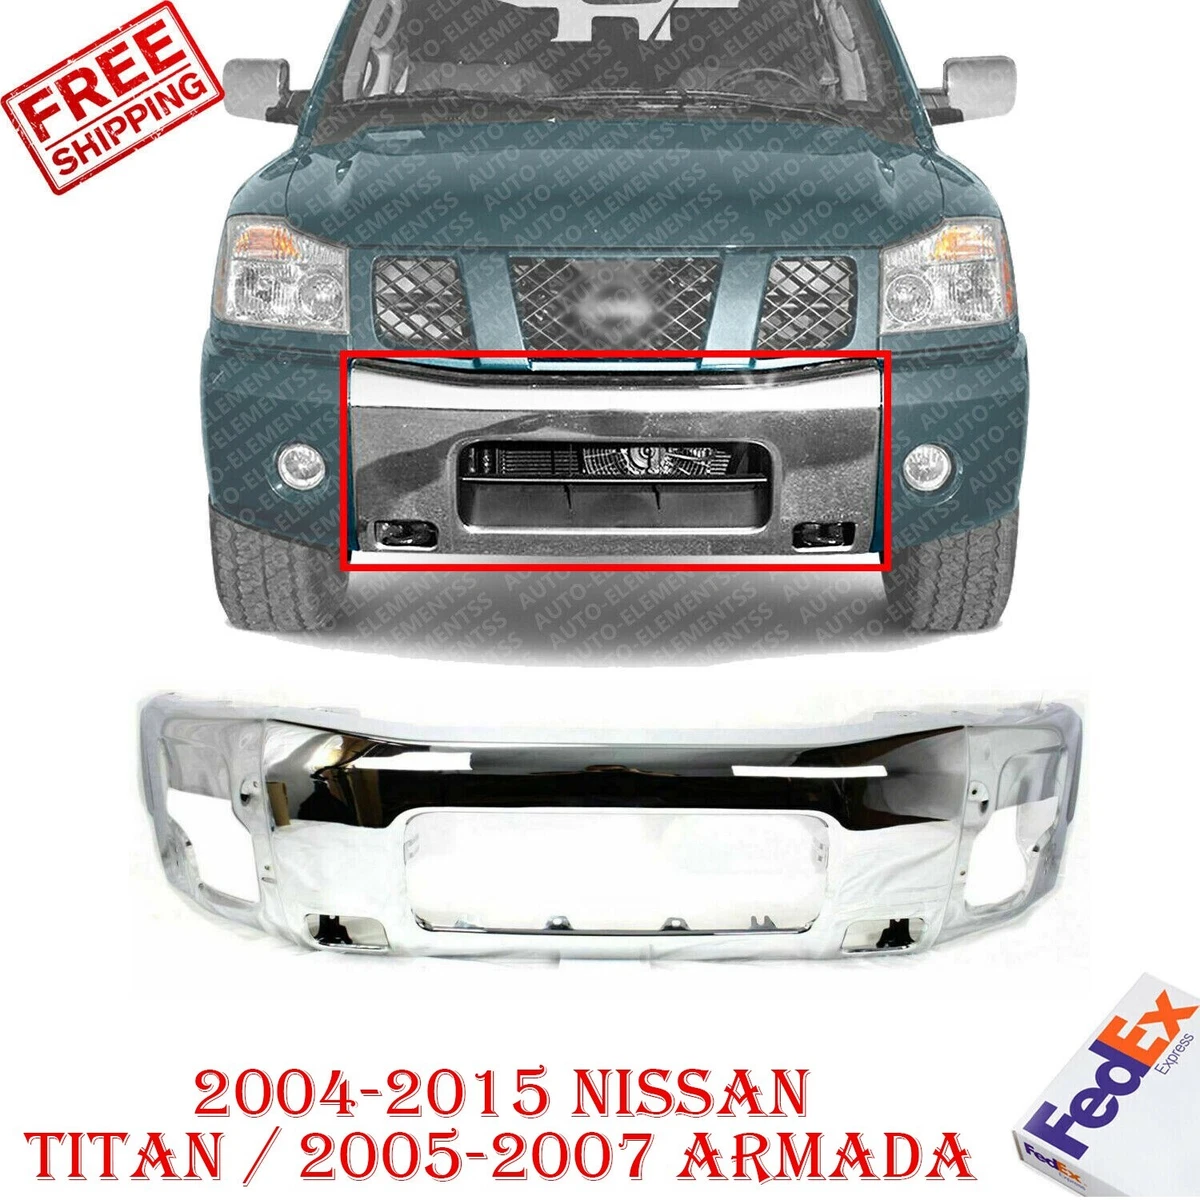
2005 Nissan Titan Front Bumper Assembly
Alright, let's dive into the 2005 Nissan Titan front bumper assembly. This guide is aimed at experienced DIYers who aren't afraid to get their hands dirty and want to understand the ins and outs of their truck's front end. We'll cover everything from component identification to removal and reinstallation, touching on torque specs and potential pitfalls along the way.
Understanding the 2005 Titan Front Bumper Assembly
The 2005 Nissan Titan front bumper isn't just a cosmetic piece; it's a critical safety component designed to absorb impact and protect vital vehicle parts in a collision. Understanding its construction will make any repair or modification process smoother.
The assembly typically comprises the following primary components:
- Bumper Cover: This is the outermost, usually painted, plastic or composite shell that provides the aesthetic appeal. It's designed to deform under impact.
- Bumper Reinforcement Bar: Located behind the cover, this is a strong, usually steel, beam that absorbs the brunt of an impact. It's bolted directly to the truck's frame.
- Bumper Brackets (or Mounting Brackets): These connect the reinforcement bar to the frame. They’re designed to be sacrificial in a collision, bending or breaking to further absorb energy. They're often called "energy absorbers" in more technical contexts.
- Fog Lights (Optional): Many Titans came equipped with fog lights integrated into the bumper cover.
- Valance (or Air Dam): Located below the bumper, the valance improves aerodynamics and directs airflow under the vehicle.
- Hardware: This includes bolts, nuts, clips, and fasteners of various sizes and materials. Knowing the correct torque specifications for these is crucial.
Tools and Materials Required
Before you begin, gather the necessary tools and materials. Having everything on hand will prevent frustration and delays.
- Socket Set: A metric socket set is essential. Sizes 10mm, 12mm, 14mm, 17mm, and 19mm are commonly used.
- Wrench Set: A matching metric wrench set for tightening nuts in hard-to-reach places.
- Torque Wrench: Absolutely crucial for tightening bolts to the correct specifications. Under-torquing can lead to components loosening, while over-torquing can strip threads or damage the parts.
- Screwdrivers: Both flathead and Phillips head screwdrivers will be needed for removing clips and fasteners.
- Pliers: For removing stubborn clips.
- Penetrating Oil: For loosening rusted bolts.
- Jack and Jack Stands: For safely lifting and supporting the vehicle if needed, especially when accessing lower mounting points.
- Wheel Chocks: To secure the rear wheels and prevent rolling.
- Gloves: To protect your hands.
- Safety Glasses: To protect your eyes.
- Plastic Trim Removal Tools: These are designed to remove plastic clips and fasteners without damaging the bumper cover or other components.
- Replacement Parts (if necessary): Bumper cover, reinforcement bar, brackets, fog lights, etc. Order these ahead of time to avoid delays.
- Painter's Tape (Optional): To protect the paint around the bumper during removal.
Removal Procedure
Let's get to the meat of the process: removing the bumper. Always prioritize safety; ensure the vehicle is properly supported before crawling underneath.
- Preparation: Engage the parking brake, chock the rear wheels, and disconnect the negative battery cable to prevent accidental electrical shorts.
- Disconnect Fog Lights (If Equipped): Locate the electrical connectors for the fog lights. These are usually found on the back of the fog light housings. Disconnect them carefully, pressing the release tab on the connector. Never pull on the wires themselves.
- Remove the Valance: The valance is typically attached with screws or plastic clips. Use a screwdriver or trim removal tool to carefully detach it. Start from one side and work your way across.
- Locate and Remove Mounting Bolts: The bumper is attached to the frame with several bolts, typically located on the bumper brackets. You'll usually find bolts on the top, bottom, and sides of the brackets. Spray the bolts with penetrating oil and let it soak in for a few minutes before attempting to loosen them.
- Support the Bumper: As you remove the last few bolts, have a helper support the bumper to prevent it from falling. These bumpers can be surprisingly heavy.
- Carefully Remove the Bumper: Once all the bolts are removed, carefully lift the bumper assembly away from the vehicle. Be mindful of any remaining wiring or hoses that might be attached.
- Inspect Components: Once the bumper is removed, inspect the reinforcement bar, brackets, and other components for damage. Replace any parts that are bent, cracked, or rusted. This is a good time to check the frame horns (the protruding ends of the frame that the bumper brackets bolt to) for any signs of damage or misalignment.
Reinstallation Procedure
Reinstallation is essentially the reverse of removal. However, paying attention to details and torque specifications is crucial for a safe and secure installation.
- Prepare Mounting Surfaces: Clean the mounting surfaces on the frame and bumper brackets. Remove any rust or debris.
- Position the Bumper: With the help of a partner, carefully position the bumper assembly in front of the vehicle.
- Install Mounting Bolts: Align the bumper brackets with the mounting holes on the frame. Install the bolts, but don't tighten them completely yet.
- Torque Bolts to Specification: Consult a repair manual or online resource for the correct torque specifications for the bumper mounting bolts. Use a torque wrench to tighten the bolts in a star pattern. This ensures even pressure and prevents distortion. Improperly torqued bolts are a major safety hazard. A common torque specification for the Titan bumper bolts is around 60-80 ft-lbs, but always verify the correct value for your specific year and model.
- Reinstall the Valance: Attach the valance to the bumper using the original screws or clips.
- Reconnect Fog Lights: Reconnect the electrical connectors for the fog lights. Make sure they are securely connected and that the locking tabs are engaged.
- Test Fog Lights: Turn on the headlights and fog lights to verify that they are working properly.
- Double-Check: Give everything a final visual inspection to ensure that all bolts are tightened, connections are secure, and all components are properly installed.
- Reconnect Battery: Reconnect the negative battery cable.
Common Issues and Troubleshooting
Here are some common issues you might encounter and how to address them:
- Rusted Bolts: Rusted bolts can be extremely difficult to remove. Apply penetrating oil liberally and let it soak in for several hours or even overnight. If the bolt still won't budge, you may need to use a bolt extractor or heat. Be careful when using heat, as you could damage surrounding components.
- Stripped Threads: If you strip the threads on a bolt or mounting hole, you may need to use a thread repair kit (e.g., Heli-Coil) or replace the damaged component.
- Broken Clips: Plastic clips can become brittle and break, especially in cold weather. Have a supply of replacement clips on hand.
- Misalignment: If the bumper is not properly aligned after installation, loosen the mounting bolts slightly and adjust the bumper until it is aligned. Then, retorque the bolts to specification.
- Fog Lights Not Working: If the fog lights are not working after reinstallation, check the fuses and wiring. Make sure the bulbs are good and that the connectors are securely connected.
Modifications and Upgrades
Many Titan owners choose to modify or upgrade their front bumpers. Here are a few common options:
- Aftermarket Bumpers: Heavy-duty steel bumpers offer increased protection and a more aggressive look. They often include features like winch mounts and integrated lighting.
- Light Bars: Adding a light bar to the front bumper can significantly improve visibility in off-road conditions.
- Bumper Caps/End Caps: These can be used to cover damaged or rusted areas of the bumper or to give the bumper a more finished look.
- Custom Paint/Coatings: You can customize the look of your bumper with a custom paint job or powder coating.
Remember to consider the impact of any modifications on vehicle safety and legality. Some modifications may require professional installation.
Disclaimer: This guide is for informational purposes only. Always consult a qualified mechanic if you are unsure about any aspect of the repair or modification process. Working on vehicles can be dangerous, so take all necessary safety precautions. The author and publisher are not responsible for any damages or injuries that may result from following this guide.
With patience, the right tools, and a good understanding of the process, you can successfully remove and reinstall your 2005 Nissan Titan front bumper. Good luck!