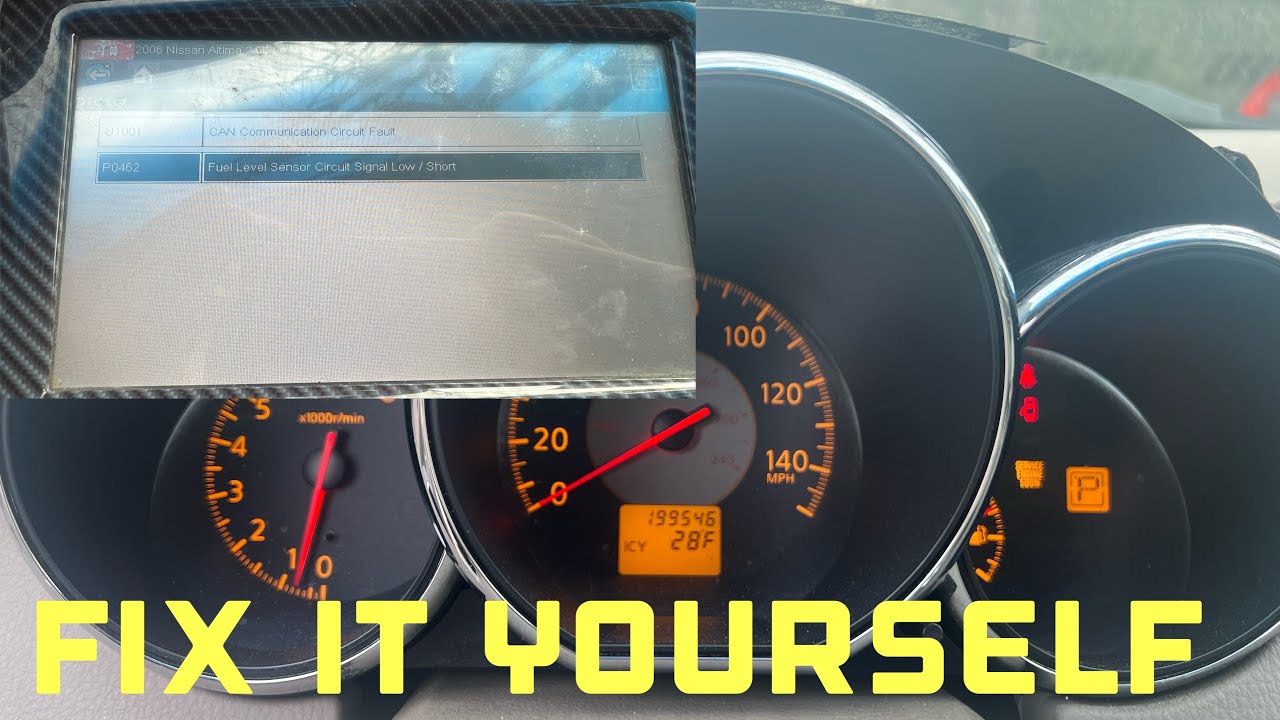
2006 Nissan Altima Fuel Gauge Not Working
Alright, so your 2006 Nissan Altima's fuel gauge is acting up. Annoying, right? A faulty fuel gauge can leave you stranded, so let's dive into diagnosing and (hopefully) fixing the problem. This article aims to guide you through the common culprits, diagnostic steps, and potential solutions, assuming you have some basic automotive knowledge and tools.
Understanding the System
Before we start poking around, let's briefly understand how the fuel gauge system works. It's a pretty simple system, really, but several components can fail.
Key Components:
- Fuel Level Sensor (Sending Unit): This is the heart of the system. It's located inside the fuel tank and consists of a float attached to a variable resistor (also known as a potentiometer). As the fuel level changes, the float moves, changing the resistance.
- Wiring Harness: This connects the fuel level sensor to the instrument cluster. Damaged or corroded wiring can interrupt the signal.
- Instrument Cluster (Gauge): This receives the resistance signal from the fuel level sensor and displays the fuel level on the gauge. The cluster also contains the circuitry to power the system.
- Fuel Pump: While not directly part of the gauge circuit, a failing fuel pump *can* sometimes mimic fuel gauge issues (though this is rarer). It's a consideration for *rule-out diagnosis*.
The fuel gauge operation is as follows: The fuel level sensor, through the potentiometer, creates a variable resistance. This resistance changes proportionally to the level of fuel. This resistance is fed through the wiring harness, to the instrument cluster. The instrument cluster sees the changes in resistance and moves the needle on the fuel gauge to reflect a certain amount of fuel in the tank.
Common Causes and Troubleshooting Steps
Now let's get into the nitty-gritty. Here are the most frequent causes of a fuel gauge malfunction in your 2006 Altima, along with detailed troubleshooting steps.
1. Faulty Fuel Level Sensor
This is the most common culprit. The sensor itself can fail electrically, or the float can become damaged or detached. Here's how to check it:
- Access the Fuel Tank: This usually involves removing the rear seat cushion (often held in place by clips or bolts) and then an access panel. Be careful, as fuel vapor can be present. Disconnect the negative battery terminal before proceeding further.
- Locate the Fuel Level Sensor Connector: It's typically a multi-pin connector on top of the fuel tank, connected to the fuel pump assembly.
- Inspect the Connector: Look for corrosion, damaged wires, or loose connections. Clean the connector with electrical contact cleaner if necessary.
- Measure Resistance: With a multimeter set to measure resistance (Ohms - Ω), measure the resistance across the appropriate terminals of the fuel level sensor. You'll need a wiring diagram for your 2006 Altima to identify the correct terminals (available online or in a repair manual like Haynes or Chilton). With the tank full, you should see a low resistance value. With the tank empty, you should see a high resistance value. As you manually move the float arm, the resistance should change smoothly.
- Interpretation:
- No Resistance or Open Circuit: Indicates a broken sensor or wiring. Replace the fuel level sensor.
- Constant Resistance (regardless of float position): Indicates a faulty sensor. Replace the fuel level sensor.
- Erratic or Jumping Resistance: Indicates a worn-out sensor. Replace the fuel level sensor.
- Resistance Within Expected Range, but Still No Gauge Reading: The problem lies elsewhere, like wiring or the instrument cluster.
- Replacement: If the sensor is faulty, replace the entire fuel pump assembly or just the fuel level sensor, depending on what is available. Sometimes it's only available as a unit. Be *extremely* careful handling fuel and avoid any sparks or open flames. Use new fuel tank seals when reassembling.
Important Safety Note: Fuel is highly flammable. Work in a well-ventilated area, wear safety glasses and gloves, and have a fire extinguisher nearby. Avoid smoking or using any devices that could create a spark.
2. Wiring Problems
A break in the wiring between the fuel level sensor and the instrument cluster can also cause the gauge to fail. This includes short circuits and opens in the wiring.
- Visual Inspection: Carefully inspect the wiring harness running from the fuel tank to the instrument cluster. Look for chafing, cuts, crimps, or corrosion. Pay particular attention to areas where the harness is routed near sharp edges or moving parts.
- Continuity Test: Using a multimeter set to measure continuity, check the continuity of each wire in the circuit. Again, you'll need a wiring diagram to identify the correct wires. Disconnect the battery and the connectors at both ends of the circuit before performing this test. Continuity means a complete circuit, indicating an unbroken wire. No continuity means a break in the wire.
- Short to Ground Test: Use a multimeter to check for a short circuit to ground. With the connector disconnected from the fuel level sensor and instrument cluster, measure the resistance between each wire in the circuit and a known good ground (e.g., the vehicle chassis). A low resistance reading indicates a short to ground.
- Repairing Wiring: Repair any damaged wiring by splicing in new sections of wire using appropriate connectors. Ensure the connections are secure and weatherproofed. Use heat shrink tubing to protect the splices from corrosion.
3. Instrument Cluster Issues
While less common than sensor or wiring problems, the instrument cluster itself can be faulty. This is usually the most difficult and expensive issue to resolve.
- Check for Other Gauge Problems: Are other gauges (e.g., temperature, speedometer) also malfunctioning? If so, it strongly suggests a problem with the cluster itself.
- Self-Test (if applicable): Some vehicles have a built-in instrument cluster self-test. Consult your owner's manual or a repair manual for instructions on how to activate it. This test will cycle through all the gauges and lights to check for proper operation.
- Visual Inspection: Remove the instrument cluster and inspect the circuit board for any signs of damage, such as burnt components, cracked solder joints, or corrosion.
- Signal Check (advanced): Using a multimeter, check for the presence of the correct signals at the instrument cluster connector. You'll need a wiring diagram and the pinout for the connector. This requires more advanced troubleshooting skills.
- Professional Diagnosis: If you suspect a cluster issue but can't diagnose it yourself, take the vehicle to a qualified mechanic or an auto electronics specialist. They have the tools and expertise to diagnose and repair instrument cluster problems.
- Replacement/Repair: Instrument clusters can sometimes be repaired, but often they need to be replaced. A new or remanufactured cluster will need to be programmed to your vehicle's VIN (Vehicle Identification Number) by a dealer or qualified mechanic.
4. Fuel Pump Issues (Rare, but Possible)
A failing fuel pump can sometimes indirectly cause fuel gauge issues. This is usually because the fuel level sensor is integrated with the fuel pump assembly.
- Monitor Fuel Pressure: Use a fuel pressure gauge to check the fuel pressure at the fuel rail. A weak or erratic fuel pump can cause inaccurate fuel level readings.
- Listen for Noises: A failing fuel pump may make whining or buzzing noises, especially when the fuel level is low.
- Stalling or Hesitation: If the engine is stalling or hesitating, especially under acceleration, it could be a sign of a failing fuel pump.
- Replace Fuel Pump (if necessary): If you suspect a faulty fuel pump, replace it with a new or remanufactured unit. Be sure to follow the manufacturer's instructions carefully.
Tools You'll Need
- Multimeter
- Socket set and wrenches
- Screwdrivers (Phillips and flathead)
- Wiring diagram for your 2006 Nissan Altima
- Electrical contact cleaner
- Wire stripper and crimper
- Heat shrink tubing
- Fuel pressure gauge (optional)
- Safety glasses and gloves
Final Thoughts
Troubleshooting a fuel gauge issue can be challenging, but with a systematic approach and the right tools, you can often diagnose and fix the problem yourself. Remember to always prioritize safety when working with fuel. If you're uncomfortable with any of these procedures, it's best to take your vehicle to a qualified mechanic. Good luck!