2006 Nissan Pathfinder Heater Hose Diagram
Okay, let's talk about the heater hoses on your 2006 Nissan Pathfinder. A malfunctioning heater can be a real pain, especially during those cold months. Understanding the heater hose routing and the components involved is crucial for diagnosing and repairing issues. This guide will walk you through the system, focusing on the hose diagram, common problems, and troubleshooting tips. We'll assume you have some basic mechanical knowledge and are comfortable working on your vehicle. Always remember to prioritize safety – disconnect the negative battery terminal before starting any work and wear appropriate safety gear.
Understanding the Heater System
Before diving into the diagram, let's briefly recap how the heater system works. The engine produces a lot of heat as a byproduct of combustion. The cooling system, including the radiator and coolant, circulates this heat to prevent the engine from overheating. The heater system taps into this circulating hot coolant and uses it to warm the cabin air.
The key components include:
- Engine Coolant: The lifeblood of the system, carrying heat from the engine.
- Heater Core: A small radiator-like component located inside the dashboard. Hot coolant flows through it, transferring heat to the air passing over its fins.
- Heater Hoses: These hoses carry the hot coolant from the engine to the heater core and back.
- Heater Control Valve (If Equipped): Some models use a valve to regulate the flow of coolant to the heater core, controlling the heat output. The 2006 Pathfinder *typically* does not have a mechanically actuated valve; instead, it relies on blending air from the evaporator core and the heater core to achieve the desired temperature.
- Blower Motor: Pushes air across the heater core to warm it, then directs that warm air into the cabin via the vents.
- Temperature Blend Door: Controls the ratio of hot air (from the heater core) and cold air (potentially from the A/C evaporator) that enters the cabin.
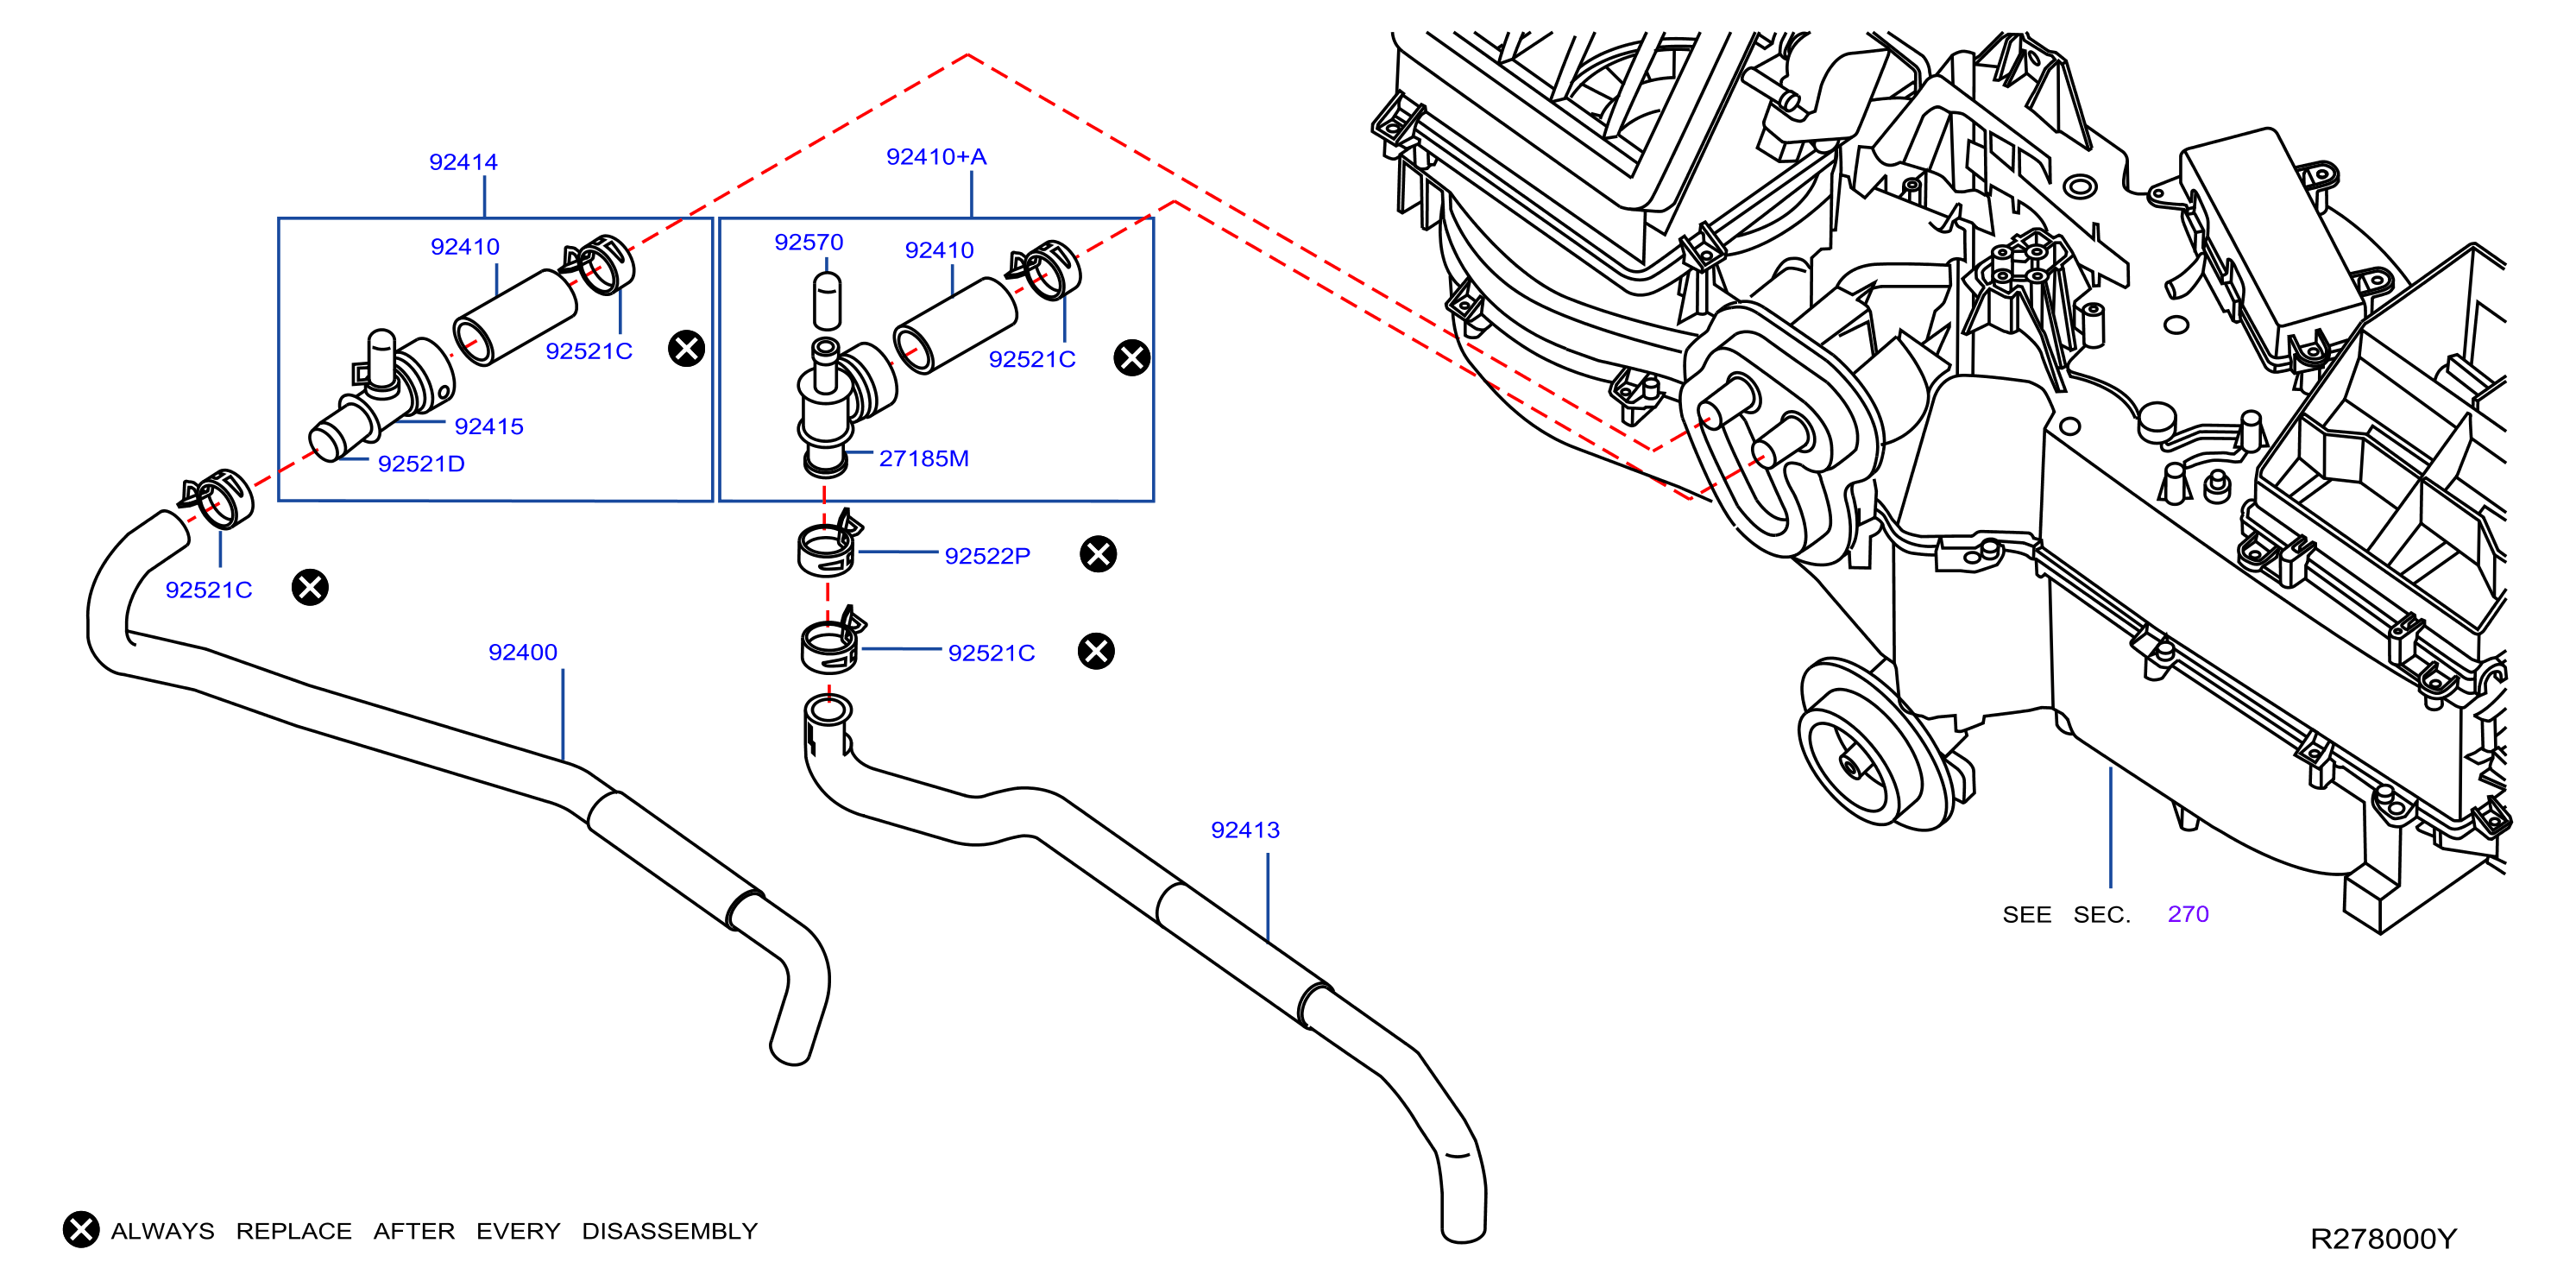
2006 Nissan Pathfinder Heater Hose Diagram and Routing
The heater hose routing on the 2006 Pathfinder is relatively straightforward. You'll find two hoses connected to the heater core pipes protruding from the firewall (the metal barrier separating the engine compartment from the passenger cabin). These hoses are typically around ¾ inch in diameter.
Here's a breakdown of the general routing. Keep in mind that slight variations might exist depending on your specific trim level and options, but the fundamental principles remain the same:
Hose 1 (Heater Inlet Hose): This hose carries hot coolant *from* the engine *to* the heater core. It usually originates from a fitting on the engine block or the cylinder head. The exact location can vary. Common locations are near the thermostat housing or the rear of the engine, depending on the engine configuration (VQ40DE engine is most common in the 2006 Pathfinder). It's crucial to identify which hose is the inlet because incorrect connection can lead to inefficient heating or even damage to the heater core.
Hose 2 (Heater Outlet Hose): This hose returns the coolant *from* the heater core *back* to the engine's cooling system. It typically connects to a fitting on the engine block, the water pump, or the radiator. The radiator connection usually is near the bottom of the radiator, allowing the cooler coolant to re-enter the engine for recirculation.
Visual Inspection is Key: Always visually inspect the hoses and fittings for signs of wear and tear, leaks, or corrosion. Look for bulges, cracks, or soft spots in the hoses. These are telltale signs that the hose is nearing the end of its life and needs replacement. Also, check the hose clamps for tightness and corrosion. Loose or corroded clamps can lead to coolant leaks. A white powdery residue near the hose connections is a sign of a slow coolant leak.
While a precise diagram is best visualized, it's difficult to represent perfectly in text. However, here's a conceptual representation. Imagine looking at the engine bay from the front:
[Firewall]
| [Heater Core Pipes]
| / \
| / \
[Hose 1] [Hose 2]
| |
| |
[Engine (Coolant Ports)]
Important Note: Refer to your vehicle's specific repair manual or a reliable online database (like Alldata or Mitchell OnDemand) for the *exact* routing diagram specific to your VIN. These resources provide detailed illustrations and connection points, which are far more accurate than a general description.
Common Problems and Troubleshooting
Several issues can affect the heater system in your 2006 Pathfinder. Here are some common problems and troubleshooting tips:
- No Heat: This is the most common complaint.
- Low Coolant Level: The most frequent cause. Check the coolant level in the radiator and overflow tank. Never open the radiator cap when the engine is hot! Add coolant as needed, but also investigate the cause of the coolant loss (leaks).
- Air Lock in the System: Air trapped in the cooling system can prevent proper coolant circulation. Bleed the system by using the bleeder valve (if equipped) or by carefully opening the radiator cap (when *cool*) to release trapped air. The 2006 Pathfinder can be a bit difficult to bleed the air completely. Proper bleeding procedures are crucial.
- Clogged Heater Core: Debris or rust can accumulate in the heater core, restricting coolant flow. Flushing the heater core can sometimes resolve this issue. Disconnect the heater hoses at the firewall and use a garden hose (with low pressure) to flush the core in both directions.
- Faulty Thermostat: A stuck-open thermostat can prevent the engine from reaching its operating temperature, resulting in insufficient heat.
- Blend Door Actuator Failure: If the blend door actuator is faulty, it might not be properly mixing hot and cold air, resulting in cold or lukewarm air. Diagnostics may require an OBDII scanner capable of reading body control module (BCM) data.
- Leaking Heater Hoses: Check the hoses for cracks, bulges, or leaks. Replace damaged hoses immediately. Coolant leaks can lead to overheating and engine damage.
- Overheating: While less common, a severely clogged heater core *could* contribute to overheating, though this is usually caused by other cooling system issues like a faulty water pump, radiator blockage, or thermostat failure.
- Coolant Smell Inside the Cabin: This is a strong indicator of a leaking heater core. This will likely require replacement of the heater core, which is a significant undertaking as it requires removing the dashboard.
Replacing Heater Hoses
If you determine that a heater hose needs replacement, here's a general overview of the process:
- Gather Your Tools and Supplies: You'll need new heater hoses (make sure they're the correct diameter and length), hose clamps, a screwdriver or pliers for removing the old clamps, a drain pan to catch coolant, and a wrench for removing any fittings.
- Drain Coolant (Partially): You don't need to drain the entire cooling system, but draining enough coolant to lower the level below the heater hose connections will prevent a mess. Locate the radiator drain cock (usually at the bottom of the radiator) and open it to drain the coolant into a drain pan.
- Remove the Old Hose: Loosen the hose clamps on the old hose and carefully remove it from the fittings. Be prepared for some residual coolant to spill.
- Install the New Hose: Slide the new hose onto the fittings and secure it with new hose clamps. Make sure the hose is fully seated on the fittings and that the clamps are tightened securely, but don't overtighten them, as this can damage the hose.
- Refill the Cooling System: Add coolant to the radiator and overflow tank to the proper levels.
- Bleed the Cooling System: As mentioned earlier, bleeding the cooling system is crucial to remove any trapped air.
- Check for Leaks: Start the engine and let it warm up. Check for any coolant leaks around the new hose connections.
Safety First!
Working on your car can be rewarding, but it's essential to prioritize safety. Always wear safety glasses and gloves when working with coolant. Coolant is toxic and can irritate the skin. If you're not comfortable performing any of these tasks, it's best to consult a qualified mechanic. Working on your vehicle's cooling system can be tricky, and improper repairs can lead to serious engine damage.