2007 Nissan Frontier Headlight Bulb
If you're experiencing dim or non-functioning headlights on your 2007 Nissan Frontier, a likely culprit is a burned-out headlight bulb. Replacing a headlight bulb is a relatively straightforward DIY project that can save you money compared to taking it to a mechanic. This guide will walk you through everything you need to know about replacing the 2007 Nissan Frontier headlight bulb, from identifying the correct bulb type to step-by-step instructions and troubleshooting tips.
Identifying the Correct 2007 Nissan Frontier Headlight Bulb
Before you even think about touching your vehicle, it's crucial to determine the correct headlight bulb type for your 2007 Nissan Frontier. Using the wrong bulb can result in poor visibility, damage to your headlight assembly, or even electrical issues. Thankfully, finding the right bulb is relatively easy.
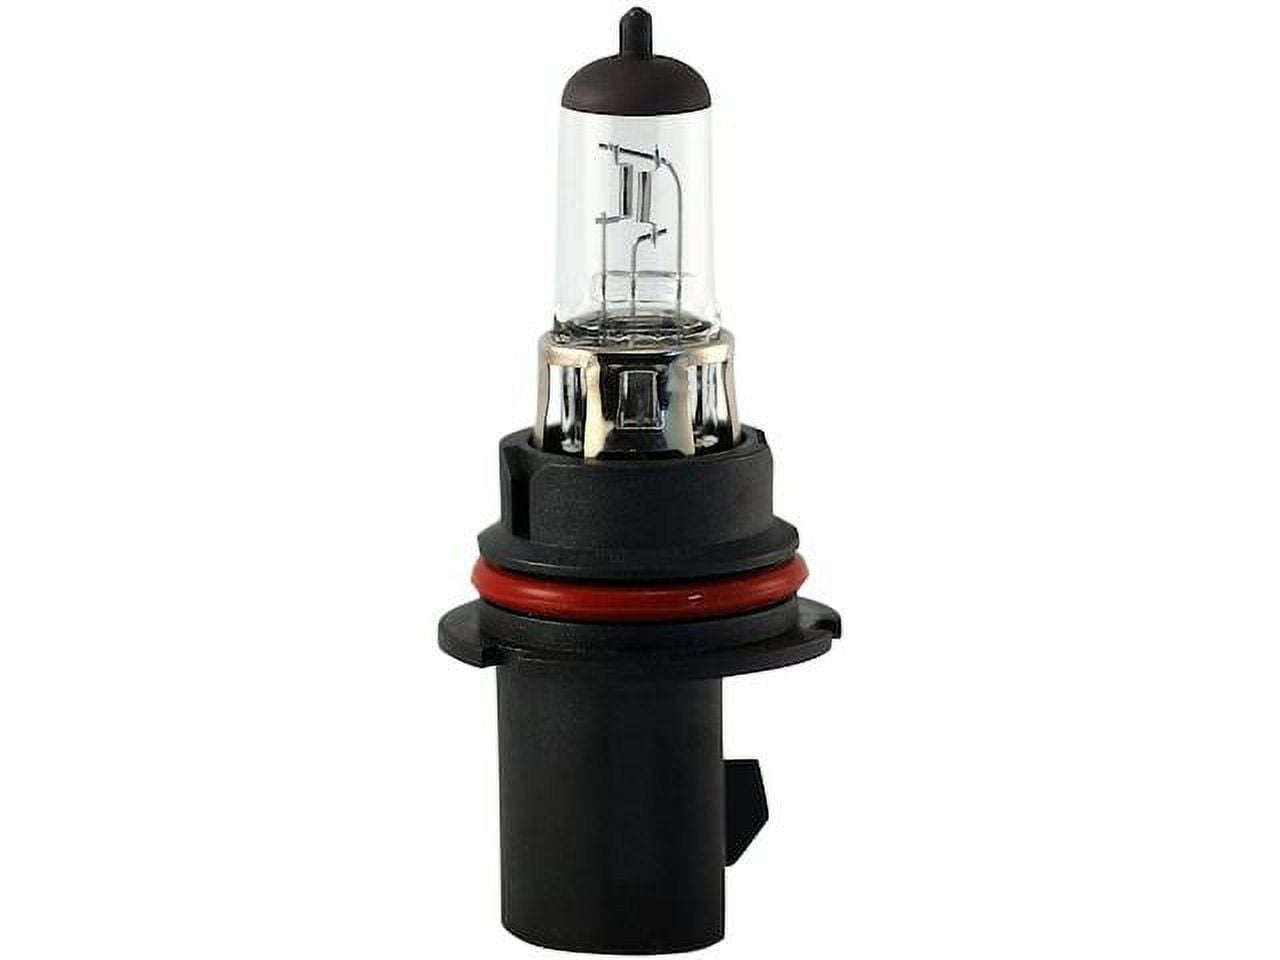
The 2007 Nissan Frontier typically uses an H4 (9003) bulb for the high and low beams. This is a dual-filament bulb, meaning it contains both the high and low beam functions within a single bulb. However, it's always a good idea to double-check to be absolutely certain. Here are a few ways to confirm the correct bulb type:
- Consult Your Owner's Manual: The owner's manual is the definitive source for information about your vehicle, including the correct bulb types. Look for the section on exterior lights or headlight bulb replacement.
- Check the Existing Bulb: Carefully remove the existing headlight bulb (following the safety precautions outlined later) and examine it. The bulb type should be printed directly on the base of the bulb.
- Use an Online Bulb Finder: Many automotive parts retailers, such as AutoZone, Advance Auto Parts, and O'Reilly Auto Parts, offer online bulb finders. Simply enter your vehicle's year, make, and model, and the tool will provide a list of compatible bulbs.
- Visit a Local Auto Parts Store: A knowledgeable parts specialist at your local auto parts store can assist you in finding the correct bulb for your 2007 Nissan Frontier.
Once you've confirmed the bulb type, you can choose from a variety of brands and styles. Options range from standard halogen bulbs to brighter halogen bulbs and even LED headlight conversions (though these may require additional modifications). Consider your budget and desired light output when making your selection.
Tools and Materials Needed for Headlight Bulb Replacement
Replacing a 2007 Nissan Frontier headlight bulb is a relatively simple process, but it's essential to have the right tools and materials on hand. Here's a list of what you'll need:
- New H4 (9003) Headlight Bulb(s): Purchase a replacement bulb(s) from a reputable brand. Consider replacing both bulbs at the same time, even if only one has burned out, to ensure even light output and avoid having to replace the other bulb soon after.
- Gloves: Wearing gloves, preferably latex or nitrile, is crucial to protect the new bulb from oils on your skin. These oils can create hotspots on the bulb and significantly shorten its lifespan.
- Screwdriver (Possibly): Depending on the design of your Frontier's headlight housing, you might need a screwdriver (Phillips or flathead) to remove any retaining clips or covers.
- Socket Wrench (Possibly): Some models may require a socket wrench to remove the headlight assembly.
- Flashlight or Headlamp: Adequate lighting is essential, especially if you're working in a dimly lit garage or at night.
- Clean Rag or Paper Towels: To wipe off any dirt or debris from the headlight assembly.
Step-by-Step Guide to Replacing the 2007 Nissan Frontier Headlight Bulb
Now that you have the correct bulb and the necessary tools, you can begin the replacement process. Follow these step-by-step instructions carefully:
- Safety First! Park your 2007 Nissan Frontier on a level surface, turn off the engine, and engage the parking brake. Let the engine cool down completely before starting the replacement process. Disconnect the negative terminal of the battery for added safety (optional, but recommended).
- Access the Headlight Assembly: Open the hood of your vehicle. Locate the headlight assembly on the side with the burned-out bulb. Depending on the model year and trim level, you may need to remove a plastic cover or retaining clips to access the back of the headlight assembly. Consult your owner's manual for specific instructions on accessing the headlight assembly.
- Disconnect the Electrical Connector: Locate the electrical connector that is attached to the back of the headlight bulb. Gently squeeze the connector's release clip and pull the connector straight off the bulb. Do not pull on the wires.
- Remove the Old Headlight Bulb: Once the electrical connector is disconnected, you can remove the old headlight bulb. Depending on the headlight assembly design, the bulb may be held in place by a retaining clip or a rotating collar.
- Retaining Clip: If a retaining clip is present, carefully unclip it. Usually, you'll need to press down and move the clip to the side to release it. Be careful not to bend or break the clip.
- Rotating Collar: If the bulb is held in place by a rotating collar, turn the collar counterclockwise to release the bulb.
- Remove the Old Bulb Carefully: Once the retaining mechanism is released, gently pull the old bulb straight out of the headlight assembly.
- Install the New Headlight Bulb: Now, take your new H4 (9003) headlight bulb, being extremely careful not to touch the glass portion of the bulb with your bare hands. Use gloves to handle the bulb. Align the bulb's tabs with the corresponding slots in the headlight assembly. Push the bulb straight in until it is fully seated.
- Secure the Headlight Bulb: Re-secure the bulb using the retaining clip or rotating collar. Make sure the bulb is firmly in place.
- Retaining Clip: Reattach the retaining clip, ensuring it's properly secured.
- Rotating Collar: Rotate the collar clockwise to lock the bulb in place.
- Reconnect the Electrical Connector: Reconnect the electrical connector to the back of the new headlight bulb. Make sure it clicks securely into place.
- Test the New Headlight Bulb: Before reassembling everything, turn on your vehicle's headlights to ensure the new bulb is working properly. Test both the low and high beams.
- Reassemble the Headlight Assembly: If the new headlight bulb is working correctly, reassemble the headlight assembly by replacing any covers or retaining clips that you removed earlier.
- Repeat for the Other Side (Optional but Recommended): If you are replacing only one bulb, consider replacing the other bulb as well to ensure even light output and avoid having to replace it soon after.
- Reconnect the Battery (If Disconnected): If you disconnected the negative terminal of the battery, reconnect it now.
Troubleshooting Common Issues
While replacing a 2007 Nissan Frontier headlight bulb is usually straightforward, you might encounter some common issues. Here's how to troubleshoot them:
- New Bulb Doesn't Work:
- Check the Connection: Ensure the electrical connector is securely attached to the bulb.
- Check the Bulb: Make sure you purchased the correct bulb type (H4/9003). Inspect the bulb for any damage.
- Check the Fuse: Locate the headlight fuse in your vehicle's fuse box (consult your owner's manual for the location). If the fuse is blown, replace it with a new one of the same amperage.
- Battery Connection: Ensure the battery terminals are clean and properly connected.
- Headlight is Dim:
- Check the Ground Connection: A poor ground connection can cause dim headlights. Check the ground wire for the headlight assembly and ensure it is securely attached to a clean metal surface.
- Voltage Drop: A voltage drop in the wiring harness can also cause dim headlights. Have a mechanic check the wiring for any issues.
- Difficulty Removing the Old Bulb:
- Inspect the Retaining Clip/Collar: Make sure you understand how the retaining clip or rotating collar works before attempting to remove the bulb. Refer to your owner's manual or search online for specific instructions.
- Apply Gentle Pressure: Avoid using excessive force, as this can damage the headlight assembly or the bulb.
Safety Precautions
Replacing a headlight bulb involves working with electrical components and fragile glass. It's crucial to take the following safety precautions:
- Work in a Well-Lit Area: Ensure you have adequate lighting to see what you're doing.
- Allow the Engine to Cool: Let the engine cool down completely before starting the replacement process to avoid burns.
- Disconnect the Battery (Optional but Recommended): Disconnecting the negative terminal of the battery will prevent any accidental electrical shocks.
- Wear Gloves: Always wear gloves to protect the new bulb from oils on your skin.
- Handle Bulbs Carefully: Headlight bulbs are fragile. Avoid dropping or bumping them.
- Dispose of Old Bulbs Properly: Headlight bulbs contain small amounts of mercury. Dispose of them properly at a designated recycling center.
Choosing the Right Replacement Bulb
As mentioned earlier, the 2007 Nissan Frontier uses an H4 (9003) bulb. Within this specification, you have several options to choose from:
- Standard Halogen Bulbs: These are the most common and affordable option. They provide adequate light output and have a relatively long lifespan.
- High-Performance Halogen Bulbs: These bulbs produce brighter light than standard halogen bulbs, improving visibility at night. However, they typically have a shorter lifespan.
- LED Headlight Bulbs: LED headlight bulbs offer several advantages, including brighter light, longer lifespan, and lower energy consumption. However, they can be more expensive and may require additional modifications to your headlight assembly. Ensure the LED bulb is specifically designed as a direct replacement for halogen bulbs in reflector housings for optimal beam pattern and to avoid blinding oncoming drivers.
When choosing a replacement bulb, consider your budget, desired light output, and the legal requirements in your area. Some areas have restrictions on the use of LED headlight bulbs in vehicles that were originally equipped with halogen bulbs. Always prioritize safety and ensure that your headlights meet all applicable regulations.
Conclusion
Replacing a 2007 Nissan Frontier headlight bulb is a straightforward DIY project that can save you money and improve your vehicle's safety. By following the steps outlined in this guide and taking the necessary safety precautions, you can easily replace your headlight bulb and get back on the road with confidence. Remember to always use the correct bulb type, handle the bulb with care, and test the new bulb before reassembling everything. If you encounter any difficulties, don't hesitate to consult a qualified mechanic.