2008 Nissan Altima Headlight Assembly
Alright, let's dive into the headlight assembly on the 2008 Nissan Altima. Whether you're troubleshooting a dim bulb, aiming your headlights, or even considering an upgrade, understanding the anatomy and operation of this critical component is essential. We'll cover everything from basic components to common problems and troubleshooting steps.
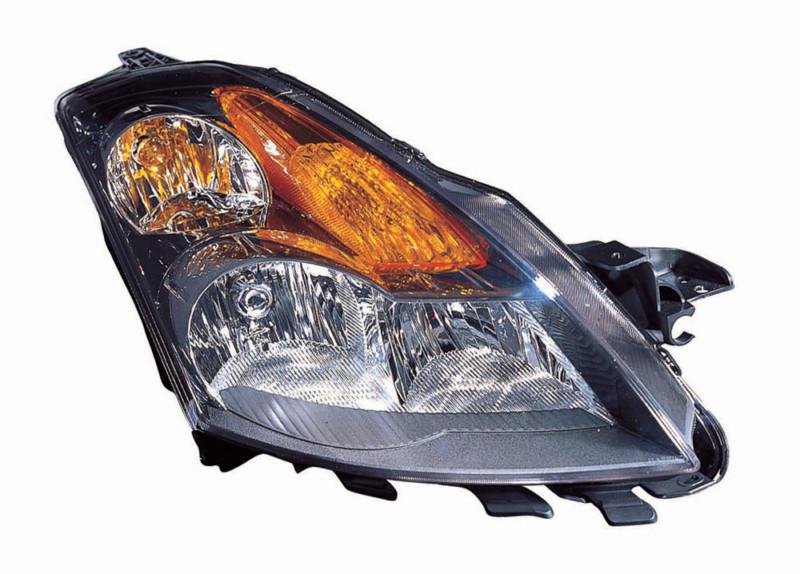
Headlight Assembly Overview
The 2008 Altima's headlight assembly isn't just about holding a bulb; it's a carefully engineered system designed for optimal light projection and driver safety. The assembly is typically comprised of these key components:
- Housing: This is the main body of the headlight, usually made of durable plastic. It provides structural support and protects the internal components from the elements.
- Lens: The clear or slightly tinted cover on the front of the assembly. Its primary function is to protect the bulb and reflector while allowing light to pass through with minimal distortion. Modern lenses are often made of polycarbonate plastic due to its impact resistance.
- Reflector: A highly polished, precisely shaped surface inside the housing. The reflector is designed to capture the light emitted by the bulb and focus it into a beam pattern. The design of the reflector dictates the shape and intensity of the light beam. Parabolic reflectors are common, but more complex designs are also used.
- Bulb(s): The light source. The 2008 Altima typically uses halogen bulbs for both high and low beams. The specific bulb type (e.g., H11, 9005) depends on the trim level and model year nuances.
- Adjusters: Screws or knobs that allow you to adjust the vertical and horizontal aiming of the headlight beam. Proper aiming is crucial for visibility and avoiding blinding oncoming drivers.
- Wiring and Connectors: These provide the electrical connection between the vehicle's wiring harness and the headlight bulb.
Bulb Types and Functionality
The 2008 Altima typically uses halogen bulbs. Understanding the difference between high and low beam bulbs is crucial for proper maintenance and replacement.
- Low Beam: Designed to provide adequate illumination of the road ahead without blinding oncoming drivers. Low beams have a specific cutoff point to prevent excessive glare.
- High Beam: Provides maximum illumination for increased visibility at night. High beams are brighter and project further than low beams, but should only be used when there are no oncoming vehicles.
Halogen bulbs work by passing electricity through a tungsten filament, which heats up and emits light. The filament is encased in a glass envelope filled with halogen gas, which helps to prolong the bulb's life and increase its light output. While generally reliable, halogen bulbs do burn out over time and need replacement. Keep in mind that handling halogen bulbs with bare hands can leave oil residue that shortens their lifespan; always use gloves or a clean cloth.
Common Problems and Troubleshooting
Here are some common issues you might encounter with your Altima's headlight assembly:
- Dim Headlights: This could be due to several factors:
- Aging Bulbs: Over time, halogen bulbs gradually lose their brightness. Replacing them is usually the first step.
- Oxidized Connectors: Corrosion on the electrical connectors can reduce the voltage reaching the bulb. Clean the connectors with electrical contact cleaner.
- Grounding Issues: A poor ground connection can also cause dim headlights. Check the ground wires connected to the headlight assembly and chassis. Use a multimeter to test for voltage drop across the ground wire.
A voltage drop of more than 0.5 volts indicates a problem with the ground circuit.
- Voltage Drop: Use a multimeter to measure the voltage at the headlight connector with the headlights on. Compare this reading to the voltage at the battery. A significant difference indicates a voltage drop in the wiring.
- Headlights Not Working: Start by checking the fuses related to the headlights in the fuse box (typically located in the engine compartment and/or under the dashboard). A blown fuse is a common culprit. If the fuse keeps blowing, there could be a short circuit in the wiring.
- Condensation Inside the Headlight: This is usually caused by a crack or leak in the headlight housing or a damaged seal around the bulb socket. Small amounts of condensation can sometimes clear up on their own, but significant moisture buildup can damage the bulb and reflector. Consider resealing the housing or replacing the entire assembly.
- Damaged Lens: Cracks, chips, or excessive clouding of the lens can reduce light output and compromise the appearance of your vehicle. Minor scratches can often be polished out, but more severe damage may require lens replacement or complete assembly replacement.
Aiming Your Headlights
Proper headlight aiming is crucial for safety and avoiding blinding other drivers. Here's a general procedure (consult your owner's manual for specific instructions):
- Park your vehicle on a level surface, facing a wall or garage door. Position the vehicle 25 feet away from the wall.
- Measure the distance from the ground to the center of your headlight bulb. Transfer this measurement to the wall, marking two horizontal lines (one for each headlight).
- Measure the distance between the center of your headlights. Transfer this measurement to the wall, marking two vertical lines.
- Turn on your low beams. Observe the beam pattern on the wall. The brightest part of the beam should be at or slightly below the horizontal line and to the right of the vertical line (for the passenger side headlight).
- Use the headlight adjusters (usually located on the back or side of the headlight assembly) to adjust the beam pattern as needed. Horizontal and vertical adjusters are usually separate. Turn the adjusters clockwise or counterclockwise to move the beam up/down or left/right.
Remember to consult your owner's manual for the specific aiming procedure and specifications for your 2008 Altima. Local regulations may also dictate specific aiming requirements.
Upgrading Your Headlights
Many Altima owners consider upgrading their headlights for improved visibility or aesthetics. Common upgrades include:
- High-Performance Halogen Bulbs: These bulbs offer increased brightness and a whiter light output compared to standard halogen bulbs. Ensure the wattage is compliant with your vehicle's specifications to avoid overloading the wiring.
- LED Headlight Bulbs: LED bulbs are more energy-efficient and longer-lasting than halogen bulbs. They also produce a brighter, more focused beam. However, compatibility can be an issue. Some LED bulbs may require additional adapters or resistors to function properly in the Altima's headlight system.
Ensure the LED bulb is specifically designed for headlight use and conforms to DOT standards.
- HID (High-Intensity Discharge) Conversion Kits: HID headlights produce a very bright, focused beam. However, HID conversion kits can be complex to install and may not be legal in all areas. Proper installation is crucial to avoid glare and ensure safety. HID systems require a ballast (a device that regulates the voltage to the bulb).
- Projector Headlights: Projector headlights use a lens to focus the light into a precise beam pattern. They offer superior light distribution and a more modern appearance. Aftermarket projector headlight assemblies are available for the 2008 Altima.
Before upgrading your headlights, research the available options and ensure compatibility with your vehicle. Pay close attention to DOT regulations and ensure that your chosen upgrade is legal and safe. Incorrectly installed or incompatible headlights can be a safety hazard.
Replacing the Headlight Assembly
Sometimes, damage to the headlight housing or lens necessitates replacing the entire assembly. Here's a general overview of the replacement process:
- Disconnect the battery: This is a crucial safety step to prevent electrical shocks.
- Remove the Grille/Bumper (if necessary): Depending on the design, you may need to remove the grille or bumper to access the headlight assembly mounting bolts. Consult your vehicle's repair manual for specific instructions.
- Disconnect the Wiring: Carefully disconnect the electrical connectors from the headlight assembly. Note the location of each connector for easy reassembly.
- Remove the Mounting Bolts: Locate and remove the bolts or screws that secure the headlight assembly to the vehicle's frame.
- Remove the Old Assembly: Carefully remove the old headlight assembly.
- Install the New Assembly: Align the new headlight assembly with the mounting points and secure it with the bolts or screws.
- Reconnect the Wiring: Reconnect the electrical connectors to the new headlight assembly.
- Reinstall the Grille/Bumper (if removed): Reinstall the grille or bumper, if necessary.
- Reconnect the Battery: Reconnect the battery.
- Test the Headlights: Turn on the headlights to ensure they are working properly.
- Aim the Headlights: Aim the headlights according to the procedure outlined earlier.
Always refer to your vehicle's repair manual for specific instructions and torque specifications.
Working on your Altima's headlight assembly can be a rewarding DIY project. By understanding the components, common issues, and troubleshooting steps, you can keep your headlights shining bright and stay safe on the road. Remember to always prioritize safety and consult your vehicle's repair manual for specific instructions. If you're unsure about any aspect of the repair, don't hesitate to seek professional assistance.