2009 Nissan Altima Ac Relay Location
If you're experiencing issues with your air conditioning in your 2009 Nissan Altima, a faulty AC relay might be the culprit. Locating and testing the AC relay is a crucial step in diagnosing and potentially resolving the problem yourself, saving you time and money. This article provides a comprehensive guide to help you find the AC relay location on a 2009 Nissan Altima and offers troubleshooting tips.
Understanding the AC System and the Relay's Role
Before diving into the location, let's quickly understand the function of the AC relay. The AC relay is an electromagnetic switch that controls the flow of electricity to the AC compressor. When you turn on your car's air conditioning, the car's computer sends a signal to the AC relay. The relay then closes the circuit, allowing power to flow to the AC compressor clutch, engaging the compressor and initiating the cooling process.
A malfunctioning AC relay can prevent the compressor from engaging, resulting in warm air blowing from your vents. Other potential issues caused by a bad relay include intermittent AC function, or the AC compressor clutch cycling on and off rapidly.
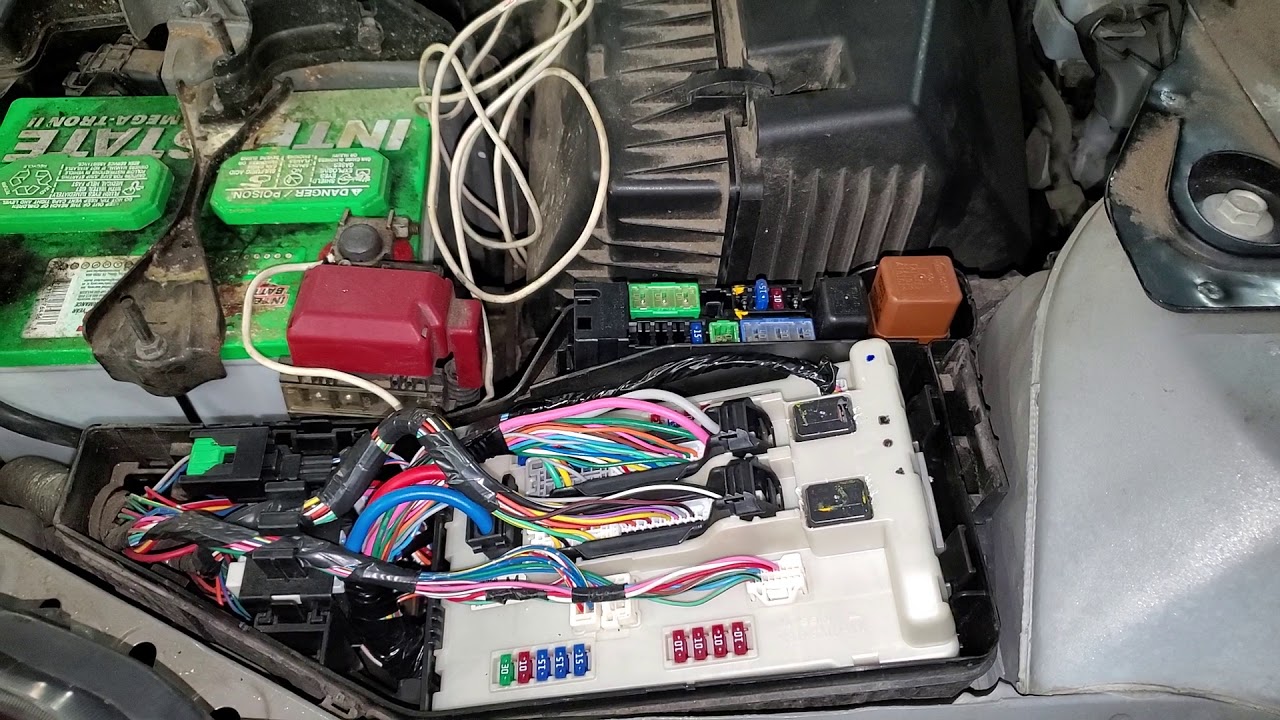
Locating the 2009 Nissan Altima AC Relay
The AC relay in a 2009 Nissan Altima is typically found in one of two locations, depending on the specific configuration of your vehicle. The most common locations are under the hood in a fuse and relay box or inside the vehicle, typically behind the glove compartment or near the driver's side kick panel.
Method 1: Checking the Under-Hood Fuse and Relay Box
The primary fuse and relay box is situated in the engine compartment, usually near the battery. Here's how to locate the AC relay in this box:
- Park your car on a level surface and turn off the engine. Ensure the engine is cool before working in the engine compartment.
- Open the hood. Secure the hood prop to prevent it from falling.
- Locate the fuse and relay box. It's usually a black plastic box with a removable cover.
- Remove the cover of the fuse and relay box. The cover typically has clips or latches that need to be released.
- Consult the fuse box diagram. The diagram is usually printed on the inside of the fuse box cover or in your owner's manual. The diagram will identify each relay and fuse. Look for the relay labeled "A/C Relay," "AC Compressor Relay," or a similar designation. It is crucial to consult the diagram to ensure you're identifying the correct relay.
- Identify the AC relay. Once you've found it on the diagram, locate the corresponding relay in the box.
Method 2: Checking the Interior Fuse and Relay Box
Some 2009 Nissan Altimas may have a secondary fuse and relay box located inside the passenger compartment. Here’s how to find the AC relay in this location:
- Park your car on a level surface and turn off the engine.
- Locate the interior fuse box. This is typically located behind the glove compartment or near the driver's side kick panel. You may need a screwdriver to remove a small access panel.
- Remove the fuse box cover.
- Consult the fuse box diagram. This diagram is often found on the inside of the cover or in your owner's manual. Look for the relay labeled "A/C Relay," "AC Compressor Relay," or a similar designation.
- Identify the AC relay. Once you've found it on the diagram, locate the corresponding relay in the box.
Important Note: Fuse box diagrams can vary slightly depending on the specific trim level and options package of your 2009 Nissan Altima. Always consult your owner's manual for the most accurate information. If you can't find your owner's manual, you can often download a digital copy from the Nissan website.
Identifying the AC Relay: Appearance and Markings
AC relays are generally small, cube-shaped components, typically black or gray in color. They have several pins on the bottom that plug into the relay socket. The relay should have markings indicating its voltage (usually 12V) and current rating.
Look for a similar relay nearby to confirm size and pin configuration. A common technique to diagnose a faulty relay is to swap it with a known working relay (such as the horn relay or a relay for another non-essential system) to see if the AC starts working. If the AC works after the swap, you know the original relay is bad and needs replacing.
Testing the AC Relay
Once you've located the AC relay, you can test it to determine if it's functioning correctly. There are two common methods for testing a relay:
Method 1: The Relay Swap Test
As mentioned above, the simplest way to test the AC relay is to swap it with a known good relay from another system (like the horn, or another non-essential system relay). If the AC starts working after the swap, the original AC relay is likely faulty.
Method 2: Using a Multimeter
A multimeter provides a more precise way to test the relay. You will need to understand basic electrical principles and how to use a multimeter.
- Set the multimeter to the continuity setting. This setting is usually indicated by a diode symbol or an audible beep.
- Identify the coil terminals. These terminals are typically labeled 85 and 86 on the relay.
- Connect the multimeter leads to the coil terminals (85 and 86). You should see a resistance reading on the multimeter. This indicates that the relay coil is intact. If you see no resistance (open circuit), the coil is likely burned out, and the relay needs to be replaced.
- Apply 12V to the coil terminals. You can use a 12V battery or a bench power supply. When you apply power, you should hear a click sound from the relay. This indicates that the relay is switching.
- Identify the normally open (NO) terminals. These terminals are typically labeled 30 and 87 on the relay.
- After applying 12V to the coil terminals, check for continuity between the NO terminals (30 and 87). The multimeter should now show continuity between these terminals. If there is no continuity, the relay is not switching correctly and needs to be replaced.
Caution: Working with electricity can be dangerous. If you're not comfortable performing these tests, it's best to consult a qualified mechanic.
Replacing the AC Relay
If the AC relay is faulty, replacing it is a straightforward process:
- Purchase a new AC relay. Make sure it's the correct type for your 2009 Nissan Altima. You can find this information in your owner's manual or by searching online using your vehicle's year, make, and model. Matching the part number of the old relay is highly recommended.
- Disconnect the negative terminal of your car battery. This is a safety precaution to prevent electrical shocks or damage to the electrical system.
- Remove the old AC relay. Simply pull it straight out of the relay socket.
- Install the new AC relay. Align the pins correctly and push it firmly into the socket.
- Reconnect the negative terminal of your car battery.
- Test the AC system. Turn on the engine and engage the air conditioning to see if it's working properly.
Troubleshooting Common AC Problems Beyond the Relay
If replacing the AC relay doesn't solve your AC problems, other potential issues could be the cause. Here are a few common culprits:
- Low Refrigerant: The AC system needs sufficient refrigerant to function properly. A leak in the system can cause low refrigerant levels.
- Faulty AC Compressor: The AC compressor is responsible for circulating the refrigerant. A malfunctioning compressor can't cool the air effectively.
- Clogged Condenser or Evaporator: These components can become clogged with debris, restricting airflow and reducing cooling efficiency.
- Bad Pressure Switch: The pressure switch monitors the refrigerant pressure. A faulty switch can prevent the compressor from engaging.
- Electrical Problems: Wiring issues, blown fuses, or a faulty climate control unit can also cause AC problems.
Recommendation: If you've replaced the AC relay and are still experiencing problems, it's best to take your 2009 Nissan Altima to a qualified mechanic for a professional diagnosis. They have the tools and expertise to identify and repair more complex AC issues.
Preventative Maintenance
Regular maintenance can help prevent AC problems and extend the life of your AC system. Here are a few tips:
- Have your AC system inspected annually by a qualified mechanic.
- Check the refrigerant level periodically.
- Clean the condenser fins to remove debris.
- Run the AC system regularly, even in the winter, to keep the seals lubricated.
By understanding the function of the AC relay, knowing its location in your 2009 Nissan Altima, and following the troubleshooting steps outlined in this guide, you can potentially diagnose and resolve common AC problems yourself. Remember to always prioritize safety when working on your car and consult a professional if you're unsure about any procedure.