2010 Nissan Altima Sun Visor Replacement
Alright, let's tackle a common issue with 2010 Nissan Altimas: replacing the sun visor. Over time, these visors can become loose, droop, or even break completely. This guide provides a step-by-step walkthrough for replacing the sun visor, assuming you have intermediate DIY experience and basic tools.
Understanding the Components
Before we begin, let's familiarize ourselves with the parts involved. The sun visor itself is the main component, designed to block sunlight. It's typically attached to the vehicle's roof via a pivot arm and a mounting bracket. The bracket is usually screwed into the roof using Torx screws or standard Phillips head screws. Sometimes, there's also a small plastic cover plate that conceals the mounting hardware for a cleaner look.
Knowing these components will help you troubleshoot if you encounter any unexpected issues during the replacement process. For instance, if the visor droops but isn't broken, the pivot arm might be loose, or the mounting bracket might be failing. A full replacement is often the easiest and most reliable solution, however.
Tools and Materials Needed
Before you start, gather the following:
- New Sun Visor: Ensure it's the correct part for a 2010 Nissan Altima, specifying the left (driver's side) or right (passenger's side).
- Screwdriver Set: Both Phillips head and Torx screwdrivers. The specific Torx size is usually T20 or T25, but check your vehicle before you begin. Having a magnetic screwdriver is extremely helpful to prevent dropping screws into hard-to-reach places.
- Panel Removal Tool (Optional): This plastic tool helps to gently pry off the cover plate without damaging the surrounding headliner. A thin, flat-head screwdriver can be used, but extreme care must be taken to avoid scratching the interior.
- Small Flat-Head Screwdriver: Useful for prying or manipulating small components.
- Safety Glasses: Protect your eyes from debris.
- Work Gloves: To protect your hands.
- Shop Towels: For cleaning and protecting surfaces.
Step-by-Step Replacement Procedure
Now, let's get to the heart of the matter. Follow these steps carefully:
Step 1: Preparation and Safety
Safety first! Before you begin, disconnect the negative terminal of your car battery. This prevents accidental electrical shorts, though it's usually not strictly necessary for this particular task. Set the parking brake and turn off the ignition. Park in a well-lit area.
Step 2: Locate and Remove the Cover Plate (If Applicable)
Many Altimas have a small plastic cover plate concealing the screws that secure the visor to the roof. This cover is usually located around the base of the visor arm, where it meets the headliner. Use your panel removal tool (or a small flat-head screwdriver, very gently) to pry the cover plate off. Insert the tool into the seam between the cover and the headliner, and gently apply pressure until the cover pops loose. Be patient and work your way around the edges to avoid breaking the plastic tabs that hold it in place.
Caution: The plastic cover can be brittle, especially in older vehicles. Take your time to avoid breaking it. If it breaks, you can usually still install the new visor, but the appearance won't be as clean.
Step 3: Remove the Mounting Screws
With the cover plate removed, you'll see the screws holding the visor in place. These are typically Torx screws or Phillips head screws. Use the appropriate screwdriver to remove them. Store the screws in a safe place so you don't lose them. It's a good idea to put them in a small container or tape them to a piece of paper labeled "Sun Visor Screws".
Tip: If the screws are difficult to remove, try applying a small amount of penetrating oil (like WD-40) and letting it sit for a few minutes before trying again. Be careful not to get the oil on the headliner.
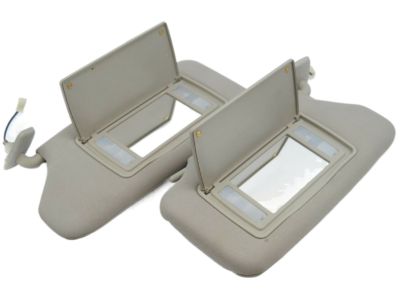
Step 4: Disconnect the Electrical Connector (If Equipped)
Some sun visors have a built-in vanity mirror with a light. If your visor has this feature, there will be an electrical connector attached to it. Once the screws are removed, gently pull the visor down slightly to expose the connector. Disconnect the connector by pressing the release tab (if there is one) and pulling the two halves apart. Do not simply yank on the wires, as this can damage the connector or the wiring.
Note: Remember the orientation of the connector before disconnecting it so you can easily reconnect it later.
Step 5: Remove the Old Sun Visor
With the screws removed and the electrical connector disconnected (if applicable), you can now remove the old sun visor. Simply pull it down and out of the mounting bracket. If it's stuck, double-check that you've removed all the screws and disconnected the electrical connector.
Step 6: Install the New Sun Visor
Installation is the reverse of removal. First, connect the electrical connector (if applicable) to the new sun visor. Ensure it clicks into place securely.
Step 7: Attach the New Sun Visor to the Mounting Bracket
Align the new sun visor with the mounting bracket on the roof. Insert the visor arm into the bracket and push it up until it's flush with the headliner. Make sure the pivot arm moves freely and smoothly.
Step 8: Reinstall the Mounting Screws
Using the screws you removed earlier, secure the new sun visor to the mounting bracket. Tighten the screws firmly, but do not overtighten them. Overtightening can strip the threads in the roof or damage the visor itself.
Step 9: Reinstall the Cover Plate (If Applicable)
If your Altima has a cover plate, snap it back into place over the mounting bracket. Ensure it's securely attached and flush with the headliner.
Step 10: Test the New Sun Visor
Test the new sun visor to make sure it moves freely and stays in the desired position. If it's equipped with a vanity mirror light, test the light to ensure it's working properly.
Step 11: Reconnect the Battery (If Disconnected)
If you disconnected the negative terminal of your car battery, reconnect it now. Ensure the connection is secure.
Troubleshooting Tips
- Stripped Screws: If you strip the head of a screw, try using a rubber band or a piece of steel wool between the screwdriver and the screw to get a better grip. If that doesn't work, you may need to use a screw extractor tool.
- Broken Cover Plate Tabs: If the tabs on the cover plate break, you can try using a small amount of adhesive (like super glue or epoxy) to reattach it. However, be careful not to get glue on the headliner.
- Loose Visor: If the visor is still loose after installation, double-check that the screws are tightened properly. If the screws are tightened and the visor is still loose, the mounting bracket may be damaged and need to be replaced.
- Vanity Mirror Light Not Working: Double-check that the electrical connector is properly connected. If it is, the bulb may be burned out and need to be replaced.
Conclusion
Replacing the sun visor on your 2010 Nissan Altima is a relatively straightforward DIY project that can save you money compared to taking it to a mechanic. By following these steps and taking your time, you can successfully replace your sun visor and restore its functionality. Remember to prioritize safety and take extra care when working with plastic components. Good luck!