2010 Nissan Maxima Ac Relay Location
If you're experiencing issues with your 2010 Nissan Maxima, such as the air conditioning not working, headlights malfunctioning, or the engine not starting, a faulty AC relay (or other relay) could be the culprit. Locating and testing the AC relay is a crucial first step in diagnosing and resolving these problems. This guide provides a clear and concise explanation of the 2010 Nissan Maxima AC relay location and related relays, helping you get your vehicle back in optimal working condition.
Understanding Relays and Their Importance
Before we dive into the specific location of the AC relay, let's briefly discuss what relays are and why they're important in your car's electrical system. A relay is essentially an electrically operated switch. It uses a small electrical current to control a larger current, allowing low-power circuits to control high-power components like the AC compressor, headlights, fuel pump, and starter motor. Without relays, the switches in your dashboard would need to handle enormous amounts of current, making them bulky, expensive, and prone to failure.
Relays protect your car's electrical system by isolating sensitive electronic components from high-voltage circuits. They also act as amplifiers, allowing a small signal from the engine control unit (ECU) or other sensors to activate a powerful device. Relays have a limited lifespan and can fail due to age, corrosion, or electrical surges. When a relay fails, the component it controls will either not work at all or may operate intermittently. Recognizing the signs of a failing relay and knowing where to find it is key for troubleshooting.
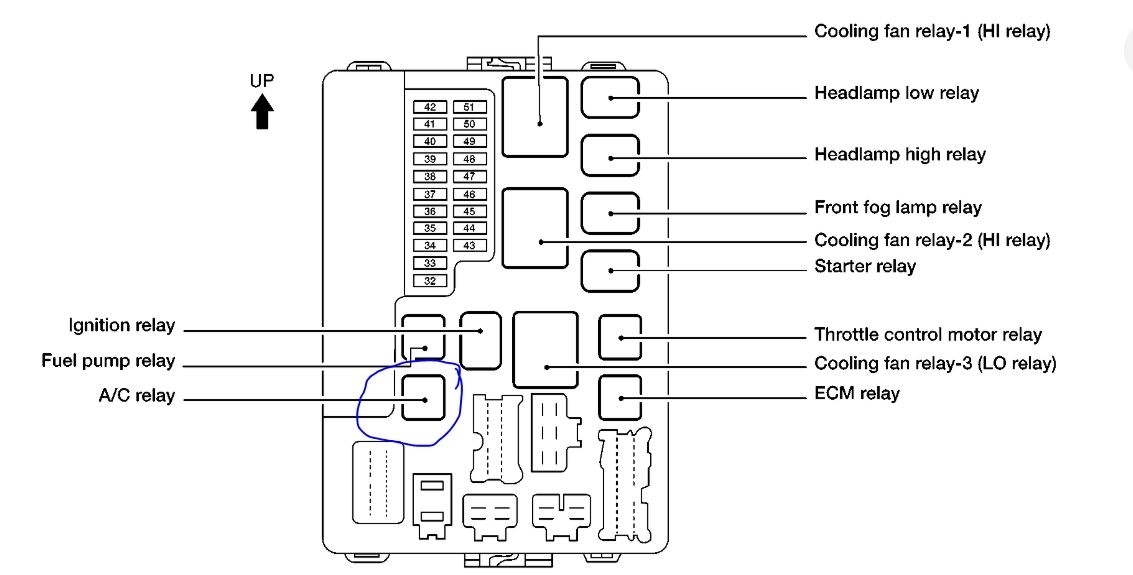
Locating the 2010 Nissan Maxima AC Relay
The primary location for the 2010 Nissan Maxima AC relay is in the Intelligent Power Distribution Module (IPDM) E/R. This module is usually found in the engine compartment, typically near the battery or on the fender well. The exact location can slightly vary, so consulting your owner's manual is always recommended.
Here's a step-by-step guide to finding the IPDM E/R and the AC relay:
- Open the Hood: Ensure the engine is off and the parking brake is engaged.
- Locate the IPDM E/R: Look for a black plastic box labeled "IPDM E/R" or "Intelligent Power Distribution Module Engine Room". It usually has several wires and connectors attached to it. Refer to your owner's manual for a precise diagram.
- Open the IPDM E/R Cover: Most IPDM E/R boxes have a cover secured by clips or fasteners. Carefully release the clips to remove the cover.
- Identify the AC Relay: Inside the IPDM E/R, you'll find a collection of relays and fuses. The AC relay is usually labeled on the inside of the cover or on the relay itself. Look for labels like "A/C Relay", "Compressor Relay", or a symbol that represents air conditioning. Sometimes, diagrams are not perfectly clear, so it is important to consult the owner's manual.
Important Note: Some Nissan Maxima models may have a secondary relay box located inside the cabin, usually under the dashboard near the driver's side. While the primary AC relay is almost always in the IPDM E/R, it's worth checking the interior relay box if you're having trouble locating it in the engine compartment. Consult your owner's manual for the exact location and diagram of any secondary relay boxes.
Identifying the AC Relay: Relay Diagrams and Labels
Once you've located the IPDM E/R, it's crucial to correctly identify the AC relay. The IPDM E/R cover usually has a diagram indicating the function of each relay and fuse. Compare the diagram with the physical relays to pinpoint the AC relay. The relay itself may also have a label indicating its function.
Look for the following labels or symbols:
- A/C Relay
- Compressor Relay
- MG CLT Relay (Magnet Clutch Relay)
- A symbol representing an air conditioner (often a snowflake)
If the diagram is unclear or missing, you can try to identify the AC relay by its color and size. Relays are typically standardized sizes and colors, but this is not a foolproof method. It's always best to refer to the diagram or owner's manual.
Testing the AC Relay
Before replacing the AC relay, it's essential to test it to confirm that it's indeed the problem. There are a few ways to test a relay:
- Visual Inspection: Check the relay for any visible signs of damage, such as cracks, burns, or corrosion. If the relay looks damaged, it should be replaced regardless of other tests.
- Relay Tester: A relay tester is a specialized tool that applies power to the relay and checks its internal contacts for continuity. This is the most reliable method for testing relays.
- Multimeter Test: You can use a multimeter to test the relay's coil resistance and continuity of the contacts. This method requires some electrical knowledge.
- Relay Swapping: If you have another relay in the IPDM E/R that is the same type and size as the AC relay (e.g., a headlight relay), you can temporarily swap them. If the AC now works and the headlight doesn't, the AC relay is likely faulty. Important: Make sure the relays are identical before swapping them to avoid damaging your car's electrical system.
For a basic multimeter test, you will need to:
- Set your multimeter to measure resistance (Ohms).
- Locate the coil terminals on the relay (typically terminals 85 and 86).
- Connect the multimeter probes to the coil terminals. A good relay should show a resistance value (e.g., 60-120 Ohms). If the resistance is zero or infinite, the coil is likely damaged.
- Set your multimeter to measure continuity.
- Locate the switch terminals on the relay (typically terminals 30 and 87).
- With the relay unenergized, the circuit between terminals 30 and 87 should be open (no continuity).
- Apply 12V to the coil terminals (85 and 86). This should activate the relay and close the circuit between terminals 30 and 87, showing continuity on the multimeter.
Replacing the AC Relay
If the AC relay is faulty, replacing it is a straightforward process. Here's how:
- Purchase a Replacement Relay: Buy a new AC relay that is compatible with your 2010 Nissan Maxima. Ensure it has the same specifications (voltage, amperage, and pin configuration) as the original relay. You can find the correct relay at auto parts stores or online retailers.
- Disconnect the Battery (Optional but Recommended): To prevent electrical shocks or damage to your car's electrical system, it's recommended to disconnect the negative terminal of the battery before replacing the relay.
- Remove the Old Relay: Carefully pull the old AC relay out of the IPDM E/R. It may be held in place by a friction fit, so you may need to wiggle it gently to remove it.
- Install the New Relay: Align the pins of the new relay with the corresponding slots in the IPDM E/R and press it firmly into place.
- Reconnect the Battery (If Disconnected): Reconnect the negative terminal of the battery.
- Test the AC: Start your car and turn on the air conditioning to verify that the new relay is working correctly.
Other Relevant Relays in the 2010 Nissan Maxima
While you're troubleshooting the AC system, it's a good idea to be aware of other relays that might be related or could potentially cause similar symptoms:
- Cooling Fan Relay: The cooling fan relay controls the electric cooling fan that helps dissipate heat from the engine and AC condenser. A faulty cooling fan relay can cause the AC to perform poorly, especially when the car is idling.
- Fuel Pump Relay: The fuel pump relay controls the electric fuel pump that supplies fuel to the engine. A faulty fuel pump relay can cause the engine to stall or not start at all, which might mistakenly be attributed to the AC system.
- Headlight Relay: Headlight relays control the headlights. They are often the same type of relay as the AC relay and can be used for swapping to test for a faulty AC relay.
- ECM Relay (Engine Control Module Relay): This relay powers the engine control module. If this relay fails, the engine will likely not start.
Troubleshooting Tips and Common Issues
Here are some troubleshooting tips and common issues related to the 2010 Nissan Maxima AC system:
- Check the Fuses: Before checking the relay, always inspect the AC fuse. A blown fuse is a more common problem than a faulty relay. The AC fuse is also located in the IPDM E/R or an interior fuse box.
- Refrigerant Level: Low refrigerant levels can prevent the AC compressor from engaging. Have the refrigerant level checked by a qualified technician.
- AC Compressor Clutch: The AC compressor clutch engages and disengages the compressor. If the clutch is not engaging, the compressor will not work.
- Wiring Issues: Damaged or corroded wiring can cause AC problems. Inspect the wiring harness and connectors for any signs of damage.
- Pressure Switches: The AC system has pressure switches that prevent the compressor from operating if the refrigerant pressure is too high or too low. A faulty pressure switch can disable the AC system.
When to Consult a Professional
While replacing an AC relay is a relatively simple task, some AC problems require specialized knowledge and equipment. Consult a qualified mechanic if:
- You're not comfortable working on your car's electrical system.
- You've replaced the AC relay and the problem persists.
- You suspect a refrigerant leak.
- You need to diagnose more complex AC system issues.
By understanding the location of the 2010 Nissan Maxima AC relay and other relevant relays, you can effectively troubleshoot and potentially resolve common AC system problems. Remember to consult your owner's manual for specific diagrams and information related to your vehicle. With a little knowledge and effort, you can keep your Maxima's AC system running smoothly and comfortably for years to come.