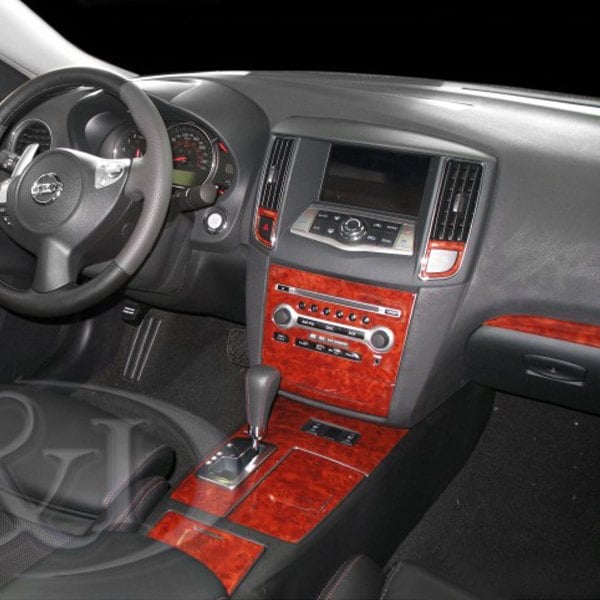
2010 Nissan Maxima Dashboard Replacement
So, you're tackling a dashboard replacement on your 2010 Nissan Maxima. This is a fairly involved job, but with the right tools, patience, and this guide, you can definitely do it yourself. We'll walk through the entire process, covering everything from disconnecting the battery to reassembling all the trim pieces. Remember, safety first! Always disconnect the battery before working on any electrical components.
Preparation is Key
Before you even think about touching a screwdriver, gather your tools and supplies. Here's a list of what you'll likely need:
- Socket set (Metric) - A comprehensive set will cover most of the bolts you'll encounter.
- Screwdrivers (Phillips head and flat head) - Various sizes.
- Trim removal tools - These plastic tools are essential for prying off trim without damaging it. You can often find inexpensive kits online. Using metal screwdrivers can easily scratch or break plastic.
- Ratchet and extensions - Different lengths of extensions will be helpful for reaching recessed bolts.
- Pliers - For removing stubborn clips and connectors.
- Multimeter - Optional, but helpful for troubleshooting electrical issues if any arise.
- New Dashboard - Obviously! Make sure it's the correct part for your 2010 Maxima (trim level and features matter). Check the part number!
- Protective gloves - Keep your hands clean and prevent scratches.
- Shop towels or rags - For wiping down surfaces and cleaning up any spills.
- Camera or Phone - Critically important! Take pictures of everything as you disassemble. This will be a lifesaver when you're putting it all back together. Especially focus on wiring harness connections and the orientation of clips and fasteners.
- Painter's tape - To label wires and connectors if you don't have a good memory.
- Floor mats/Blankets - Protect your seats and floors from scratches.
Now, let's talk about the dashboard itself. Ensure you've sourced the correct replacement. There can be differences based on features like navigation, climate control systems, and audio options. A mismatch can lead to compatibility issues and a lot of frustration.
Step-by-Step Disassembly
1. Disconnecting the Battery
Locate the battery in your engine bay (usually under the hood, sometimes in the trunk). Using a wrench (typically 10mm), disconnect the negative (-) terminal first. Then, disconnect the positive (+) terminal. This prevents short circuits and protects the car's electronics. Tuck the battery cables away from the terminals to prevent accidental contact. Wait at least 5 minutes to allow any residual electrical charge in the system to dissipate. This is especially important for the airbag system.
2. Removing Interior Trim
This is where the trim removal tools become your best friend. Start by removing the trim around the radio and climate control unit. Gently pry around the edges, working your way around until the clips release. Be patient and apply even pressure to avoid breaking anything. Don't yank! Look for screws holding the trim in place if it's not budging. Disconnect any electrical connectors attached to the trim panels.
3. Steering Wheel Removal (Airbag Caution!)
This step requires extreme caution due to the airbag. Make absolutely sure the battery has been disconnected for at least 5 minutes before proceeding!
There are typically two small access holes on the sides of the steering wheel. Insert a small flat-head screwdriver into these holes to release the airbag retaining clips. You might need to wiggle the screwdriver and apply gentle pressure to release the clips. Once the airbag module is loose, carefully disconnect the airbag wiring connectors. Take a picture of these connectors before disconnecting them! Set the airbag aside in a safe place, away from static electricity and heat. Never place it face down.
Next, you'll need to remove the steering wheel retaining bolt (usually a large socket). Before removing the bolt, mark the position of the steering wheel on the steering column. This ensures you reinstall it in the correct alignment. Use a steering wheel puller tool if necessary. This is especially helpful if the wheel is stuck on the splines. Disconnect any remaining wiring connectors attached to the steering wheel.
4. Instrument Cluster Removal
The instrument cluster (the speedometer and gauges) is usually held in place by screws or clips. Remove any trim pieces surrounding the cluster. Then, unscrew the retaining screws (often behind the trim). Gently pull the cluster forward and disconnect the wiring connectors on the back. Again, take pictures!
5. Center Console Removal
The center console often requires removing the shift knob (if applicable), parking brake lever trim, and any surrounding trim panels. There will likely be screws underneath these trim pieces. Disconnect any wiring connectors for power outlets, USB ports, or other electronic devices. Carefully lift the center console out of the vehicle.
6. Glove Box Removal
The glove box is usually held in place by screws or clips. Open the glove box and locate the retaining screws along the top and sides. Disconnect any wiring for the glove box light. Remove the glove box.
7. Removing the Dash Support Structure
Now, we're getting to the core of the dash removal. You'll start seeing the main support structure. Begin removing any metal brackets or supports that are connected to the dashboard or the car's body. Pay close attention to any wiring harnesses that are attached to these supports. Disconnect the harnesses and carefully route them out of the way. Label these harnesses with painter's tape if you're unsure where they go.
8. Detaching the Dashboard
With all the trim and supports removed, you should now be able to see the bolts or screws that secure the dashboard to the car's body. These are often located along the windshield, near the A-pillars, and in the center of the dashboard. Remove these fasteners. You may need a ratchet with extensions to reach some of them.
With all fasteners removed, carefully lift the dashboard out of the vehicle. You may need to wiggle it and maneuver it around the steering column and other components. Have a helper if possible to make this step easier and prevent damage.
Installation of the New Dashboard
1. Preparing the New Dashboard
Before installing the new dashboard, inspect it for any damage. Transfer any components from the old dashboard to the new one that weren't included, such as vents, trim pieces, or wiring harnesses. Use your photos as a reference to ensure everything is in the correct location.
2. Installing the Dashboard
Carefully maneuver the new dashboard into the vehicle, aligning it with the mounting points. Reinstall the bolts and screws that secure the dashboard to the car's body. Tighten them to the proper torque specifications (check a service manual for these values). Make sure the dashboard is securely mounted before proceeding.
3. Reconnecting Wiring Harnesses
This is where your photos and labels will be invaluable. Reconnect all the wiring harnesses to their respective connectors. Ensure the connectors are fully seated and locked in place. Double-check your work to avoid any electrical issues.
4. Reinstalling the Dash Support Structure
Reinstall all the metal brackets and supports that you removed earlier. Make sure they are securely fastened and that the wiring harnesses are properly routed and secured.
5. Reinstalling Interior Components
Reinstall the glove box, center console, instrument cluster, steering wheel, and all the trim pieces. Follow the reverse order of removal. Refer to your photos as needed. Ensure all components are securely fastened and that the trim pieces are properly aligned.
6. Reinstalling the Steering Wheel (Airbag Caution!)
Carefully reconnect the airbag wiring connectors to the airbag module. Then, carefully reinstall the airbag module into the steering wheel, ensuring the retaining clips are properly engaged. Align the steering wheel with the mark you made earlier on the steering column. Reinstall the steering wheel retaining bolt and tighten it to the proper torque specification. Reinstall any trim pieces around the steering wheel.
7. Reconnecting the Battery
Reconnect the positive (+) battery terminal first, then the negative (-) terminal. Tighten the terminals securely.
Testing and Final Checks
After reconnecting the battery, start the engine and test all the electrical components, including the lights, radio, climate control, and instrument cluster. Make sure everything is working properly. Check for any warning lights on the dashboard. If any warning lights are illuminated, refer to a service manual or diagnostic tool to troubleshoot the issue.
Double-check all the trim pieces and make sure they are properly aligned and secured. Clean the interior of the vehicle and remove any tools or debris.
Important Considerations:
Airbag System: Working with the airbag system requires extreme caution. If you're not comfortable with this aspect of the job, it's best to have a professional handle it. Improper handling of the airbag can result in serious injury.
Wiring: Take your time and be meticulous when reconnecting wiring harnesses. Incorrect connections can damage electrical components and cause malfunctions.
Torque Specifications: Using the correct torque specifications for bolts and screws is crucial to ensure proper assembly and prevent damage. Consult a service manual for the correct torque values.
Replacing a dashboard is a significant undertaking, but with patience, careful planning, and this guide, you can successfully complete the project. Remember to take your time, document everything, and prioritize safety. Good luck!