2010 Nissan Rogue Blower Motor Replacement
So, your 2010 Nissan Rogue's blower motor has decided to take a vacation, leaving you sweating in the summer or shivering in the winter? It's a common problem, and thankfully, one you can often tackle yourself with a bit of know-how. Let's walk through diagnosing the issue and getting that blower motor replaced, so you can get back to comfortable driving.
Identifying the Problem: Is it *Really* the Blower Motor?
Before we dive into replacing the blower motor, let's make sure that's actually the culprit. A few symptoms point directly to a failing blower motor:
- No air blowing out of the vents at any speed: This is the most obvious sign. If you turn the fan speed dial and nothing happens, the motor isn't running.
- Air only blowing on certain speeds: The blower motor resistor, which controls fan speed, could be the issue here. We'll touch on that later.
- Noisy blower motor: Grinding, squealing, or rattling sounds coming from under the dashboard on the passenger side strongly suggest a worn-out blower motor.
- Intermittent operation: The blower motor works sometimes, but not others. This can indicate a failing motor or a loose connection.
- Burning smell: A burning smell, especially accompanied by a lack of airflow, is a serious red flag. The motor might be overheating and on its way out.
However, other issues can mimic a bad blower motor. Here's what else to check:
- Fuses: Check the blower motor fuse. It's usually located in the fuse box under the hood or inside the cabin. Consult your owner's manual for the exact location. A blown fuse is a quick and easy fix!
- Blower motor resistor: This component controls the fan speed. If you only have airflow on certain speeds (usually high), the resistor is likely the problem. Replacing it is often easier and cheaper than replacing the blower motor.
- Wiring and connections: Inspect the wiring harness and connectors leading to the blower motor. Look for loose connections, corrosion, or damaged wires. Clean or repair as needed.
Pro Tip: Before buying a new blower motor, try tapping the old one with a wrench (gently!). If it suddenly starts working, even for a short time, it's a strong indication the motor is failing and needs replacement.
Gathering Your Tools and Supplies
If you've confirmed the blower motor is indeed the problem, here's what you'll need for the replacement:
- New Blower Motor: Purchase a blower motor specifically designed for your 2010 Nissan Rogue. Check online retailers or your local auto parts store. Make sure it's a reputable brand.
- Socket Set: A basic socket set with metric sizes (typically 8mm, 10mm, and 12mm) will be necessary.
- Screwdrivers: Both Phillips head and flathead screwdrivers are useful.
- Pliers: For disconnecting electrical connectors.
- Work Light: Essential for seeing what you're doing under the dashboard.
- Gloves: To protect your hands.
- Safety Glasses: Always wear safety glasses when working on your car.
- Shop Rags: For cleaning up any messes.
- Optional: Multimeter (for testing voltage if needed)
Estimated Cost of Parts: The cost of a new blower motor typically ranges from $50 to $150, depending on the brand and supplier. The blower motor resistor, if needed, usually costs between $20 and $50.
Step-by-Step Blower Motor Replacement
Here's a general guide to replacing the blower motor in your 2010 Nissan Rogue. Always disconnect the negative battery terminal before starting any electrical work on your car.
- Locate the Blower Motor: The blower motor is typically located under the passenger side dashboard. You'll likely need to remove the lower dash panel to access it. This panel is usually held in place by clips or screws.
- Remove the Lower Dash Panel: Use a screwdriver or trim removal tool to carefully pry off the lower dash panel. Be gentle to avoid breaking any clips.
- Disconnect the Electrical Connector: Once you have access to the blower motor, disconnect the electrical connector. There's usually a small tab that needs to be pressed to release the connector.
- Remove the Blower Motor Screws: The blower motor is usually held in place by three or four screws. Use a socket wrench or screwdriver to remove these screws.
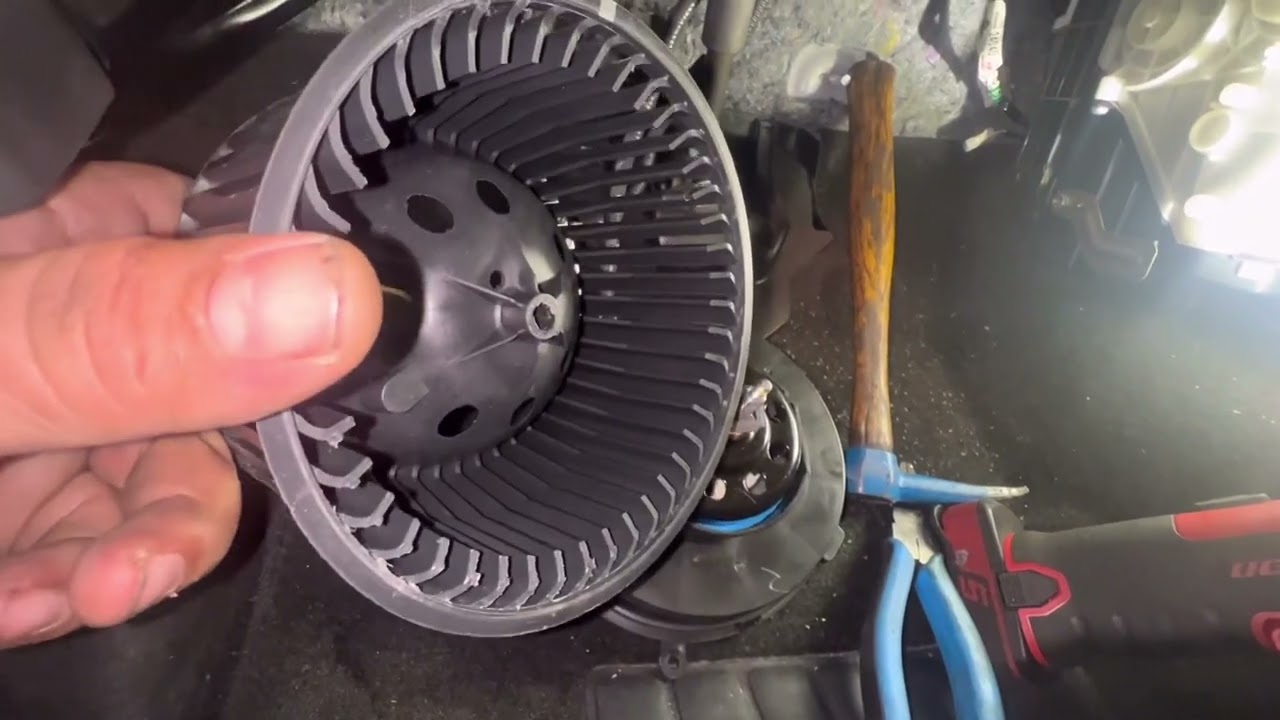
- Remove the Blower Motor: Carefully pull the blower motor out of its housing. It might be a tight fit, so wiggle it gently until it comes loose.
- Install the New Blower Motor: Align the new blower motor with the housing and push it into place. Make sure it's seated properly.
- Install the Blower Motor Screws: Secure the new blower motor with the screws you removed earlier.
- Reconnect the Electrical Connector: Plug the electrical connector back into the blower motor. Make sure it clicks into place.
- Reinstall the Lower Dash Panel: Snap or screw the lower dash panel back into place.
- Reconnect the Negative Battery Terminal: Reconnect the negative battery terminal.
- Test the Blower Motor: Turn on the ignition and test the blower motor at all speeds. Make sure it's working properly.
Pro Tip: Before installing the new blower motor, compare it to the old one to make sure they're identical in size and shape. Also, make sure the fan spins freely on the new motor.
What if it's the Blower Motor Resistor?
As mentioned earlier, if your blower motor only works on certain speeds (usually high), the blower motor resistor is likely the culprit. The resistor is usually located near the blower motor. Here's how to replace it:
- Locate the Blower Motor Resistor: It's usually attached to the blower motor housing or nearby.
- Disconnect the Electrical Connector: Disconnect the electrical connector from the resistor.
- Remove the Resistor Screws: The resistor is usually held in place by two or three screws.
- Remove the Resistor: Pull the resistor out of its housing.
- Install the New Resistor: Align the new resistor with the housing and push it into place.
- Install the Resistor Screws: Secure the new resistor with the screws you removed earlier.
- Reconnect the Electrical Connector: Plug the electrical connector back into the resistor.
- Test the Blower Motor: Turn on the ignition and test the blower motor at all speeds. Make sure it's working properly.
When to Call a Professional
While replacing a blower motor is a relatively straightforward DIY project, there are times when it's best to call a professional mechanic:
- You're not comfortable working on your car: If you're not comfortable with basic automotive repairs, it's best to leave the job to a professional.
- You can't locate the blower motor: Some vehicles have the blower motor in a difficult-to-reach location.
- You're having trouble removing the dash panel: Forcing the dash panel can damage it.
- You suspect a more complex electrical problem: If you've checked the fuses, resistor, and connections and the blower motor still doesn't work, there might be a more serious electrical issue.
Estimated Professional Repair Cost: If you choose to have a mechanic replace the blower motor, expect to pay between $150 and $300 for labor, in addition to the cost of the part.
Preventative Maintenance Tips
Here are a few tips to help prevent blower motor failure:
- Replace the cabin air filter regularly: A clogged cabin air filter restricts airflow and can put extra strain on the blower motor. Check your owner's manual for the recommended replacement interval.
- Avoid running the blower motor at high speed unnecessarily: Running the blower motor at high speed for extended periods can shorten its lifespan.
- Keep the vents clean: Dust and debris can accumulate in the vents and restrict airflow. Use a vacuum cleaner with a brush attachment to clean the vents regularly.
Replacing your 2010 Nissan Rogue's blower motor is a manageable task with the right tools and instructions. By following these steps, you can save money and get your car's climate control system back in working order. Good luck, and happy driving!