2012 Nissan Murano Ac Relay Location
Welcome, fellow automotive enthusiasts, to a deep dive into a seemingly simple component that plays a crucial role in keeping you cool and comfortable on the road: the AC relay in a 2012 Nissan Murano. While seemingly insignificant, understanding its location and function can empower you to diagnose and potentially resolve air conditioning issues yourself, saving you time and money.
The AC Relay: A Small Component with a Big Impact
Let's start with the basics. An automotive relay, in general, is an electrically operated switch. Its purpose is to allow a low-current circuit to control a high-current circuit. Think of it as a bodyguard – a small signal tells the relay to engage, and the relay then handles the heavy lifting of supplying power to a more demanding component. In the context of your 2012 Murano's air conditioning system, the AC relay allows the relatively low-current signal from the AC request (turning on the AC button on your dashboard) to control the high-current power supply to the AC compressor clutch.
Without a functioning AC relay, the compressor clutch won't engage, meaning the compressor won't be driven by the engine, and therefore, no refrigerant will be circulated, resulting in a complete lack of cold air. That's why identifying and testing the relay is a critical first step when troubleshooting AC problems.
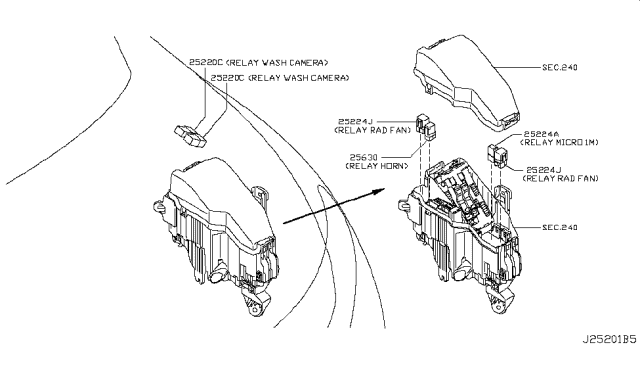
Locating the AC Relay in Your 2012 Nissan Murano
Now, the million-dollar question: where exactly *is* this elusive relay located? In the 2012 Nissan Murano, the AC relay can be found within the Intelligent Power Distribution Module (IPDM) E/R, which stands for Engine Room. It is essentially a sophisticated fuse and relay box. Understanding this key term is essential. It is more than a typical fuse box; it contains a small control module that manages various electrical functions.
Here's a step-by-step guide to finding it:
- Open the Hood: Ensure the vehicle is safely parked on a level surface and the engine is turned off. Pop the hood of your Murano.
- Locate the IPDM E/R: The IPDM E/R is typically located on the passenger side of the engine compartment, near the battery and often close to the firewall. It's a black plastic box, usually rectangular, with several wiring harnesses connected to it. Look for labels or markings on the box itself indicating "IPDM E/R" or "Intelligent Power Distribution Module."
- Open the IPDM E/R Cover: The IPDM E/R cover is usually secured by a series of clips or latches. Gently release these clips to remove the cover. Be careful not to break them, as they are often made of brittle plastic.
- Identify the AC Relay: Once the cover is removed, you'll be greeted by an array of fuses and relays. This is where things can get a bit tricky. The exact location of the AC relay within the IPDM E/R can vary slightly depending on the specific configuration of your Murano. However, there's usually a diagram printed on the underside of the IPDM E/R cover that shows the location of each fuse and relay.
- Consult the Diagram: Carefully examine the diagram. Look for a relay labeled "A/C Relay," "AC Compressor Relay," or something similar. The diagram will typically show the relay's position within the IPDM E/R using a grid-like system (e.g., A1, B3, etc.).
- Identify by Color and Size: Even with the diagram, it can be helpful to know that relays are typically cube-shaped and often come in standard sizes. They're also often color-coded. While the color isn't always consistent, knowing the general size and shape helps narrow down the possibilities.
Important Considerations:
- Safety First: Before working on any electrical components, disconnect the negative terminal of your car's battery to prevent short circuits and potential electrical shock.
- Diagram Accuracy: While the diagram on the IPDM E/R cover is usually accurate, double-check the relay's location by comparing it to the wiring diagram in your Murano's service manual (if you have one) or consulting online resources.
- Relay Swapping: A common troubleshooting technique is to swap the AC relay with a relay known to be working (e.g., the horn relay or the rear defogger relay, provided they are the same type). If the AC starts working after the swap, you've confirmed that the original AC relay is faulty.
Testing the AC Relay
Once you've located the AC relay, you can test it to confirm whether it's functioning correctly. Here are a few methods:
- Visual Inspection: Carefully examine the relay for any signs of physical damage, such as cracks, melted plastic, or corrosion. If you see any damage, the relay should be replaced.
- Relay Tester: A dedicated relay tester is the most reliable way to test a relay. These testers apply power to the relay coil and check whether the contacts close properly.
- Multimeter Test: If you don't have a relay tester, you can use a multimeter to check the relay's continuity and resistance.
- Continuity Test: With the relay removed, use the multimeter to check for continuity between the relay's coil terminals. You should see a low resistance reading (e.g., 70-120 ohms). If you see no continuity (an open circuit), the relay coil is likely faulty.
- Contact Test: Apply 12V DC power to the relay's coil terminals. You should hear a clicking sound as the relay engages. While the relay is engaged, use the multimeter to check for continuity between the relay's contact terminals. You should see continuity (a closed circuit). If you don't see continuity, the relay contacts are likely faulty.
Replacing the AC Relay
If you've determined that the AC relay is faulty, replacing it is a relatively straightforward process:
- Purchase a Replacement Relay: Make sure you purchase a replacement relay that is the exact same type as the original. Check the part number on the original relay and compare it to the part number of the replacement. Many auto parts stores can help you find the correct relay using your vehicle's year, make, and model.
- Disconnect the Battery: As always, disconnect the negative terminal of your car's battery before working on any electrical components.
- Remove the Old Relay: Gently pull the old relay out of the IPDM E/R. It may be held in place by a friction fit, so you may need to wiggle it slightly to remove it.
- Install the New Relay: Align the new relay with the corresponding slot in the IPDM E/R and firmly push it into place.
- Reconnect the Battery: Reconnect the negative terminal of your car's battery.
- Test the AC: Start your engine and turn on the AC to verify that it is working properly.
A Word of Caution: Never force a relay into a socket. If it doesn't fit easily, double-check that you have the correct relay and that you are aligning it properly.
Beyond the Relay: Other Potential AC Problems
While a faulty AC relay is a common cause of AC problems, it's important to remember that it's not the only possibility. Other potential issues include:
- Low Refrigerant: The AC system may be low on refrigerant due to a leak.
- Faulty AC Compressor: The AC compressor itself may be faulty.
- Clogged Expansion Valve: The expansion valve may be clogged, restricting refrigerant flow.
- Faulty Pressure Switches: The AC system relies on pressure switches to monitor refrigerant pressure. If these switches are faulty, they can prevent the compressor from engaging.
- Electrical Problems: Wiring problems, such as broken wires or corroded connectors, can also cause AC problems.
If replacing the AC relay doesn't solve the problem, it's best to consult a qualified mechanic to diagnose and repair the underlying issue.
Conclusion
By understanding the function and location of the AC relay in your 2012 Nissan Murano, you've equipped yourself with valuable knowledge for troubleshooting and potentially resolving AC problems. Remember to always prioritize safety and consult a professional when dealing with complex automotive repairs. With a little knowledge and effort, you can keep your Murano's AC running smoothly and enjoy comfortable driving in any weather. Happy motoring!