2013 Nissan Altima Center Console Removal
The 2013 Nissan Altima, a vehicle praised for its comfortable ride and fuel efficiency, often sees its center console endure a significant amount of wear and tear. Whether you're looking to replace damaged components, upgrade the audio system, or simply clean thoroughly beneath the console, understanding its disassembly is key. This guide provides an in-depth look at the process of removing the center console in a 2013 Nissan Altima, offering both procedural steps and an explanation of the underlying design considerations.
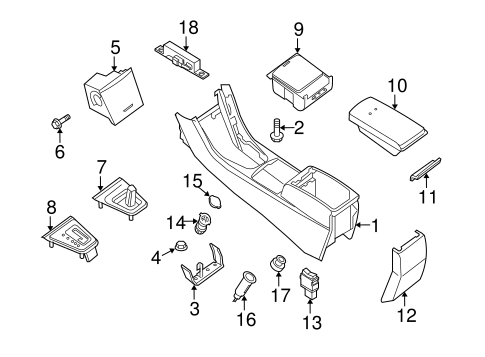
Understanding the Altima's Center Console Design
Before diving into the removal process, it's crucial to understand the basic construction of the Altima's center console. The console is not simply a single molded piece of plastic. Instead, it's a carefully assembled structure comprised of several interconnected components. This modular design allows for easier repair and replacement of individual elements, as well as accommodating various vehicle trim levels and option packages.
Key components include:
- The main console body, typically constructed from injection-molded plastic.
- The shift lever bezel or surrounding trim.
- Storage compartments, often including a covered bin and cup holders.
- Electrical connectors for power outlets, USB ports, and potentially seat heater controls.
- Retaining clips and screws that secure the console to the vehicle's floor pan and dashboard.
Nissan engineers prioritize ease of assembly and serviceability during the design phase. This means the fasteners are usually accessible with standard tools, and the disassembly sequence generally follows a logical order. However, patience and attention to detail are vital to avoid damaging delicate plastic trim or wiring.
Tools and Materials Required
Having the right tools on hand will significantly streamline the removal process and reduce the risk of damage. The following tools are generally required:
- A set of plastic trim removal tools. These tools are designed to pry apart plastic panels without scratching or breaking them. Avoid using screwdrivers for this purpose, as they can easily damage the finish.
- A Phillips head screwdriver (various sizes).
- A flathead screwdriver (small to medium size).
- A socket set (with various sizes).
- A small container or magnetic tray to hold screws and small parts. This will prevent them from getting lost.
- A work light.
- Gloves (optional, but recommended to protect your hands).
Step-by-Step Removal Procedure
Caution: Disconnect the negative battery terminal before starting any electrical work. This will prevent accidental shorts and protect the vehicle's electrical system.
Step 1: Removing the Shift Lever Bezel
The shift lever bezel is typically the first component to be removed. Its design varies depending on whether the vehicle has an automatic or manual transmission. In most automatic models, the bezel is held in place by clips. Use a plastic trim removal tool to gently pry up the edges of the bezel. Work your way around the perimeter until all the clips are disengaged.
For manual transmission models, the shift knob will likely need to be removed first. This may involve unscrewing the knob or using a small tool to release a retaining clip. Once the knob is removed, the bezel can be pried up in a similar fashion to the automatic models.
Once the bezel is free, carefully disconnect any electrical connectors attached to it, such as those for the shift indicator lights or sport mode switch. Do not pull on the wires; instead, depress the release tab on the connector.
Step 2: Removing the Side Trim Panels
The side trim panels, located on either side of the center console, often overlap with the main console body. These panels are typically held in place by clips and possibly a few screws. Use a trim removal tool to carefully pry the panels away from the console. Start at the bottom and work your way up.
Check for any hidden screws, often located behind small covers or in recessed areas. Remove these screws before attempting to pull the panels completely free.
Step 3: Accessing and Removing the Console Mounting Screws
With the shift lever bezel and side trim panels removed, you should now have access to the main console mounting screws. These screws are typically located in the following areas:
- At the front of the console, near the dashboard.
- In the rear of the console, under the rear climate control vents (if equipped).
- Inside the storage compartment, beneath a removable liner.
- Along the sides of the console, where the side trim panels were attached.
Remove all the screws using the appropriate screwdriver or socket. Keep track of the location of each screw, as they may be different sizes.
Step 4: Disconnecting Electrical Connectors
Before lifting the console, check for any remaining electrical connectors. These connectors may be for power outlets, USB ports, seat heater controls, or other accessories. Carefully disconnect each connector by depressing the release tab and pulling the connector straight out. Never force a connector; if it doesn't come loose easily, double-check that you've released the tab.
Step 5: Lifting and Removing the Console
With all the screws and connectors removed, you should now be able to lift the console out of the vehicle. Gently wiggle the console back and forth to loosen it. Be careful not to snag any wires or damage the surrounding trim. You might need an assistant to carefully maneuver the console out of the vehicle. Once free, lift the console up and out of the car.
Reinstallation
Reinstallation is generally the reverse of the removal process. However, pay close attention to the following:
- Ensure all electrical connectors are properly connected.
- Tighten all screws securely, but do not overtighten them.
- Line up the trim panels correctly before snapping them into place.
- Test all electrical functions (power outlets, USB ports, etc.) before reassembling everything.
- Double-check that all retaining clips are properly engaged.
Troubleshooting Tips
If you encounter any difficulties during the removal or reinstallation process, consider the following:
- Stuck Panels: If a panel is stuck, double-check for hidden screws. If there are no screws, try using a different trim removal tool or applying more gentle pressure.
- Broken Clips: Plastic clips can sometimes break during removal. Replacement clips are readily available at most auto parts stores.
- Difficult Connectors: If a connector is difficult to disconnect, make sure you've fully depressed the release tab. You may also need to gently rock the connector back and forth to loosen it.
- Missing Screws: If you lose a screw, try to find a replacement with the same size and thread pitch. Using the wrong screw can damage the threads or prevent the console from being properly secured.
Conclusion
Removing the center console in a 2013 Nissan Altima is a straightforward process that can be accomplished with basic tools and a bit of patience. By understanding the console's construction and following the steps outlined in this guide, you can safely and effectively remove the console for repair, replacement, or cleaning. Always prioritize safety by disconnecting the battery and taking your time to avoid damaging any components. Properly executed disassembly and reassembly can enhance the longevity and functionality of your vehicle. Remember to consult your vehicle's repair manual for specific diagrams and instructions tailored to your exact model and trim level. This information should serve as a guide, always refer to your vehicle's specific information first.