2013 Nissan Altima Headlight Adjustment
So, your 2013 Nissan Altima's headlights seem a little...off? Maybe you're blinding oncoming traffic, or perhaps you're struggling to see the road ahead. Don't worry, you're not alone! Misaligned headlights are a common issue, and thankfully, often easily corrected. This article will walk you through troubleshooting and adjusting your Altima's headlights, saving you a trip to the mechanic (and potentially some money!).
Understanding the Problem
Before diving into adjustments, let's pinpoint the reason why your headlights might be out of whack. Several factors can contribute:
- Accident or Minor Impact: Even a seemingly insignificant bump can knock the headlight assembly out of alignment.
- Suspension Work: Recent suspension repairs or replacements can alter the vehicle's ride height, affecting headlight aim.
- Worn Suspension Components: Over time, worn shocks, struts, or springs can cause the vehicle to sag, misdirecting the headlight beams.
- Bulb Replacement: While less common, an improperly installed or incorrect bulb can alter the light pattern. Double-check that you're using the correct bulb type for your 2013 Altima (refer to your owner's manual).
- Age and Vibration: General wear and tear, combined with road vibrations, can gradually loosen the adjustment mechanisms.
Important Note: If you suspect significant damage or misalignment due to an accident, it's always best to have a professional inspect the headlight assembly and surrounding bodywork for hidden issues.
Diagnosing the Headlight Alignment
The first step is to determine how far off your headlights are. Here’s a simple DIY method:
The Wall Test
This method is easiest to perform at night in a dark area with a flat surface (like a garage or parking lot) and a light-colored wall.
- Park on a Level Surface: Park your Altima directly facing the wall, approximately 25 feet (7.6 meters) away. Make sure the ground is as level as possible.
- Prepare the Vehicle: Ensure your tires are properly inflated and that your fuel tank is at least half full. This helps simulate normal driving conditions. You might also want to add weight to the driver's seat to simulate the driver's presence.
- Mark the Wall:
- Vertical Lines: Measure the distance from the ground to the center of your headlights. Transfer this measurement to the wall and mark two vertical lines, one for each headlight. These lines represent the center of your headlight beams.
- Horizontal Line: Measure the distance between the center of your headlights. Transfer this measurement to the wall and mark two points on the vertical lines that represent the center points of the headlights. Connect the points with a horizontal line.
- Turn on Low Beams: Turn on your Altima's low beams. Observe where the brightest part of the beam hits the wall in relation to the lines you marked.
- Evaluate:
- Ideally, the brightest part of the low beam should be at or slightly below the horizontal line you marked on the wall. If the beam is significantly higher, it's aimed too high.
- The center of the beam should be aligned with (or very close to) the vertical line for each headlight. If the beam is significantly to the left or right, it needs horizontal adjustment.
What to Look For: Are the beams even? Is one noticeably higher or lower than the other? Are they both pointing too high, causing glare for other drivers? Or are they pointing too low, limiting your visibility?
Adjusting the Headlights
Now for the main event! Most 2013 Altimas have adjustment screws located near the headlight assembly. The exact location may vary slightly, but they are typically visible and accessible without removing the entire headlight unit.
Tools You'll Need
- Phillips Head Screwdriver: This is the most common tool needed.
- Socket Wrench Set: Some adjustment screws might require a socket wrench.
- Level: Optional, but helpful to ensure accurate vertical alignment.
- Tape Measure: For accurate measurements during the wall test.
- Gloves: To protect your hands.
The Adjustment Process
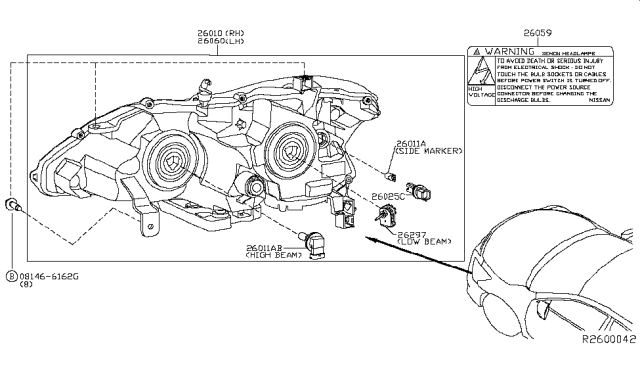
- Locate the Adjustment Screws: Open your Altima's hood. Look around the back of the headlight assembly. You should find two adjustment screws (or sometimes a screw and a bolt) per headlight. One screw typically controls the vertical adjustment (up and down), and the other controls the horizontal adjustment (left and right). The screws are usually marked with arrows indicating the direction of adjustment (e.g., "UP/DN" or "L/R"). Refer to your owner’s manual or a repair manual for the exact location if you're unsure.
- Adjust Vertical Aim: Use the screwdriver or socket wrench to turn the vertical adjustment screw. Turn it clockwise to lower the beam and counterclockwise to raise it. Make small adjustments and re-check the beam pattern on the wall after each adjustment. Aim for the brightest part of the low beam to be at or slightly below the horizontal line you marked on the wall.
- Adjust Horizontal Aim: Use the screwdriver or socket wrench to turn the horizontal adjustment screw. Turn it to the left or right to center the beam on the vertical line you marked on the wall. Again, make small adjustments and re-check the beam pattern.
- Repeat for the Other Headlight: Repeat the process for the other headlight.
- Test Drive: After making the adjustments, take your Altima for a test drive at night. Pay attention to your visibility and whether you're causing glare for oncoming traffic. You may need to make further fine-tuning adjustments.
Important Considerations
- Small Adjustments: Make only small adjustments at a time. A little turn can make a significant difference in the beam pattern.
- Don't Over-Adjust: Avoid forcing the adjustment screws. If they are difficult to turn, they may be corroded or damaged. Trying to force them can break the adjustment mechanism.
- Check High Beams: After adjusting the low beams, check the alignment of your high beams. While you primarily adjust the low beams, the high beams should be reasonably aligned as well.
- Consider Professional Alignment: If you're uncomfortable making these adjustments yourself, or if you're still having trouble achieving proper alignment, it's best to have a professional mechanic or headlight alignment specialist do it for you. They have specialized equipment to ensure precise alignment.
When to Seek Professional Help
While adjusting your headlights is often a straightforward DIY task, there are situations where professional help is definitely recommended:
- Damaged Headlight Assembly: If the headlight housing is cracked, broken, or loose, it may be impossible to achieve proper alignment. The assembly may need to be repaired or replaced.
- Broken Adjustment Mechanism: If the adjustment screws are stripped, broken, or corroded, they won't function properly. A mechanic can assess the damage and potentially repair or replace the adjustment mechanism.
- Persistent Misalignment: If you've tried adjusting the headlights yourself and they still won't stay aligned, there may be an underlying issue with the vehicle's suspension or bodywork.
- Safety Concerns: If you're unsure about any aspect of the headlight adjustment process, or if you're concerned about your safety while working on your vehicle, it's always best to err on the side of caution and seek professional assistance.
Approximate Repair Costs
If you choose to have a professional align your headlights, the cost typically ranges from $50 to $150. This price includes the labor and the use of specialized alignment equipment. If the headlight assembly needs to be replaced, the cost can be significantly higher, potentially ranging from $200 to $500+, depending on the part's cost and labor involved.
By following these steps, you should be able to properly adjust your 2013 Nissan Altima's headlights and improve your visibility on the road. Remember, safety is paramount! Always prioritize a properly aligned lighting system to ensure a safe driving experience for yourself and others.