2013 Nissan Armada Heater Control Valve
The 2013 Nissan Armada, a robust and capable SUV, relies on a complex network of systems to provide a comfortable driving experience. One often overlooked, yet crucial component of this network is the heater control valve. This unassuming valve plays a vital role in regulating the temperature inside the cabin, ensuring warmth during cold weather. While seemingly simple in design, its operation and potential failure points warrant a closer look. In this technical guide, we'll delve into the intricacies of the 2013 Nissan Armada's heater control valve, examining its function, construction, common issues, and troubleshooting techniques.
Function and Operation
At its core, the heater control valve is a gatekeeper for coolant flow into the heater core. The heater core, essentially a small radiator located inside the dashboard, is responsible for transferring heat from the engine coolant to the air that's blown into the cabin. The heater control valve, therefore, regulates the amount of hot coolant that enters the heater core, dictating the level of heat provided to the occupants.
The valve's operation is typically controlled by a blend door actuator and in some cases, a vacuum or electric solenoid. When the driver adjusts the temperature setting on the climate control panel, the system sends a signal to the blend door actuator. In the case of the Armada, it's often an electrically operated valve controlled by the HVAC control module. The signal tells the valve how much to open or close, thereby controlling the flow of coolant. When the temperature is set to "cold" or "AC," the valve should ideally close completely, preventing any hot coolant from entering the heater core. Conversely, when the temperature is set to "hot," the valve should open fully, allowing maximum coolant flow and thus maximum heat output.
In a typical setup, the engine coolant circulates continuously through the engine, picking up heat. A portion of this coolant is diverted towards the heater core. The heater control valve is strategically placed in this coolant line, typically near the firewall where the heater hoses connect to the heater core. The location varies, but it's almost always accessible from the engine compartment.
It is important to note that some vehicle designs utilize a blend door system in conjunction with the heater control valve. The blend door, a movable flap inside the HVAC unit, directs airflow either through or around the heater core. If the heater control valve fails to close completely, a properly functioning blend door can still mitigate the issue by diverting air away from the heater core. However, this is a workaround, not a solution, and addressing the faulty heater control valve is crucial for optimal climate control.
Construction and Components
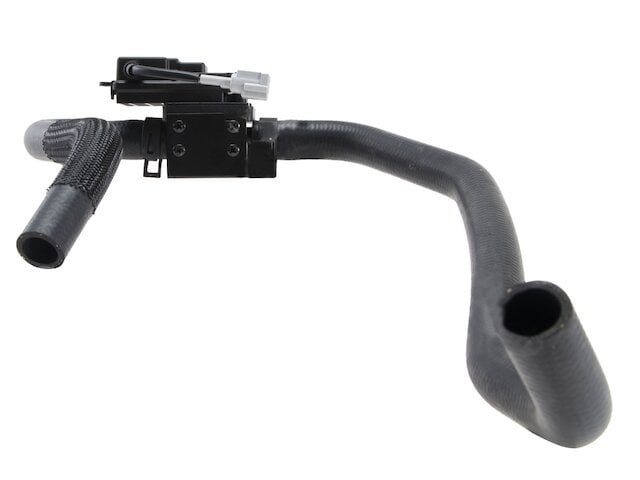
The 2013 Nissan Armada's heater control valve is generally constructed from a durable plastic or metal housing. Inside this housing resides the valve mechanism itself, which can vary in design. Some valves use a simple gate or ball that rotates to open or close the coolant passage. Others employ a more sophisticated diaphragm or solenoid-actuated system. Regardless of the specific design, the valve is typically sealed to prevent coolant leaks.
The key components of a typical heater control valve include:
- Valve Body: The main housing, typically made of plastic or metal.
- Valve Mechanism: The internal component (gate, ball, diaphragm) that controls coolant flow.
- Actuator: The device (electric motor, vacuum diaphragm) that moves the valve mechanism.
- Coolant Inlet and Outlet Ports: The connections for the heater hoses.
- Seals: To prevent coolant leaks.
The actuator is a critical part of the system. Electric actuators are more common in modern vehicles. These actuators rely on a small electric motor that turns a series of gears. This gearing provides the necessary torque to open and close the valve against the pressure of the coolant. Vacuum actuators utilize engine vacuum to move a diaphragm, which in turn controls the valve. In either case, the actuator is usually connected to the valve mechanism via a linkage.
Common Issues and Symptoms
Like any mechanical component, the heater control valve is susceptible to failure. Common issues include:
- Sticking or Binding: The valve mechanism can become stuck due to corrosion, debris buildup, or a faulty actuator. This can prevent the valve from opening or closing fully.
- Leaks: The seals around the valve can deteriorate over time, leading to coolant leaks.
- Actuator Failure: The electric motor or vacuum diaphragm can fail, rendering the valve inoperable.
- Broken Linkage: The linkage between the actuator and the valve mechanism can break or become disconnected.
The symptoms of a faulty heater control valve can vary depending on the mode of failure. Some common symptoms include:
- No Heat: If the valve is stuck closed, no hot coolant will reach the heater core, resulting in a lack of heat in the cabin.
- Constant Heat: If the valve is stuck open, hot coolant will continuously flow to the heater core, resulting in constant heat, even when the temperature is set to "cold."
- Intermittent Heat: The heat may come and go depending on the valve's position.
- Coolant Leaks: A visible coolant leak near the heater control valve is a clear indication of a problem.
- Overheating: In rare cases, a severely restricted or blocked heater control valve can contribute to engine overheating.
Troubleshooting and Diagnosis
Diagnosing a faulty heater control valve typically involves a process of elimination. Here's a step-by-step approach:
Visual Inspection
Begin by visually inspecting the heater control valve and its surrounding area for any signs of leaks, corrosion, or damage. Check the heater hoses connected to the valve for cracks or swelling. Look for any obvious damage to the actuator or its linkage.
Actuator Function Test
With the engine running and the climate control system on, adjust the temperature setting from "cold" to "hot" and listen for the actuator to move. You may be able to feel the actuator move as well. If the actuator doesn't move, it could be faulty or not receiving a signal from the climate control module. Use a multimeter to check for voltage at the actuator connector when the temperature setting is changed. If there's no voltage, the problem lies upstream, likely in the climate control module or wiring.
If voltage is present, the actuator is likely the culprit and should be replaced.
Valve Operation Check
Carefully feel the heater hoses that enter and exit the heater core. With the engine warm and the temperature set to "hot," both hoses should be hot. With the temperature set to "cold," the inlet hose should be hot, while the outlet hose should be cooler if the valve is functioning properly. If both hoses remain hot regardless of the temperature setting, the valve is likely stuck open. If both hoses remain cool, the valve is likely stuck closed or there's a blockage elsewhere in the system.
Coolant Flow Test
Caution: This test involves working with hot coolant. Exercise extreme caution and wear appropriate safety gear.
If the above tests are inconclusive, you can perform a coolant flow test. Disconnect the heater hoses from the heater control valve and temporarily bypass the valve with a connecting hose. Start the engine and observe the coolant flow through the heater core. If the heater core is flowing normally, the issue is definitely with the valve.
Error Codes
In some cases, a faulty heater control valve or its associated components may trigger a diagnostic trouble code (DTC) in the vehicle's computer. Use an OBD-II scanner to check for any relevant DTCs. Common codes might relate to actuator circuit failures or temperature sensor readings. Refer to the vehicle's service manual for specific DTC definitions and troubleshooting procedures.
Replacement and Repair
If the heater control valve is found to be faulty, replacement is generally the best course of action. Attempting to repair a damaged valve can be difficult and may not provide a lasting solution. The replacement process typically involves the following steps:
- Drain the Coolant: Allow the engine to cool completely. Drain the coolant from the cooling system.
- Disconnect Hoses: Disconnect the heater hoses from the heater control valve. Use hose clamp pliers to remove the hose clamps.
- Disconnect Actuator: Disconnect the electrical connector from the actuator.
- Remove Valve: Remove the heater control valve from its mounting location. This may involve removing bolts or clips.
- Install New Valve: Install the new heater control valve in the reverse order of removal. Make sure to use new hose clamps.
- Reconnect Hoses and Actuator: Reconnect the heater hoses and the electrical connector to the actuator.
- Refill Coolant: Refill the cooling system with the proper type and amount of coolant.
- Bleed the System: Bleed the cooling system to remove any air pockets.
- Test: Start the engine and check for leaks. Verify that the heater is functioning properly.
When selecting a replacement heater control valve, be sure to choose a quality part that is specifically designed for the 2013 Nissan Armada. Consider using a genuine Nissan part for optimal performance and reliability. After completing the replacement, carefully monitor the cooling system for leaks and verify that the heater is functioning as expected.
Conclusion
The heater control valve is an essential component of the 2013 Nissan Armada's climate control system. Understanding its function, construction, common issues, and troubleshooting techniques can empower you to diagnose and address heating problems effectively. By following the steps outlined in this guide, you can ensure that your Armada's heating system provides reliable and comfortable warmth during cold weather driving conditions. While this article has aimed to be thorough, always consult the vehicle's service manual for model-specific instructions and safety precautions. With a little knowledge and effort, you can keep your Armada running smoothly and comfortably for years to come.