2013 Nissan Pathfinder Ac Relay Location
Alright, let's dive into locating the AC relay on a 2013 Nissan Pathfinder. This is a common task for DIYers, especially when troubleshooting AC problems like the compressor not engaging or intermittent cooling. While it's not rocket science, knowing exactly where to look and understanding the system helps avoid unnecessary frustration and potential damage.
Understanding Relays and the AC System
Before we pinpoint the relay's location, let's quickly recap what a relay does and how it fits into the AC system. A relay is essentially an electrically operated switch. It allows a low-current circuit (the control circuit) to switch on or off a high-current circuit (the load circuit). In the case of the AC system, the control circuit is the signal from the AC request switch (inside the car) and the engine control module (ECM), which takes safety parameters into account.
The load circuit powers the AC compressor clutch. The compressor clutch is an electromagnetic device that, when energized, engages the compressor, allowing it to circulate refrigerant. This is a high-current draw item, which is why a relay is used. Directly switching the compressor clutch with a small switch in the dash would likely burn out the switch.
Think of it like this: you're flipping a light switch (low current) that turns on a powerful spotlight (high current). The relay is the intermediary making that happen safely.
The AC system also relies on sensors to operate correctly. Things like the refrigerant pressure sensor, and ambient temperature sensor are very important. The ECM uses inputs from these sensors to decide when it is appropriate to energize the AC relay. Low refrigerant will prevent the system from engaging, and extremely low temperatures will also prevent the AC from engaging.
Location, Location, Location: Finding the AC Relay on a 2013 Pathfinder
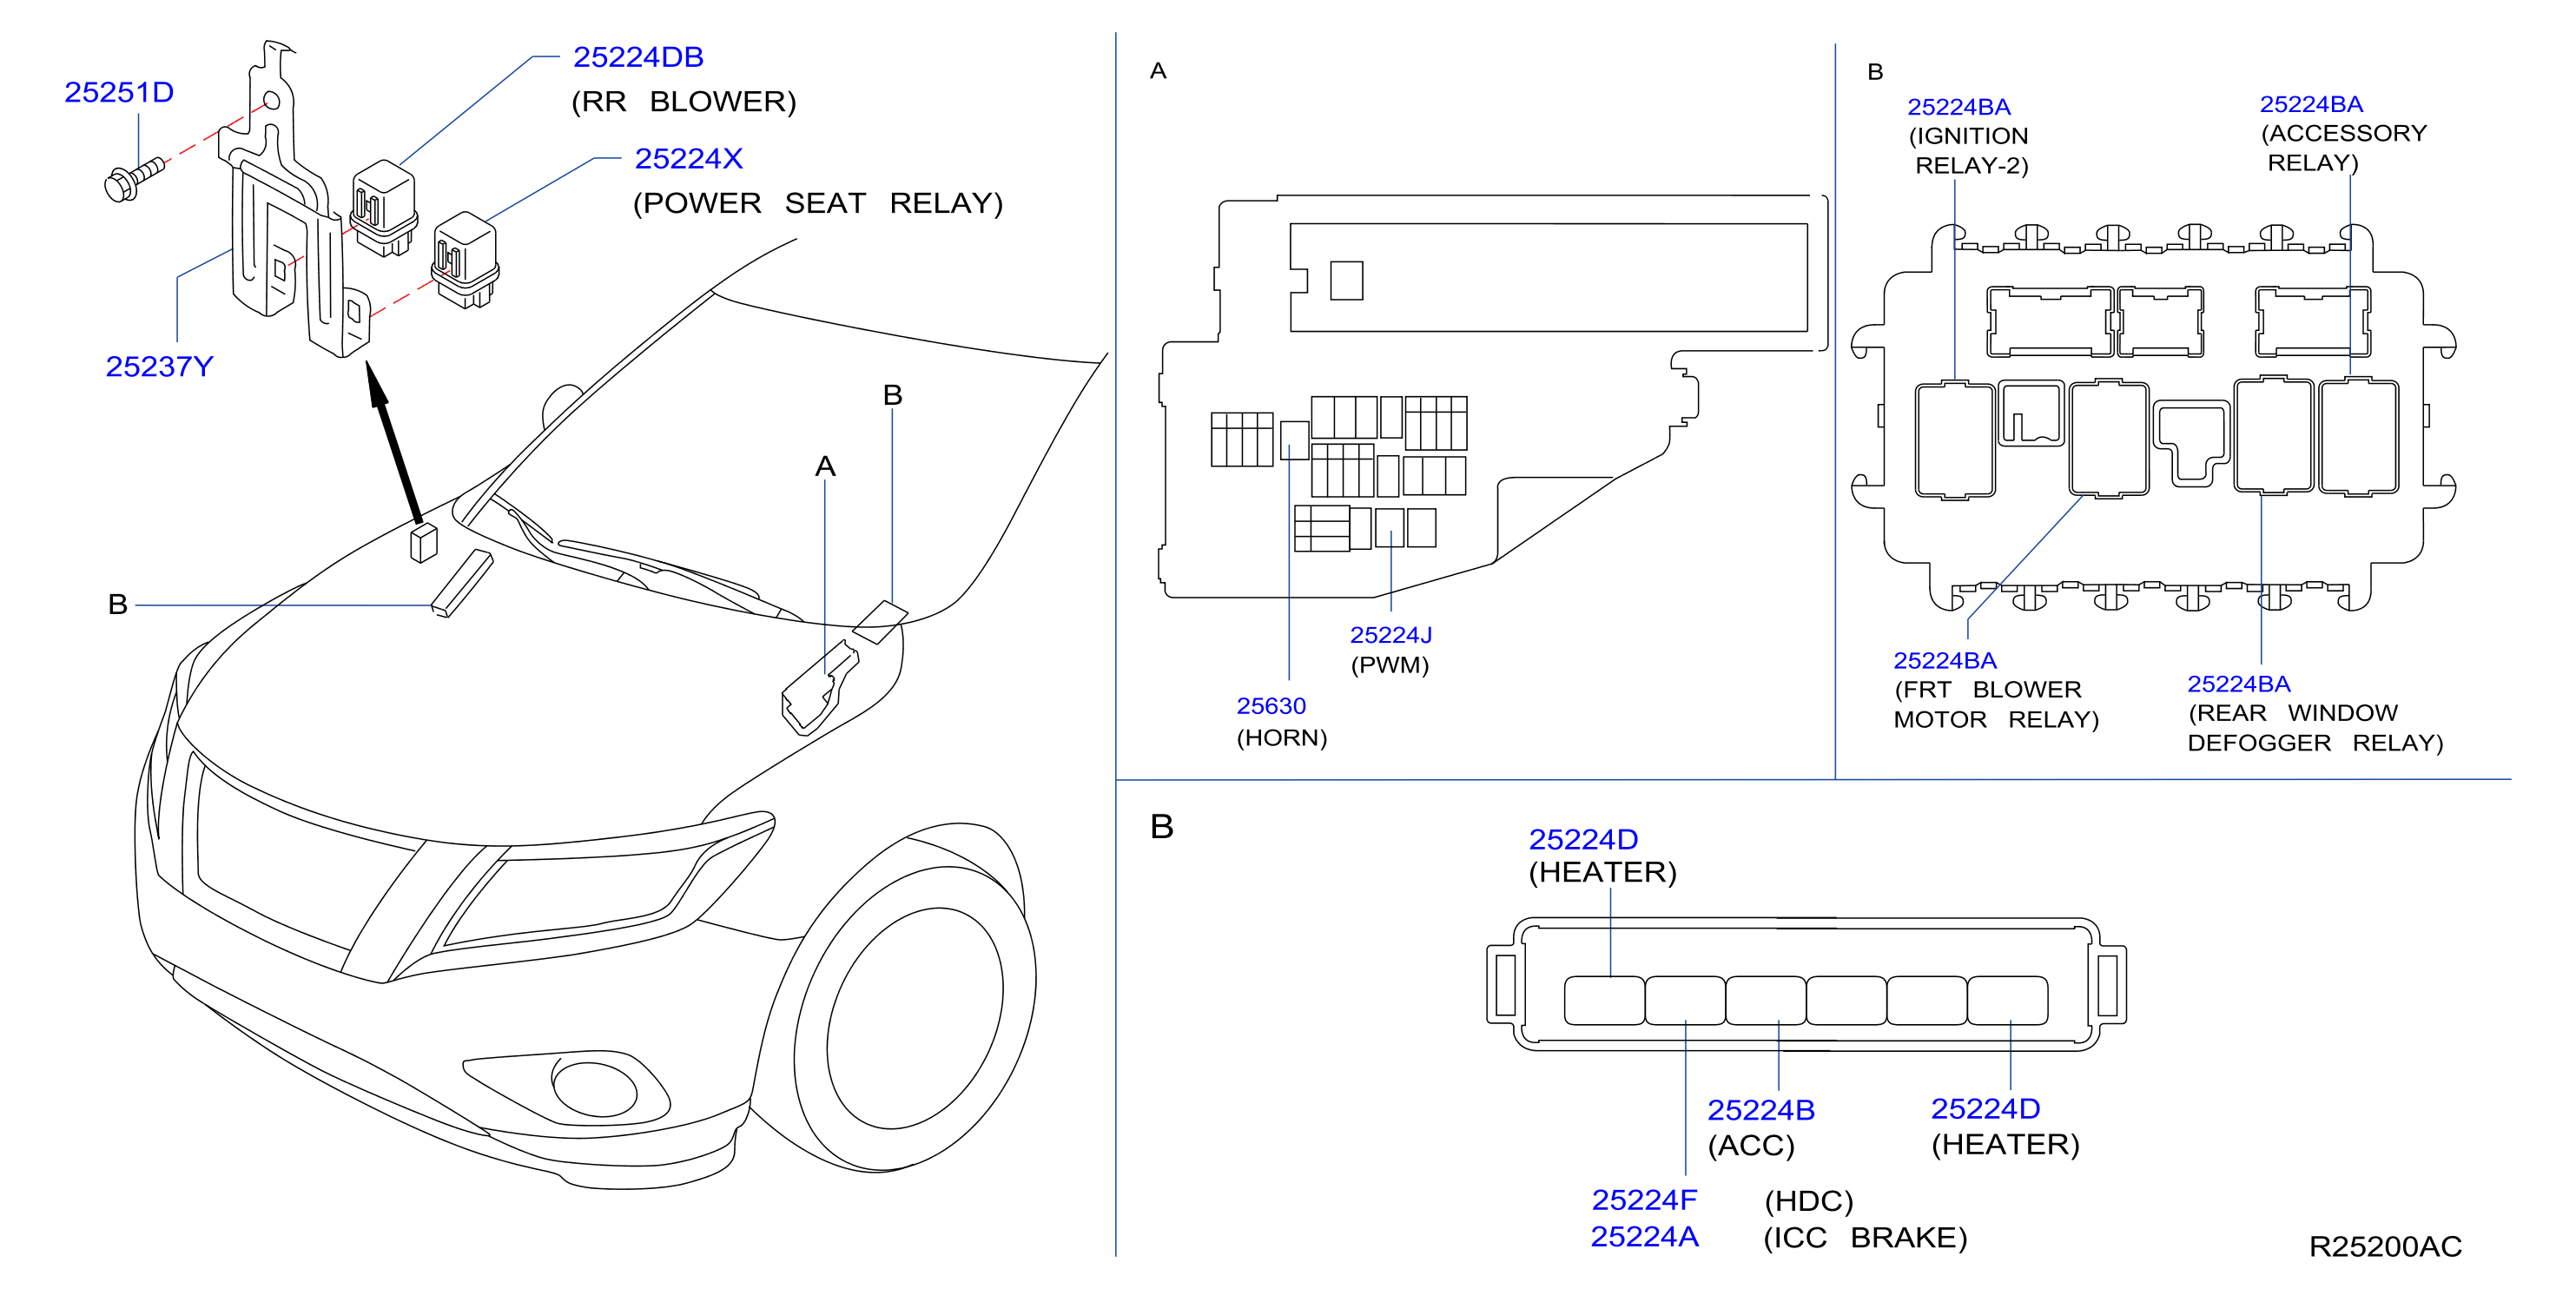
Now, to the heart of the matter: where is the AC relay located on your 2013 Nissan Pathfinder? It's usually found in one of two locations: the Intelligent Power Distribution Module (IPDM) E/R, or a separate relay box near the engine compartment. The IPDM E/R is the more common location.
The IPDM E/R (Intelligent Power Distribution Module Engine Room)
The IPDM E/R is basically a fancy name for the main fuse and relay box located in the engine compartment. It's a black plastic box, typically rectangular in shape. Here's how to find it on your Pathfinder:
- Open the Hood: Duh, right? But always a good starting point!
- Locate the IPDM E/R: On most 2013 Pathfinders, the IPDM E/R is situated on the passenger side of the engine compartment, near the firewall. Look for a black plastic box with multiple wires and connectors attached to it. It's usually labeled with a diagram on its cover.
- Open the IPDM E/R Cover: There are usually clips or tabs securing the cover. Gently release them to remove the cover. Be careful not to break the clips, as they can become brittle with age and heat.
- Identify the AC Relay: Now comes the crucial part. Inside the IPDM E/R, you'll see a collection of fuses and relays. The AC relay is usually labeled on a diagram affixed to the inside of the IPDM E/R cover, or sometimes molded into the plastic of the box itself. Look for labels like "A/C Relay", "MG CLT Relay" (Magnetic Clutch Relay), or similar abbreviations. If you can’t find a diagram on the cover, search online for a diagram specific to the 2013 Nissan Pathfinder IPDM E/R.
Important Note: Relay diagrams can sometimes be a little ambiguous. The labeling might not be crystal clear. Consult your owner's manual, a reliable online service manual (like AlldataDIY), or a Pathfinder-specific forum for a diagram that accurately identifies the AC relay's position in the IPDM E/R.
Alternate Relay Box (Less Common)
While less likely, some 2013 Pathfinders might have a separate, smaller relay box containing the AC relay. This box is usually located near the IPDM E/R, but could also be near the radiator support or inner fender well on either side of the engine bay. The approach to finding this relay is similar:
- Visually Inspect: Carefully examine the engine compartment, paying attention to any small, black plastic boxes with wires connected to them.
- Check for Labeling: Look for labeling on the box itself, indicating that it houses relays related to the AC system.
- Consult Diagrams: If you suspect you've found the relay box, try to find a diagram online that matches the physical appearance of the box and identifies the AC relay.
Identifying the Correct Relay: Physical Characteristics and Testing
Once you've located the relay box, you need to be certain you've found the *correct* AC relay. Here's what to look for:
- Relay Size and Shape: Most automotive relays are standardized in size and shape. They are typically rectangular or cube-shaped, about an inch or two in each dimension.
- Terminal Configuration: Relays typically have 4 or 5 terminals or pins. A standard automotive relay will have terminals labeled 30, 85, 86, and 87. A five-pin relay might include an 87a.
- Color Coding (Sometimes): While not a foolproof method, some manufacturers use color coding to identify relays. However, this is not consistent, and you shouldn't rely on color alone.
- Part Number: If you can see the part number on the relay, you can cross-reference it online or at an auto parts store to confirm it's the correct relay for the AC compressor clutch.
Testing the Relay: Before replacing the relay, it's wise to test it to confirm it's actually the culprit. Here are two common methods:
- Relay Swapping: Find an identical relay in the IPDM E/R that controls a less critical function (like the horn or headlights) and swap it with the suspected AC relay. If the AC now works and the other function (horn or headlights) no longer works, you've likely confirmed the AC relay is bad. Warning: Only swap relays if they are absolutely identical in part number, pin configuration, and voltage/amperage rating. Swapping with a different relay could damage your vehicle's electrical system.
- Multimeter Testing: Use a multimeter to test the relay's coil resistance and continuity. You'll need to consult a wiring diagram or relay datasheet to determine which pins correspond to the coil and switch. A broken coil circuit (infinite resistance) or a switch that doesn't close when the coil is energized indicates a faulty relay.
Replacing the AC Relay
Once you've positively identified the faulty AC relay, replacing it is straightforward:
- Purchase a Replacement Relay: Get a direct replacement relay from a reputable auto parts store. Make sure it matches the original relay's part number, voltage, amperage rating, and pin configuration.
- Disconnect the Negative Battery Terminal: This is a crucial safety step to prevent short circuits during the replacement process.
- Remove the Old Relay: Carefully pull the old relay straight out of its socket. It might be a bit tight, but avoid twisting or yanking, as this could damage the socket terminals.
- Install the New Relay: Align the pins of the new relay with the socket and firmly press it into place.
- Reconnect the Negative Battery Terminal: Tighten the terminal securely.
- Test the AC System: Start the engine and turn on the AC to verify that the compressor engages and the system is cooling properly.
Troubleshooting Beyond the Relay
If replacing the AC relay doesn't solve the problem, the issue lies elsewhere in the AC system. Possible causes include:
- Low Refrigerant: The most common cause of AC problems. A leak in the system can cause the refrigerant pressure to drop below the threshold required for the compressor to engage.
- Faulty AC Compressor: The compressor itself might be failing.
- Bad Compressor Clutch: The clutch mechanism might be worn or damaged.
- Faulty Pressure Switch: The refrigerant pressure switch might be malfunctioning, preventing the compressor from engaging.
- Wiring Issues: Damaged or corroded wiring can interrupt the electrical signals to the compressor clutch.
- Faulty ECM: In rare cases, the engine control module (ECM) could be the cause of the problem. This is a more complex issue that usually requires professional diagnosis.
Remember: Working on AC systems involves handling refrigerant, which requires specialized equipment and knowledge. If you're not comfortable diagnosing and repairing these issues yourself, it's best to consult a qualified automotive technician.
By following these steps and understanding the components involved, you should be able to successfully locate and replace the AC relay on your 2013 Nissan Pathfinder and get your AC blowing cold air again!