2013 Nissan Rogue Fuel Pump Relay Location
Alright, so you're diving into the fuel system of your 2013 Nissan Rogue. That's a good skill to have. Knowing where the fuel pump relay is and how to access it can save you a tow and some serious money down the line. We're going to walk through the location and access procedure step-by-step. Keep in mind that working with fuel systems always carries some risk, so disconnect the negative battery terminal and have a fire extinguisher handy. Safety first!
Understanding the Fuel Pump Relay
Before we pinpoint its location, let’s quickly recap what the fuel pump relay actually does. The fuel pump relay is an electrically operated switch. Its main job is to supply power to the fuel pump. The Engine Control Module (ECM), sometimes also referred to as the Powertrain Control Module (PCM) in your Rogue, controls the relay. When you turn the key to the "ON" position (but not starting the engine), the ECM usually energizes the fuel pump relay for a brief period (typically a few seconds). This primes the fuel system. Once the engine starts, the ECM continues to keep the relay energized, ensuring a constant supply of fuel to the engine.
Why a relay instead of just a direct switch? The fuel pump requires a relatively high current to operate. Using a relay allows the ECM to control this high current circuit with a low current signal, protecting the ECM from being overloaded. This is crucial for the longevity of the ECM.
Signs of a failing fuel pump relay include:
- Engine not starting (most common)
- Engine stalling intermittently
- Loss of power, especially under load
- Fuel pump not priming when the key is turned to the "ON" position (listen carefully; you should hear a brief whirring sound from the rear of the vehicle)
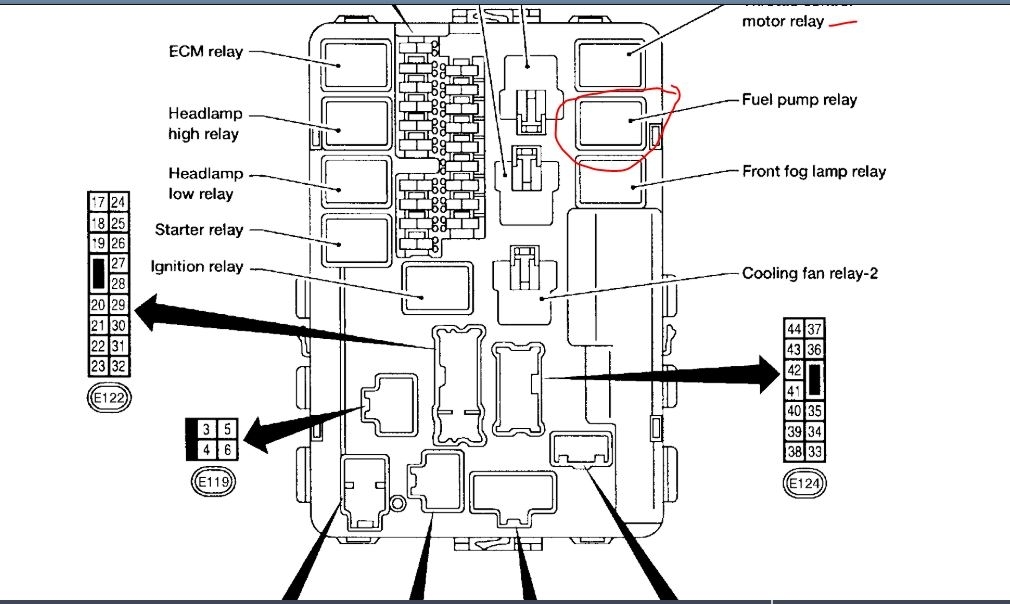
Location of the 2013 Nissan Rogue Fuel Pump Relay
Here's the crucial part: the fuel pump relay on a 2013 Nissan Rogue is typically located in the Intelligent Power Distribution Module (IPDM) E/R. The IPDM E/R is basically a fancy name for the main fuse and relay box under the hood. Think of it as the central nervous system for your car's electrical system, distributing power to various components.
Important Note: While this is the most common location, there *could* be minor variations depending on specific trim levels or regional variations. Always consult your owner's manual for the definitive location for your specific vehicle. However, 99% of the time, it will be in the IPDM E/R.
Identifying the IPDM E/R
The IPDM E/R is a black plastic box located in the engine compartment. On a 2013 Rogue, it's usually on the passenger side, near the battery. It's a rectangular box with a secure cover. Look for wiring harnesses entering and exiting the box – this is a dead giveaway.
Accessing the Fuel Pump Relay
- Safety First: Disconnect the negative battery terminal. This prevents any accidental electrical shorts while you're working.
- Locate the IPDM E/R: As described above, find the black plastic box on the passenger side of the engine compartment.
- Open the IPDM E/R Cover: There will be clips or latches securing the cover. Use a small screwdriver or your fingers to carefully release these clips. Be gentle; you don't want to break them.
- Locate the Fuel Pump Relay: Once the cover is off, you'll see an array of fuses and relays. This is where it gets a bit tricky. There isn't always a clear label indicating the fuel pump relay specifically.
The best way to identify the relay is to consult the diagram printed on the underside of the IPDM E/R cover. This diagram shows the location of each fuse and relay. Look for a relay labeled "Fuel Pump Relay," "FP Relay," or something similar.
- Identifying the Relay (If No Diagram): If the diagram is missing or illegible (it happens!), you can try to identify the relay by its color and size, and by comparing it to a known good relay. Typically, the fuel pump relay is a standard Bosch-style relay. You can also try to *listen* for the relay clicking when someone turns the ignition key to the "ON" position. Get close to the IPDM E/R and have a helper turn the key – you should hear a faint "click" from the fuel pump relay. This method isn't foolproof, but it can help narrow it down.
- Removing the Relay: Once you've identified the fuel pump relay, gently pull it straight up out of its socket. You might need to wiggle it slightly. Do not use excessive force, as you could damage the socket.
Testing the Fuel Pump Relay
Before you simply replace the relay, it’s a good idea to test it to confirm that it's actually faulty. Here are a couple of ways to do this:
Using a Multimeter
A multimeter is your best friend for electrical troubleshooting. You can use it to test the relay's continuity and voltage.
- Identify the Relay Terminals: A standard automotive relay has four or five terminals. The terminals are usually numbered (e.g., 30, 85, 86, 87, 87a).
- Test the Coil (Terminals 85 and 86): Set your multimeter to measure resistance (Ohms). Connect the multimeter probes to terminals 85 and 86. You should see a resistance reading, typically between 50 and 120 Ohms. If you see no reading (open circuit) or a very low reading (short circuit), the relay coil is likely bad.
- Test the Switch (Terminals 30 and 87): With the multimeter still set to measure resistance, connect the probes to terminals 30 and 87. You should see an open circuit (infinite resistance) when the relay is *not* energized.
- Energize the Relay: Apply 12 volts to terminals 85 and 86. You can use a small battery or a bench power supply. Be careful not to reverse the polarity!
- Test the Switch (Terminals 30 and 87) Again: With the relay energized, connect the multimeter probes to terminals 30 and 87. You should now see a closed circuit (very low resistance, close to 0 Ohms). If the resistance remains high, the relay's switch is not working correctly.
The "Swap Test"
If you don't have a multimeter, you can try the "swap test." Look for another relay in the IPDM E/R that is identical to the fuel pump relay and is used for a non-essential function (like the horn or rear window defogger). Swap the fuel pump relay with the other relay. If your car now starts but the horn (or whatever function you swapped with) doesn't work, then the fuel pump relay is bad. This is a quick and easy way to diagnose the problem, but it only works if you have a compatible relay to swap with.
Replacing the Fuel Pump Relay
Once you've confirmed that the fuel pump relay is faulty, replacing it is straightforward. Purchase a new relay that is the exact same type and amperage rating as the old one. You can find these at any auto parts store. Simply plug the new relay into the socket where you removed the old one, making sure it's fully seated. Reconnect the negative battery terminal, and you should be good to go!
Troubleshooting Beyond the Relay
If you replace the fuel pump relay and your car still doesn't start, the problem likely lies elsewhere. Possible causes include:
- Faulty Fuel Pump: The fuel pump itself could be bad.
- Clogged Fuel Filter: A clogged fuel filter can restrict fuel flow.
- Wiring Issues: There could be a break in the wiring between the relay and the fuel pump.
- Crankshaft Position Sensor: A faulty crankshaft position sensor can prevent the ECM from triggering the fuel pump relay.
- ECM Problems: In rare cases, the ECM itself could be faulty.
Diagnosing these issues can require more advanced tools and knowledge. If you're not comfortable tackling these problems yourself, it's best to take your car to a qualified mechanic.
Good luck with your troubleshooting! Remember to double-check everything, and always prioritize safety. With a little patience and the right information, you can often fix these kinds of problems yourself and save a lot of money.