2014 Nissan Murano Ac Relay Location
If you're experiencing issues with your air conditioning, headlights, or other electrical components in your 2014 Nissan Murano, a faulty AC relay might be the culprit. Locating and testing the relay is a relatively straightforward task that can save you a trip to the mechanic. This article will guide you through the process of finding the 2014 Nissan Murano AC relay location and provide some helpful tips along the way.
Understanding Relays and Their Importance
Before we dive into the specifics of locating the AC relay, it's helpful to understand what a relay is and why it's important. A relay is essentially an electrically operated switch. It allows a low-current circuit to control a high-current circuit. In the context of your car, this means that the small electrical signal from your AC control panel can activate a relay that then supplies power to the AC compressor, which requires a significant amount of electricity.
Relays are crucial for protecting your car's electrical system. Without them, the delicate switches and wiring in your dashboard would be overwhelmed by the high current demands of components like the AC compressor, headlights, and other accessories. A faulty relay can prevent these components from working properly, leading to discomfort and potential safety issues.
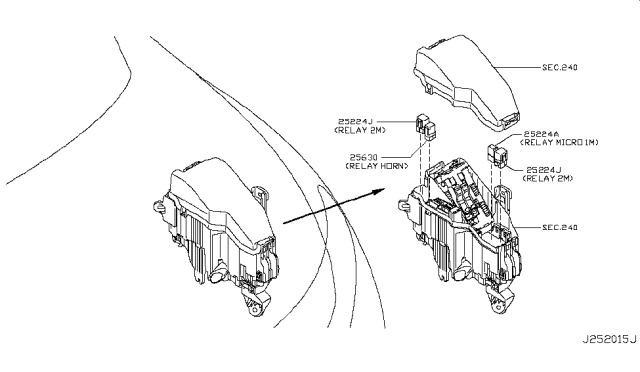
Locating the 2014 Nissan Murano AC Relay
The AC relay in a 2014 Nissan Murano is typically located within one of the vehicle's fuse boxes. While the exact placement can sometimes vary slightly depending on the specific trim level, here's a general guide to help you find it:
Identifying the Fuse Boxes
Your 2014 Nissan Murano has two primary fuse box locations:
- Interior Fuse Box: This fuse box is usually located inside the cabin of the vehicle, often under the dashboard on the driver's side. You might need to remove a small panel or access it from beneath the steering wheel column. Check your owner's manual for the specific location in your vehicle.
- Engine Compartment Fuse Box: This fuse box is located under the hood, typically near the battery or on one of the fender wells. It houses fuses and relays for components in the engine bay.
Checking the Engine Compartment Fuse Box First
In many vehicles, the AC relay is located in the engine compartment fuse box. This is the first place you should check.
- Open the Hood: Ensure the engine is off and the car is parked safely.
- Locate the Fuse Box: Find the fuse box under the hood. It will be a black plastic box with a lid that can be unclipped or unscrewed.
- Remove the Lid: Carefully remove the lid of the fuse box. You might need a small screwdriver to help you unclip it.
- Consult the Fuse Box Diagram: Inside the lid of the fuse box, you should find a diagram that identifies each fuse and relay. This diagram is crucial for locating the AC relay. The diagram might label the AC relay as "A/C Relay," "Compressor Relay," or something similar. Look closely at the diagram.
- Identify the AC Relay: Based on the diagram, identify the AC relay. It will be a small, typically cube-shaped component plugged into a socket. The color can vary, but it's often black, blue, or grey.
If Not in the Engine Compartment, Check the Interior Fuse Box
If you don't find the AC relay in the engine compartment fuse box, proceed to check the interior fuse box.
- Locate the Interior Fuse Box: As mentioned earlier, the interior fuse box is usually located under the dashboard on the driver's side.
- Remove the Access Panel: You might need to remove a small plastic panel to access the fuse box. Consult your owner's manual for instructions on how to remove the panel.
- Consult the Fuse Box Diagram: Like the engine compartment fuse box, the interior fuse box should also have a diagram on the inside of the access panel or in your owner's manual.
- Identify the AC Relay: Use the diagram to locate the AC relay. The label might be slightly different than in the engine compartment fuse box, so look carefully.
Using Your Owner's Manual
Your owner's manual is your best resource for identifying the exact location of the AC relay in your specific 2014 Nissan Murano. The manual will provide detailed diagrams and descriptions of the fuse boxes and their components. Take the time to consult your owner's manual before attempting to locate the relay. It will save you time and frustration.
Testing the AC Relay
Once you've located the AC relay, you can test it to see if it's functioning properly. There are several ways to test a relay:
Using a Multimeter
A multimeter is a versatile tool that can be used to test the continuity and resistance of the relay. Here's how to test a relay with a multimeter:
- Identify the Relay Terminals: Relays typically have four or five terminals. You'll need to identify the coil terminals (for energizing the relay) and the switch terminals (for the circuit being controlled). The relay diagram should show the terminal layout.
- Test the Coil Resistance: Set the multimeter to the ohms setting. Connect the multimeter leads to the coil terminals. You should read a resistance value, typically between 50 and 120 ohms. An open circuit (infinite resistance) indicates a faulty coil.
- Test the Switch Continuity: Disconnect the relay from the fuse box. Set the multimeter to the continuity setting (it usually has a beep sound). Connect the multimeter leads to the switch terminals. With the relay de-energized, the switch should be open (no continuity).
- Energize the Relay: Use a 12V power source (like a battery charger) to energize the coil terminals. Be careful to observe the correct polarity (positive and negative).
- Test the Switch Continuity Again: With the relay energized, the switch should now be closed (showing continuity). If the switch doesn't close, the relay is faulty.
The "Swap Test"
A simpler method is the "swap test." This involves swapping the AC relay with another identical relay in the fuse box that controls a less critical system, such as the horn relay. If the AC now works and the horn doesn't, you've confirmed that the AC relay is faulty. Always ensure the relays are identical before swapping them.
Listening for the "Click"
You can also try listening for a "click" when the AC is turned on. When the AC control panel sends a signal to activate the AC, you should hear a faint click from the AC relay as it engages. If you don't hear a click, it could indicate a problem with the relay or the wiring leading to it.
Replacing the AC Relay
If you've determined that the AC relay is faulty, replacing it is a simple process:
- Purchase a New Relay: Buy a replacement relay that is identical to the original. Make sure it has the same part number and specifications. You can find replacement relays at most auto parts stores or online.
- Disconnect the Old Relay: Carefully disconnect the old relay from the fuse box.
- Install the New Relay: Plug the new relay into the socket. Make sure it's fully seated.
- Test the AC: Turn on the AC to see if it's working properly.
Troubleshooting Tips
If replacing the AC relay doesn't solve the problem, there might be other issues with your AC system. Here are some troubleshooting tips:
- Check the AC Fuse: Make sure the AC fuse is not blown. The fuse is usually located in the same fuse box as the relay.
- Check the Refrigerant Level: Low refrigerant can prevent the AC compressor from engaging.
- Inspect the Wiring: Check the wiring leading to the AC compressor and relay for any damage or corrosion.
- Consult a Mechanic: If you're unable to diagnose the problem yourself, it's best to consult a qualified mechanic.
Preventive Maintenance
Regular maintenance can help prevent AC relay failures. Here are some tips:
- Keep the Fuse Boxes Clean: Clean the fuse boxes periodically to remove dirt and debris.
- Protect Against Moisture: Ensure the fuse boxes are properly sealed to prevent moisture from entering.
- Replace Relays When Necessary: If you notice any signs of relay failure, such as intermittent operation or a weak click, replace the relay promptly.
Conclusion
Locating the 2014 Nissan Murano AC relay location is a manageable task with the right information. By following the steps outlined in this article, you can identify the relay, test it, and replace it if necessary. Remember to consult your owner's manual for specific details about your vehicle. By taking the time to troubleshoot your AC system, you can save money and keep your car running smoothly. Always prioritize safety when working with electrical components. If you're not comfortable performing these tasks yourself, seek the help of a qualified mechanic.