2015 Nissan Altima Fuel Pump Replacement
The 2015 Nissan Altima, a mainstay of the mid-size sedan market, relies on a robust fuel system to deliver gasoline from the tank to the engine. At the heart of this system lies the fuel pump, a component that, over time, can degrade and require replacement. This article provides an in-depth look at the fuel pump replacement process for the 2015 Altima, outlining the necessary steps and providing technical insights into the system’s operation.
Understanding the Fuel System
Before diving into the replacement procedure, it's crucial to grasp the basic functionality of the fuel system. The fuel pump, typically located inside the fuel tank, draws fuel and pressurizes it, sending it through a fuel filter to remove impurities. This pressurized fuel then travels through fuel lines to the fuel rail, which distributes it to the injectors. The injectors, precisely controlled by the engine control unit (ECU), spray the fuel into the cylinders for combustion.
A failing fuel pump can manifest in several ways: difficulty starting, engine stalling, reduced fuel efficiency, and a noticeable loss of power, especially during acceleration. Diagnosing a fuel pump issue often involves checking fuel pressure with a specialized gauge. A reading below the manufacturer's specification indicates a potential problem with the pump, filter, or fuel pressure regulator.
Tools and Materials Required
Replacing the fuel pump is a task best undertaken with the proper tools and safety precautions. Here's a comprehensive list:
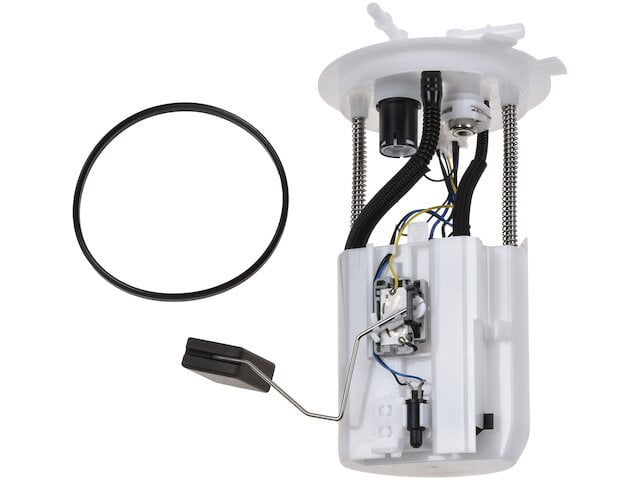
- New fuel pump module assembly (specific to the 2015 Nissan Altima)
- Fuel tank lock ring tool (essential for removing the fuel pump retaining ring)
- Screwdrivers (Phillips head and flat head)
- Socket set with various sizes, including extensions
- Wrenches (various sizes)
- Torque wrench
- Hammer (for gently tapping the lock ring tool)
- Jack and jack stands (for safely lifting the vehicle)
- Wheel chocks
- Safety glasses
- Gloves (fuel-resistant)
- Fuel-resistant container (to collect spilled fuel)
- Shop towels or rags
- Fire extinguisher (for safety)
- Penetrating oil (to loosen stubborn bolts)
- Wiring diagram (helpful for identifying electrical connectors)
Important Safety Note: Working with fuel is inherently dangerous. Ensure adequate ventilation, eliminate any potential ignition sources (sparks, open flames), and have a fire extinguisher readily available. Disconnect the negative battery cable before starting any work to prevent electrical shorts.
Step-by-Step Fuel Pump Replacement Procedure
The following steps outline the fuel pump replacement process for a 2015 Nissan Altima. While specific details may vary slightly depending on the vehicle's configuration, the general principles remain the same.
Step 1: Preparation and Safety
Begin by disconnecting the negative battery cable. Chock the rear wheels and lift the vehicle using a jack. Securely support the vehicle with jack stands. Locate the fuel tank, usually situated beneath the rear seats or in front of the rear axle. Minimize the amount of fuel in the fuel tank for safety. Driving the car until it's low on fuel is recommended.
Step 2: Accessing the Fuel Pump
The fuel pump access panel is typically located beneath the rear seat. Remove the rear seat cushion (usually held in place by clips or bolts). Locate and remove the access panel, revealing the fuel pump assembly.
Step 3: Disconnecting Fuel Lines and Electrical Connectors
Carefully disconnect the fuel lines from the fuel pump module. Use a fuel line disconnect tool, if required, to release the retaining clips. Place a fuel-resistant container beneath the lines to catch any spilled fuel. Disconnect the electrical connector from the fuel pump module. Refer to a wiring diagram if needed to ensure proper identification.
Important Note: Fuel lines can be under pressure even after the engine has been turned off. Wrap a shop towel around the fuel line connection before disconnecting to absorb any sprayed fuel.
Step 4: Removing the Fuel Pump Module
Use the fuel tank lock ring tool to loosen and remove the fuel pump retaining ring. This ring secures the fuel pump module to the fuel tank. Position the tool on the ring and gently tap it with a hammer to rotate it counterclockwise until it is free. Once the retaining ring is removed, carefully lift the fuel pump module out of the fuel tank. Be mindful of the fuel level sender float arm, which is delicate and can be easily damaged.
Step 5: Installing the New Fuel Pump Module
Before installing the new fuel pump module, compare it to the old one to ensure they are identical in terms of size, shape, and connector configuration. Carefully lower the new fuel pump module into the fuel tank, ensuring the fuel level sender float arm moves freely. Align the module with the tank opening and install the retaining ring. Use the fuel tank lock ring tool to tighten the retaining ring to the specified torque (refer to the vehicle's service manual).
Step 6: Reconnecting Fuel Lines and Electrical Connectors
Reconnect the fuel lines to the new fuel pump module, ensuring they are securely attached. Reconnect the electrical connector to the fuel pump module. Double-check that all connections are properly seated and locked.
Step 7: Reassembly and Testing
Reinstall the fuel pump access panel and the rear seat cushion. Lower the vehicle from the jack stands. Reconnect the negative battery cable. Turn the ignition key to the "on" position (but do not start the engine) to allow the fuel pump to prime the fuel system. Listen for the fuel pump running for a few seconds. Check for any fuel leaks around the fuel pump module and fuel line connections. If no leaks are detected, start the engine. Monitor the engine for smooth running and proper fuel delivery. Take the vehicle for a test drive to ensure proper operation.
Post-Installation Checks and Considerations
After replacing the fuel pump, several checks are recommended to ensure proper operation and longevity:
- Fuel Pressure Test: Verify that the fuel pressure meets the manufacturer's specification using a fuel pressure gauge.
- Leak Inspection: Thoroughly inspect all fuel line connections and the fuel pump module for any signs of leaks.
- OBD-II Scan: Scan the vehicle's onboard diagnostic system for any error codes related to the fuel system.
- Fuel Filter Replacement: Consider replacing the fuel filter at the same time as the fuel pump, as a clogged filter can strain the new pump.
Troubleshooting Common Issues
Even with careful execution, some issues may arise after fuel pump replacement:
- No Start: If the engine fails to start, double-check all electrical connections and fuel line connections. Verify that the fuel pump is receiving power.
- Rough Idle: A rough idle can indicate a problem with fuel delivery. Check for vacuum leaks and ensure the fuel injectors are functioning correctly.
- Check Engine Light: A check engine light may indicate a fuel system issue. Use an OBD-II scanner to retrieve the error code and diagnose the problem.
In conclusion, replacing the fuel pump on a 2015 Nissan Altima is a manageable task for the informed and prepared DIY enthusiast. By understanding the fuel system's operation, using the correct tools, following the proper procedure, and adhering to safety precautions, you can successfully complete this repair and restore your vehicle to optimal performance. Remember to always consult the vehicle's service manual for specific instructions and torque specifications.