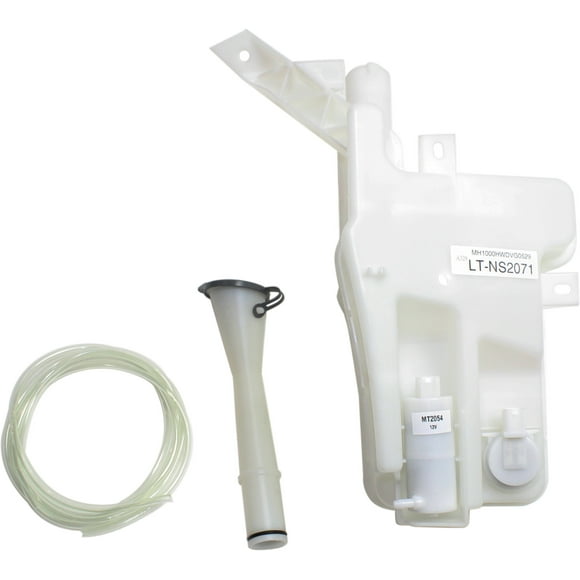
2015 Nissan Altima Washer Fluid Reservoir
Alright, let's talk about the washer fluid reservoir in your 2015 Nissan Altima. It's a seemingly simple component, but a failure in the system can be surprisingly annoying, especially when you're driving in less-than-ideal weather. We'll cover its function, common problems, how to diagnose them, and finally, how to replace the reservoir if necessary. Think of this as your deep dive into all things 2015 Altima washer fluid related.
Understanding the Washer Fluid System
The washer fluid system's primary job is to provide a stream of cleaning solution to your windshield, helping you maintain visibility. It's more than just a tank of water; it's a complete system comprised of several key components:
- Reservoir: The storage container for the washer fluid itself. Its capacity varies, but typically holds a gallon or more.
- Washer Pump: An electric pump that draws fluid from the reservoir and pushes it through the lines. This pump is usually located at the bottom of the reservoir or attached to it.
- Washer Lines: Hoses that carry the fluid from the pump to the spray nozzles.
- Spray Nozzles: The outlets on the hood or cowl that direct the spray onto the windshield.
- Check Valve (Sometimes): A one-way valve that prevents fluid from flowing back into the reservoir when the pump is not active. This maintains pressure in the lines for a more immediate spray.
- Fill Neck & Cap: For filling the reservoir with washer fluid.
The 2015 Altima uses a fairly standard setup. Understanding how each part interacts is crucial for troubleshooting problems. The pump is triggered by the windshield washer switch on your steering column. When you activate the switch, it sends power to the pump, which then forces the fluid through the system.
Common Problems with the 2015 Altima Washer Fluid Reservoir System
Several issues can plague the washer fluid system. Here are some of the most common:
- Cracked Reservoir: This is a frequent culprit, especially in regions with harsh winters where temperature fluctuations can cause the plastic to become brittle. Impacts from road debris can also contribute to cracks.
- Leaking Reservoir: Even without a visible crack, leaks can develop around the pump seal or at the seams of the reservoir itself.
- Clogged Spray Nozzles: Mineral deposits or debris can accumulate in the nozzles, obstructing the flow of fluid.
- Frozen Washer Fluid: Using plain water instead of proper washer fluid (which contains antifreeze) can cause the fluid to freeze and potentially crack the reservoir or damage the pump.
- Faulty Washer Pump: The pump itself can fail due to age, corrosion, or running dry.
- Damaged Washer Lines: Cracks, kinks, or disconnections in the washer lines can disrupt the flow of fluid.
- Electrical Issues: A blown fuse or a faulty wiring harness can prevent the pump from receiving power.
Diagnosing Washer Fluid Reservoir Problems
Before you start throwing parts at the problem, a little diagnosis can save you time and money. Here's a step-by-step approach:
- Check the Fluid Level: Obvious, but often overlooked! Make sure the reservoir is actually full.
- Listen for the Pump: When you activate the windshield washer switch, listen for the sound of the pump. If you don't hear anything, it could be a faulty pump, a blown fuse, or a wiring issue.
- Inspect the Reservoir for Leaks: Look for signs of fluid leakage around the reservoir, especially at the bottom and near the pump. A flashlight can be helpful here.
- Check the Spray Nozzles: If the pump is running but no fluid is coming out, the nozzles might be clogged. Try cleaning them with a small needle or pin.
- Examine the Washer Lines: Look for cracks, kinks, or disconnections in the washer lines. Pay close attention to areas where the lines might be rubbing against other components.
- Check the Fuse: Consult your owner's manual to locate the fuse for the windshield washer system. Check the fuse to see if it's blown. If it is, replace it with a fuse of the same amperage. Note: If the fuse blows again immediately, there's likely a short circuit in the system.
- Test the Pump (Advanced): If you suspect a faulty pump, you can test it directly. Disconnect the electrical connector from the pump and use a multimeter to check for voltage when the windshield washer switch is activated. If you're getting voltage but the pump isn't running, the pump is likely bad. You can also apply 12V directly from a battery to the pump terminals to see if it activates. Be careful and observe proper polarity.
Troubleshooting tip: If the rear windshield washer (if equipped) works, but the front doesn't, the pump may have separate outputs for the front and rear. One output might be faulty while the other is still functional.
Replacing the 2015 Altima Washer Fluid Reservoir
If you've determined that the reservoir itself is cracked or leaking, replacement is often the best course of action. Here's a general guide to the process. Always disconnect the negative battery terminal before working on any electrical components.
- Gather Your Tools and Materials: You'll need a new washer fluid reservoir (ensure it's the correct part for your 2015 Altima), a socket set, screwdrivers (both flathead and Phillips), pliers, a drain pan, and possibly some new washer fluid.
- Drain the Old Reservoir: Before removing the reservoir, drain as much of the washer fluid as possible. You can use a siphon or disconnect the washer lines at a low point and let the fluid drain into a pan.
- Remove the Existing Reservoir: The location of the reservoir can vary slightly depending on the specific trim level of your Altima, but it's typically located in the engine bay near the fender.
- You may need to remove some other components, such as the air intake assembly or the wheel well liner, to gain access to the reservoir.
- Disconnect the electrical connector from the washer pump.
- Disconnect the washer lines from the pump and the reservoir. Remember the routing of the lines for reinstallation.
- Remove any bolts or screws that secure the reservoir to the vehicle.
- Carefully lift the reservoir out of the engine bay.
- Transfer the Washer Pump (If Necessary): Many aftermarket reservoirs don't come with a new pump. If your old pump is still functional, you'll need to transfer it to the new reservoir.
- Carefully remove the pump from the old reservoir. It's usually held in place by a rubber grommet or seal.
- Install the pump into the new reservoir, ensuring it's properly seated and sealed.
- Install the New Reservoir:
- Position the new reservoir in the engine bay.
- Secure it with the bolts or screws you removed earlier.
- Reconnect the washer lines to the pump and the reservoir, following the original routing.
- Reconnect the electrical connector to the washer pump.
- Reinstall any components you removed to gain access to the reservoir, such as the air intake assembly or the wheel well liner.
- Fill the Reservoir with Washer Fluid: Fill the new reservoir with the appropriate washer fluid.
- Test the System: Reconnect the negative battery terminal. Activate the windshield washer switch and check for proper spray from the nozzles. Look for any leaks around the reservoir and connections.
Important Considerations:
- Aftermarket vs. OEM: You can choose between an aftermarket or an OEM (Original Equipment Manufacturer) replacement reservoir. OEM parts are generally more expensive but offer a guaranteed fit and quality. Aftermarket parts can be more affordable but may require some modifications to fit properly.
- Washer Fluid Type: Always use a high-quality windshield washer fluid that's designed for your climate. Using plain water can damage the system and reduce its effectiveness.
- Safety First: Always wear safety glasses when working on your vehicle, especially when dealing with fluids.
Preventative Maintenance
Here are a few tips to help prevent problems with your washer fluid system:
- Use the Right Fluid: Use a good quality windshield washer fluid appropriate for your climate.
- Don't Run it Dry: Avoid running the washer fluid reservoir completely empty, as this can damage the pump.
- Inspect Regularly: Periodically inspect the reservoir, lines, and nozzles for leaks, cracks, or clogs.
- Clean the Nozzles: Occasionally clean the spray nozzles with a small needle or pin to remove any debris.
By understanding how the washer fluid system works and following these diagnostic and repair tips, you can keep your 2015 Nissan Altima's windshield clear and your visibility optimal.