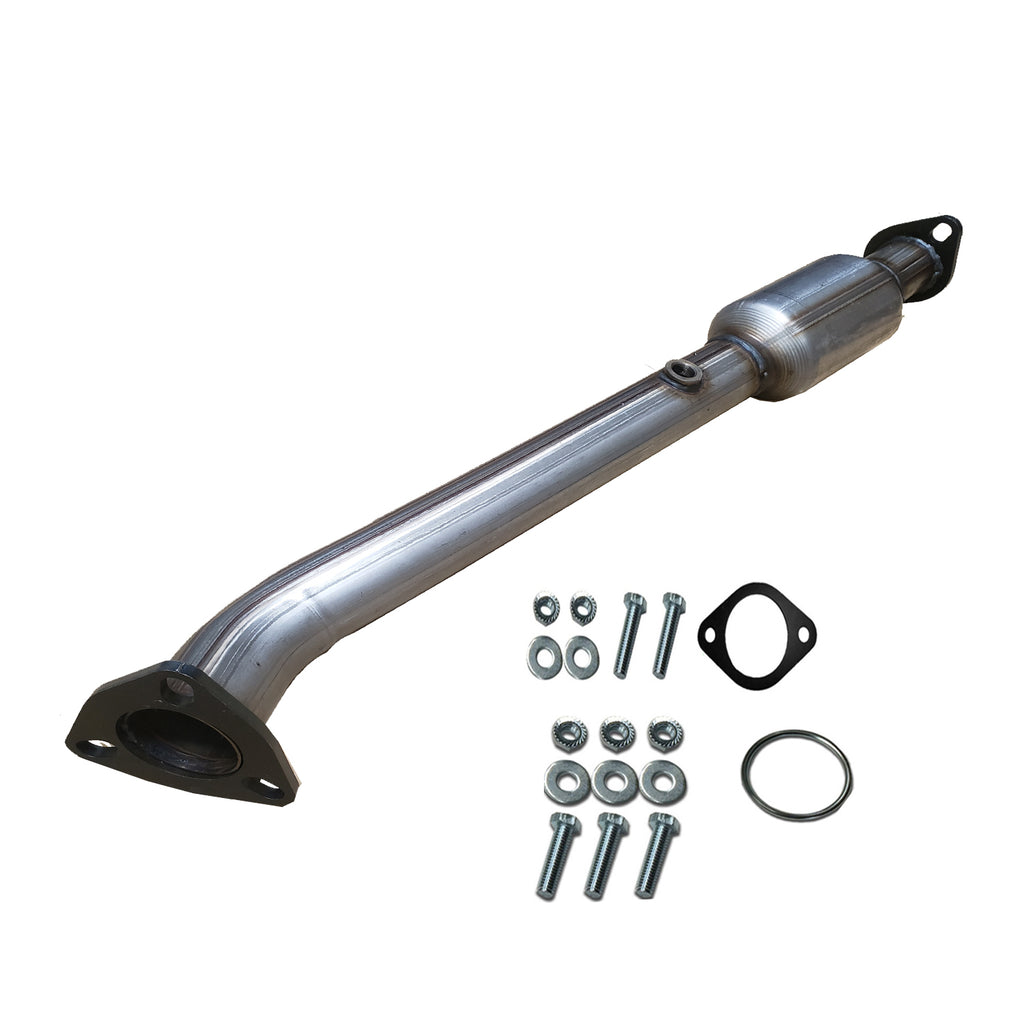
2015 Nissan Frontier Catalytic Converter
So, you're experiencing some issues with your 2015 Nissan Frontier, and the catalytic converter is the prime suspect? Don't worry, you're not alone. Catalytic converter problems are relatively common, especially as vehicles age. Let's break down what might be happening, why it's happening, and, most importantly, how to fix it.
Understanding the Problem: Your 2015 Frontier and the Catalytic Converter
The catalytic converter is a crucial part of your 2015 Frontier's exhaust system. Its job is to reduce harmful emissions like hydrocarbons (HC), carbon monoxide (CO), and nitrogen oxides (NOx) into less harmful substances. It essentially acts as a chemical reactor using precious metals like platinum, palladium, and rhodium to facilitate these reactions.
Several things can lead to catalytic converter failure. The most common culprits are:
- Contamination: Engine oil, coolant, or excessive fuel entering the exhaust system can coat the catalyst, rendering it ineffective. This is the most frequent cause.
- Physical Damage: Road debris, impacts, or even just age can cause the converter's internal structure to crack or crumble, reducing its surface area and efficiency.
- Overheating: A rich-running engine (too much fuel) can cause the converter to overheat to the point of melting its internal components.
- Age and Wear: Like any part, the catalytic converter has a lifespan. Over time, the catalyst materials degrade, leading to reduced efficiency.
Common Symptoms of a Failing Catalytic Converter
Recognizing the symptoms early can save you money and prevent further damage. Here's what to look out for:
- Check Engine Light (CEL): This is the most common indicator. The diagnostic trouble codes (DTCs) you'll likely see are P0420 (Catalyst System Efficiency Below Threshold - Bank 1) and/or P0430 (Catalyst System Efficiency Below Threshold - Bank 2). While these codes strongly suggest a catalytic converter issue, it's important to understand that other problems can trigger them as well.
- Reduced Engine Performance: A clogged or failing converter can restrict exhaust flow, leading to a noticeable decrease in power, especially during acceleration.
- Poor Fuel Economy: A less efficient converter can indirectly impact fuel economy. The engine might compensate for the inefficiency, leading to increased fuel consumption.
- Rattling Noise: If the internal components of the converter have broken down, you might hear a rattling noise coming from underneath the vehicle.
- Failed Emissions Test: This is a surefire sign. If your Frontier fails an emissions test, the catalytic converter is a prime suspect.
- Burning Smell: In rare cases, a severely overheated converter can produce a burning smell.
Diagnosing the Problem: Getting to the Root Cause
Before you rush to replace the catalytic converter, it's crucial to accurately diagnose the problem. Simply replacing the converter without addressing the underlying cause is a waste of money and could lead to premature failure of the new converter.
- Read the Diagnostic Trouble Codes (DTCs): Use an OBD-II scanner to retrieve the DTCs stored in the engine control unit (ECU). A P0420 or P0430 code is a strong indicator, but note any other codes present.
- Inspect for Leaks: Carefully inspect the exhaust system for any leaks, especially upstream of the catalytic converter. Exhaust leaks can introduce extra oxygen into the exhaust stream, which can throw off the readings from the oxygen sensors and trigger a false P0420/P0430 code.
- Check the Oxygen Sensors: The oxygen sensors (O2 sensors) play a vital role in monitoring the catalytic converter's efficiency. There are typically two O2 sensors: one upstream (before) and one downstream (after) the converter. Using a scan tool with live data capabilities, you can monitor the voltage readings from these sensors. A healthy converter will show a relatively stable voltage reading from the downstream sensor, while the upstream sensor's voltage will fluctuate. If both sensors fluctuate similarly, it suggests the converter isn't working correctly.
- Visual Inspection: Carefully inspect the catalytic converter for any signs of physical damage, such as dents, cracks, or rust. You can also try tapping the converter with a rubber mallet. If you hear a rattling noise, it suggests the internal components are broken.
- Backpressure Test: A backpressure test measures the resistance to exhaust flow in the exhaust system. Excessive backpressure can indicate a clogged catalytic converter. This test requires a special adapter that threads into the oxygen sensor port.
- Check for Engine Problems: As mentioned earlier, engine problems like oil leaks, coolant leaks, or a rich-running condition can damage the catalytic converter. Perform a thorough inspection of the engine to rule out these issues. A compression test and leak-down test can help assess the overall health of the engine.
Solutions: Replacing or Repairing the Catalytic Converter
Once you've confirmed that the catalytic converter is indeed the problem, you have a few options:
- Replace the Catalytic Converter: This is the most common solution. You can choose between an OEM (Original Equipment Manufacturer) converter or an aftermarket converter. OEM converters are generally more expensive but offer the best performance and longevity. Aftermarket converters are typically more affordable, but their quality can vary. Be sure to choose a converter that meets EPA or CARB (California Air Resources Board) standards, depending on your location. Using a non-compliant converter can result in fines and/or failure to pass an emissions test.
- Repair the Catalytic Converter: In some rare cases, a catalytic converter can be repaired. However, this is usually only possible if the damage is minor and the catalyst material is still intact. Repairing a converter is generally not recommended, as the results are often unreliable.
- Address the Underlying Cause: If the catalytic converter failed due to an engine problem, it's essential to fix the underlying issue before replacing the converter. Otherwise, the new converter will likely fail prematurely as well.
Replacing the Catalytic Converter: A Step-by-Step Guide (General Instructions)
Replacing a catalytic converter is a moderately difficult task that can be tackled by a DIYer with some mechanical experience. Always consult your vehicle's repair manual for specific instructions and torque specifications.
Tools Needed:
- Socket set
- Wrench set
- Penetrating oil
- Oxygen sensor socket
- Torque wrench
- Jack and jack stands
- Safety glasses
- Gloves
- Possibly a hacksaw or reciprocating saw (if the converter is welded to the exhaust system)
Steps:
- Safety First: Disconnect the negative battery cable. Jack up the vehicle and secure it on jack stands. Wear safety glasses and gloves.
- Apply Penetrating Oil: Spray penetrating oil on the bolts connecting the catalytic converter to the exhaust system. Let it soak for at least 15-20 minutes.
- Remove Oxygen Sensors: Disconnect the electrical connectors for the oxygen sensors and use an oxygen sensor socket to remove them from the converter.
- Remove the Catalytic Converter: Loosen and remove the bolts connecting the converter to the exhaust system. You may need to use a breaker bar or heat to loosen stubborn bolts. If the converter is welded, you'll need to cut it off using a hacksaw or reciprocating saw.
- Install the New Catalytic Converter: Install the new converter, using new gaskets and hardware if provided. Torque the bolts to the manufacturer's specifications.
- Install Oxygen Sensors: Install the oxygen sensors into the new converter and connect the electrical connectors.
- Reconnect Battery: Reconnect the negative battery cable.
- Clear DTCs: Use an OBD-II scanner to clear any DTCs that may have been stored in the ECU.
- Test Drive: Test drive the vehicle to ensure that the problem has been resolved and that there are no new issues.
Cost Considerations
The cost of replacing a catalytic converter can vary depending on several factors, including:
- The type of converter (OEM vs. aftermarket)
- The make and model of your vehicle
- The labor rate at your chosen repair shop
- Your location
Generally, you can expect to pay anywhere from $500 to $1500 to replace a catalytic converter on a 2015 Nissan Frontier, including parts and labor. OEM converters will be on the higher end of that range, while aftermarket converters will be more affordable. If you choose to do the job yourself, you'll save on labor costs, but you'll still need to purchase the converter and any necessary hardware.
Important Note: In some states, it's illegal for anyone other than a licensed repair shop to replace a catalytic converter. Be sure to check your local laws before attempting to do the job yourself.
Preventive Maintenance: Keeping Your Catalytic Converter Healthy
While catalytic converter failure can sometimes be unavoidable, there are several things you can do to extend its lifespan:
- Regular Engine Maintenance: Keep your engine properly tuned and maintained. Address any oil leaks, coolant leaks, or other engine problems promptly.
- Use High-Quality Fuel: Avoid using low-quality fuel, as it can contain contaminants that can damage the catalytic converter.
- Avoid Short Trips: Short trips can prevent the catalytic converter from reaching its optimal operating temperature, which can lead to carbon buildup and reduced efficiency.
- Drive Responsibly: Avoid aggressive driving, as it can put excessive strain on the engine and exhaust system.
- Regularly Inspect Your Exhaust System: Have your exhaust system inspected regularly for leaks or damage.
By following these tips, you can help keep your 2015 Nissan Frontier running smoothly and efficiently for years to come and potentially avoid costly catalytic converter repairs.