2015 Nissan Sentra Cabin Filter Location
Having issues with stale air, reduced airflow, or an unusual smell coming from your vents in your 2015 Nissan Sentra? Chances are, your cabin air filter is overdue for a change. A dirty cabin air filter can significantly impact the efficiency of your HVAC system and the air quality inside your car. Fortunately, replacing the cabin air filter in a 2015 Sentra is a relatively straightforward DIY project. This guide will walk you through the location of the filter, the replacement process, and offer some helpful tips along the way.
Locating the Cabin Air Filter
Unlike some vehicles where the cabin filter is easily accessible under the hood, the 2015 Nissan Sentra's cabin air filter is located behind the glove compartment. This means you'll need to access it from inside the vehicle. Don't worry; it's not as daunting as it sounds!
Step-by-Step Replacement Guide
Here's a detailed breakdown of how to change your 2015 Nissan Sentra's cabin air filter:
- Gather Your Tools: You'll need a few basic tools before you begin:
- A Phillips head screwdriver (preferably a short one, as space can be tight).
- A new cabin air filter (make sure it's the correct size and type for your 2015 Sentra – check your owner's manual or a parts retailer).
- Optional: A small flathead screwdriver (for releasing the glove box damper).
- Optional: A shop light or flashlight (to provide better visibility).
- Prepare the Glove Compartment:
Empty the glove compartment completely. This will make it much easier to maneuver and prevent items from falling out during the process.
- Detach the Glove Compartment Damper:
On the right side of the glove compartment, you'll see a damper arm connected to the glove box frame. This damper slows the opening of the glove box. To detach it, gently push the glove box inward on the right side to create some slack. Then, carefully use your fingers or a small flathead screwdriver to detach the damper arm from the glove box. It usually pops off with a little persuasion. Don't force it; you don't want to break the damper.
- Release the Glove Compartment Stops:
Now, you'll need to release the glove compartment stops. These are located on either side of the glove compartment. Gently push inward on the sides of the glove compartment until the stops clear the dashboard. The glove compartment should now be able to swing down further than usual.
- Locate the Cabin Air Filter Housing:
Behind the glove compartment, you'll see a rectangular plastic housing. This is the cabin air filter housing. It's usually black or dark gray in color.
- Remove the Filter Housing Cover:
The filter housing cover is typically held in place by a small clip or two. Use the Phillips head screwdriver to remove the screw(s) securing the cover. Some models may have clips instead of screws; in this case, gently pry the clips open with a small flathead screwdriver or your fingers. Be careful not to break the clips.
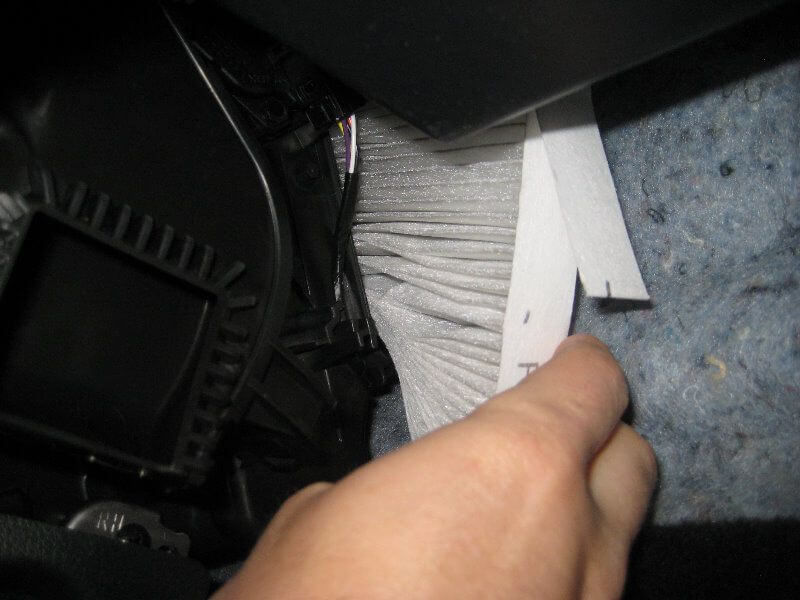
- Remove the Old Cabin Air Filter:
Carefully slide the old cabin air filter out of the housing. Note the direction of airflow, which is usually indicated by an arrow on the filter frame. This is important for installing the new filter correctly. You might find leaves, dust, or other debris accumulated around the filter. Use a vacuum cleaner or your hand to clean out the housing before installing the new filter.
- Install the New Cabin Air Filter:
Insert the new cabin air filter into the housing, making sure the airflow arrow on the filter frame points in the same direction as the arrow on the old filter. Ensure the filter is seated properly.
- Reinstall the Filter Housing Cover:
Replace the filter housing cover and secure it with the screw(s) or clips you removed earlier.
- Reattach the Glove Compartment Stops:
Push the glove compartment back into place, aligning the stops with the openings in the dashboard. Push the glove compartment inward until the stops click into place.
- Reattach the Glove Compartment Damper:
Reattach the damper arm to the glove compartment. This can sometimes be a little tricky. Align the damper arm with the mounting point on the glove box and gently push it into place until it snaps in. Ensure the damper is functioning correctly by opening and closing the glove compartment a few times. The glove box should open smoothly and slowly.
- Test Your Work:
Turn on your car's ignition and test the HVAC system. Check the airflow and temperature. You should notice an improvement in air quality and airflow.
Troubleshooting and Common Issues
While the process is relatively simple, you might encounter a few snags:
- Stuck or Broken Clips: If the filter housing cover clips are stuck, try using a small flathead screwdriver to gently pry them open. If they break, you may need to purchase a replacement cover.
- Difficulty Reattaching the Damper: This is a common issue. Ensure the damper arm is properly aligned with the mounting point before attempting to snap it in. If you're having trouble, try using a small amount of lubricant, such as silicone grease, on the mounting point.
- Incorrect Filter Size: Always double-check that you have the correct cabin air filter for your 2015 Nissan Sentra. Using the wrong size filter can damage the housing or reduce the effectiveness of the filtration.
When to Replace Your Cabin Air Filter
Nissan recommends replacing the cabin air filter every 12,000 to 15,000 miles, or once a year, whichever comes first. However, if you live in an area with high levels of dust, pollen, or pollution, you may need to replace it more frequently. Signs that your cabin air filter needs replacing include:
- Reduced airflow from the vents.
- Stale or musty odors coming from the vents.
- Increased allergy symptoms while driving.
- Visible dirt and debris on the filter.
Filter Types and Cost
Cabin air filters come in various types, including:
- Particulate Filters: These filters remove dust, pollen, and other airborne particles.
- Activated Carbon Filters: These filters also remove odors and some gases, providing an extra layer of air purification.
- HEPA Filters: High-Efficiency Particulate Air (HEPA) filters are the most effective at removing small particles, including bacteria and viruses.
The cost of a cabin air filter for a 2015 Nissan Sentra typically ranges from $10 to $30, depending on the type and brand. Activated carbon and HEPA filters are generally more expensive than standard particulate filters.
Professional Installation Costs
If you're not comfortable replacing the cabin air filter yourself, you can have a professional do it for you. The labor cost for this service is usually around $30 to $60, in addition to the cost of the filter. The total cost for professional cabin air filter replacement at a shop or dealership can range from $40 to $90. Doing it yourself will save you money!
By following these steps, you can easily replace your 2015 Nissan Sentra's cabin air filter and enjoy improved air quality and HVAC system performance. Remember to consult your owner's manual for specific instructions and recommendations for your vehicle.
Disclaimer: This guide is for informational purposes only and should not be considered professional automotive advice. Always consult your owner's manual and follow safety precautions when working on your vehicle.