2016 Nissan Altima Headlight Adjustment
The 2016 Nissan Altima, a mid-size sedan known for its reliability and efficiency, relies heavily on properly aligned headlights for safe nighttime driving. Misaligned headlights can significantly reduce visibility, potentially endangering the driver and other road users. This guide provides a detailed examination of the headlight adjustment mechanism in the 2016 Altima, offering a clear understanding of the process involved in achieving optimal headlight alignment.
Understanding Headlight Alignment Principles
Before diving into the specifics of the 2016 Altima, let's establish the fundamental principles behind headlight alignment. The goal is to project a beam of light that illuminates the road ahead effectively without blinding oncoming drivers. This involves adjusting both the vertical (up/down) and horizontal (left/right) angles of the headlight beam. Standard measurements are typically expressed in inches of drop (vertical) and inches of offset (horizontal) at a specific distance from the vehicle. Vehicle manufacturers provide these specifications, ensuring compliance with safety regulations and optimal visibility.
It's crucial to understand that even minor deviations from the recommended alignment can drastically affect visibility. An upward-angled headlight beam will blind oncoming traffic, while a downward-angled beam will severely limit the driver's range of vision. Similarly, headlights aimed too far to the left or right will fail to properly illuminate the road ahead, especially on curves.
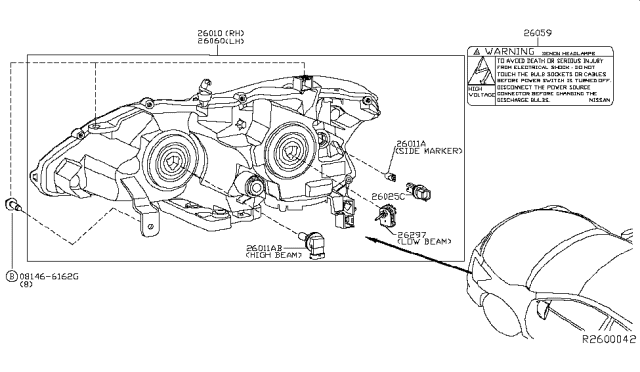
2016 Altima Headlight Assembly Overview
The 2016 Altima utilizes a projector-style headlight assembly in many trims, a design that focuses the light into a more concentrated beam compared to older reflector-style headlights. Projector headlights offer improved light output and control, but they also require precise alignment to function optimally. The headlight assembly is typically mounted to the vehicle's front fascia with several bolts and screws. Adjustment mechanisms, usually consisting of adjustment screws connected to internal gearing, are integrated into the assembly. These screws allow for independent vertical and horizontal adjustments.
Access to these adjustment screws often requires opening the hood and locating them at the rear of the headlight assembly. Their precise location can vary slightly depending on the specific trim level and optional features equipped on the vehicle, such as LED headlights versus halogen. Consulting the vehicle's service manual or a reliable online resource is highly recommended for pinpointing the exact location of the adjustment screws.
Tools and Preparation
Before attempting headlight adjustment, gather the necessary tools and prepare the vehicle:
- A Phillips head screwdriver: This is usually the tool needed to turn the adjustment screws. Ensure the screwdriver head fits snugly to avoid stripping the screw heads.
- Measuring tape or yardstick: For accurately measuring distances and beam height during the alignment process.
- Masking tape: To mark reference points on a wall or garage door.
- A level: To ensure the ground in front of the vehicle is level.
- Vehicle service manual (optional but recommended): Provides specific alignment specifications for the 2016 Altima.
- A helper (recommended): To assist with measurements and observations.
Preparation is key to achieving accurate results:
- Park the vehicle on a level surface, approximately 25 feet away from a flat wall or garage door.
- Ensure the vehicle has a full tank of fuel or compensate for the weight if it's significantly less.
- Check tire pressure and inflate them to the recommended specifications.
- Remove any heavy items from the trunk or rear seats.
The Adjustment Procedure: A Step-by-Step Guide
Follow these steps to adjust the headlights on your 2016 Nissan Altima:
Step 1: Marking the Reference Points
On the wall or garage door, mark the following reference points using masking tape:
- Vertical Center Line: Find the center of the vehicle (measured from the center of the Nissan emblem on the hood) and extend a vertical line upwards on the wall.
- Headlight Center Lines: Measure the distance from the center of the vehicle to the center of each headlight. Transfer these measurements to the wall and mark vertical lines corresponding to the center of each headlight.
- Horizontal Line (Headlight Height): Measure the height from the ground to the center of each headlight. Transfer this measurement to the wall and draw a horizontal line across the wall at this height.
- Horizontal Line (Drop): Consult the vehicle's service manual or a reliable online resource for the recommended headlight drop. Typically, this is expressed as inches of drop at 25 feet. For example, a common specification is 2 inches of drop at 25 feet. Measure down from the headlight height line and draw a second horizontal line representing the target beam height.
Step 2: Locating the Adjustment Screws
Open the hood of the vehicle. Locate the headlight adjustment screws on the rear of the headlight assemblies. As mentioned earlier, their exact location can vary, but they are typically identifiable by their plastic construction and the presence of a Phillips head or hex head. One screw controls the vertical adjustment, and the other controls the horizontal adjustment. Refer to the service manual if necessary to confirm the function of each screw.
Step 3: Vertical Adjustment
Turn on the headlights (low beams only). Observe the headlight beams projected onto the wall. The brightest part of the beam should be aligned with the lower horizontal line (the line representing the specified drop). If the beams are too high, turn the vertical adjustment screw to lower them. If the beams are too low, turn the screw to raise them. Make small adjustments and observe the effect on the wall before making further adjustments.
It's important to adjust both headlights independently to ensure that each beam is properly aligned.
Step 4: Horizontal Adjustment
After completing the vertical adjustment, focus on the horizontal alignment. The center of each beam's brightest spot should be aligned with the corresponding vertical line that marks the center of each headlight. If the beams are too far to the left, turn the horizontal adjustment screw to move them to the right. If the beams are too far to the right, turn the screw to move them to the left. Again, make small adjustments and observe the effect on the wall.
Step 5: Final Check and Refinement
Once both vertical and horizontal adjustments are complete, double-check the alignment by driving the vehicle on a dark road. Pay attention to the beam pattern and ensure that it provides adequate visibility without blinding oncoming drivers. If necessary, make minor adjustments to fine-tune the alignment.
Troubleshooting Common Issues
Several issues can arise during the headlight adjustment process:
- Stripped Adjustment Screws: If the adjustment screws are stripped, they will not turn, preventing you from adjusting the headlights. In this case, you may need to replace the entire headlight assembly.
- Frozen Adjustment Screws: Corrosion or dirt can cause the adjustment screws to become frozen. Try applying a small amount of penetrating oil to the screws and allow it to soak in before attempting to turn them.
- Broken Headlight Assembly: If the headlight assembly is damaged, it may not be possible to properly align the headlights. Replacement may be necessary.
- Uneven Road Surface: An uneven road surface will make it impossible to accurately align the headlights. Ensure the vehicle is parked on a level surface before starting the adjustment process.
When to Seek Professional Assistance
While this guide provides a comprehensive overview of the headlight adjustment process, some situations may warrant professional assistance:
- If you are uncomfortable working on your vehicle or lack the necessary tools.
- If you are unable to achieve proper headlight alignment despite following the instructions.
- If the headlight assembly is damaged or requires replacement.
- If you are experiencing recurring headlight alignment issues.
A qualified mechanic has the expertise and specialized equipment to accurately align headlights and diagnose any underlying issues. Investing in a professional headlight alignment can ensure safe and optimal visibility, providing peace of mind while driving at night.
Conclusion
Properly aligned headlights are essential for safe nighttime driving. Understanding the headlight adjustment mechanism in your 2016 Nissan Altima and following the steps outlined in this guide can empower you to achieve optimal headlight alignment. While the process may seem complex, with careful preparation, attention to detail, and a methodical approach, you can significantly improve your visibility and enhance your driving safety.