2016 Nissan Versa Battery Replacement
Delving into the seemingly simple task of replacing a car battery can reveal a surprising amount of engineering consideration. In this guide, we'll dissect the battery replacement process for a 2016 Nissan Versa, not just providing steps but explaining the why behind each action. This isn't just about swapping parts; it's about understanding the electrical heart of your vehicle.
Understanding the 2016 Nissan Versa's Electrical System
Before we even touch a wrench, let's appreciate the role of the battery in the Versa. It's not merely a starting device. While its primary function is to provide the high current needed to crank the engine via the starter motor, it also acts as a voltage stabilizer for the entire electrical system when the engine is running. The alternator, driven by the engine, charges the battery and supplies power to all the electrical components (lights, radio, computer, etc.). The battery smooths out voltage fluctuations and provides a buffer when the alternator's output momentarily dips, such as during heavy electrical load or rapid engine deceleration.
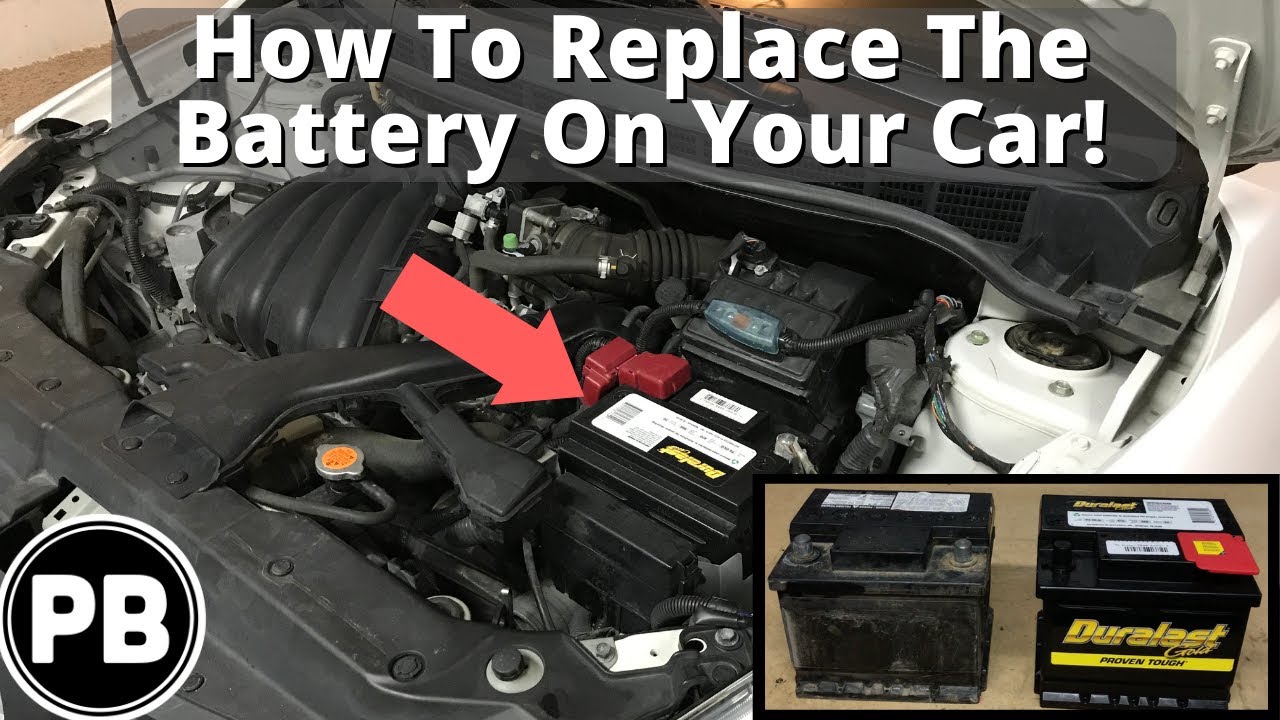
The 2016 Versa typically uses a Group Size 35 battery, though it's crucial to confirm this in your owner's manual or by checking the existing battery's label. Group sizes dictate the physical dimensions and terminal placement of the battery, ensuring a proper fit and electrical connection. The Cold Cranking Amps (CCA) rating is also important. CCA indicates the battery's ability to deliver sufficient current at 0°F (-18°C) for 30 seconds while maintaining a voltage above a specified minimum. Choosing a battery with the recommended CCA ensures reliable starting performance in cold weather.
Tools and Materials Required
Success in any mechanical endeavor hinges on having the right tools. For a 2016 Versa battery replacement, you'll need:
- New Battery: Group Size 35 with appropriate CCA rating.
- Wrench Set: Typically a 10mm wrench for the battery terminals and hold-down clamp.
- Socket Set: Potentially needed for accessing the battery hold-down.
- Battery Terminal Cleaner: For cleaning corrosion from the terminals.
- Wire Brush: For cleaning corrosion from the battery posts.
- Safety Glasses: Essential for eye protection.
- Gloves: To protect your hands from battery acid and grime.
- Memory Saver (Optional): A device that plugs into the OBD-II port to maintain the vehicle's electronic settings (radio presets, etc.) while the battery is disconnected.
- Shop Rags: For cleaning spills and wiping down surfaces.
- Baking Soda and Water Solution: For neutralizing any spilled battery acid.
Step-by-Step Battery Replacement Procedure
Now, let's get our hands dirty. Follow these steps meticulously:
1. Safety First: Preparation
Safety is paramount. Ensure the vehicle is parked on a level surface, the engine is off, and the parking brake is engaged. Locate the battery (usually under the hood, but sometimes in the trunk on some vehicles – confirm in your owner's manual). Put on your safety glasses and gloves. Clear the area around the battery to allow for easy access.
2. Disconnecting the Old Battery
This is where polarity matters. Always disconnect the negative (-) terminal first. This prevents accidental short circuits if you touch the wrench to the vehicle's body while disconnecting the positive (+) terminal. Using the appropriate wrench (usually 10mm), loosen the nut on the negative terminal clamp and carefully remove the clamp from the battery post. Tuck the cable away from the battery to prevent accidental contact. Repeat this process for the positive (+) terminal, ensuring the cable is also safely tucked away.
Why negative first? The chassis of the car is connected to the negative terminal, grounding it. If you were to disconnect the positive terminal first, and your wrench accidentally touched the chassis while still connected to the positive terminal, you would create a short circuit, potentially damaging your car's electrical system or even causing a fire. By disconnecting the negative terminal first, you break the circuit, making it safe to work on the positive terminal.
3. Removing the Battery Hold-Down
Most vehicles use a hold-down clamp or bracket to secure the battery in place, preventing it from moving around during driving. This is crucial because a loose battery can vibrate and potentially damage its internal components or even cause acid to leak. Identify the hold-down mechanism (it might be a clamp, a bracket, or straps) and use the appropriate wrench or socket to remove it. Carefully lift the hold-down out of the way.
4. Lifting Out the Old Battery
Now that the terminals are disconnected and the hold-down is removed, you can carefully lift the old battery out of the battery tray. Batteries are heavy and can contain corrosive acid, so use a firm grip and avoid tilting the battery excessively. If there's any sign of corrosion on the battery tray, clean it with a baking soda and water solution to neutralize the acid. Dispose of the old battery responsibly at a recycling center or auto parts store. Never dispose of a car battery in the regular trash.
5. Cleaning the Terminals and Posts
Before installing the new battery, thoroughly clean the battery terminals and posts using a battery terminal cleaner and a wire brush. Corrosion can impede electrical conductivity, leading to starting problems and reduced battery life. Clean both the inside of the terminal clamps and the posts on the new battery. A small amount of dielectric grease can be applied to the terminals after cleaning to prevent future corrosion.
6. Installing the New Battery
Carefully lower the new battery into the battery tray, ensuring it's properly aligned. Reinstall the battery hold-down, tightening it securely but not overtightening. Overtightening can damage the battery case.
7. Connecting the New Battery
This is the reverse of the disconnection process, and it's equally important to get the polarity right. Connect the positive (+) terminal first. Securely attach the positive terminal clamp to the positive battery post and tighten the nut. Then, connect the negative (-) terminal, ensuring the clamp is firmly attached to the negative battery post and the nut is tightened. Double-check that both terminals are securely connected and that the cables are not strained.
Why positive first this time? Connecting the positive terminal first ensures that if your wrench accidentally touches the chassis while connecting the negative terminal, no short circuit will occur, because the circuit is still open until the negative terminal is connected.
8. Final Checks and Cleanup
Once the battery is connected, double-check that all connections are secure and that the hold-down is properly installed. Wipe down the battery and surrounding area with a shop rag. Start the engine to verify that the new battery is functioning correctly. If you used a memory saver, disconnect it now.
Troubleshooting Common Issues
Even with careful adherence to these steps, problems can arise. Here are some common issues and how to address them:
- Engine won't start after battery replacement: Double-check the terminal connections to ensure they are clean and tight. Verify that the battery has sufficient charge. Check the fuses related to the starting system.
- Loose battery hold-down: Ensure the hold-down is properly installed and tightened. A loose battery can damage its internal components.
- Corrosion on terminals: Clean the terminals thoroughly with a battery terminal cleaner and a wire brush. Apply dielectric grease to prevent future corrosion.
- Error codes or loss of settings: If you didn't use a memory saver, you may need to reset your radio presets and other electronic settings. Some vehicles may require a scan tool to clear error codes.
Conclusion
Replacing a car battery is a task that most vehicle owners can accomplish with the right tools, knowledge, and a cautious approach. By understanding the electrical system and following these steps meticulously, you can save money on professional service and gain a deeper appreciation for the inner workings of your 2016 Nissan Versa. Remember, safety always comes first, so take your time and double-check your work.