2017 Nissan Altima Ac Relay Location
Alright, let's dive into the A/C relay location on your 2017 Nissan Altima. Tracking down the correct relay is essential for diagnosing A/C problems, whether your system is blowing hot air, not blowing at all, or is just acting erratically. I'll walk you through the common locations, things to look for, and some troubleshooting tips.
Primary Relay Locations
The A/C relay on a 2017 Altima isn't *always* in the same spot, but generally speaking, you'll be looking in one of two fuse boxes. The first and most likely location is the Intelligent Power Distribution Module (IPDM) E/R, which is Nissan's fancy name for the engine room fuse and relay box. The second potential location is the fuse box located inside the passenger compartment. Let's break down each location in detail:
IPDM E/R (Engine Room Fuse and Relay Box)
This is the primary suspect. The IPDM E/R box is usually located on the passenger side of the engine bay, often near the battery. It's a black plastic box with a hinged or clip-on lid. To access the relays, you'll need to open this box.
Finding the Right Relay: Inside the IPDM E/R lid, you should find a diagram that maps out the locations of the fuses and relays. Look for a label indicating the "A/C Relay," "Air Conditioner Relay," "MG Clutch Relay," or something similar. Nissan sometimes uses slightly different names across model years. Refer to your owner's manual if you can't find a diagram on the lid itself.
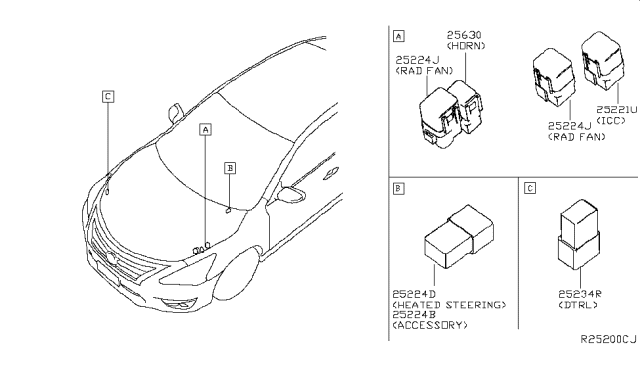
Important Note on Relay Identification: Sometimes, the diagram isn't perfectly clear, or it might be faded. The A/C relay is often a standard, rectangular, 4 or 5-pin relay. It's usually interchangeable with other relays in the box, such as the horn relay or the rear defogger relay. This is crucial for troubleshooting, as we'll get to in a bit.
Passenger Compartment Fuse Box
While less common for the *main* A/C relay, there might be a supplementary A/C-related relay located inside the car. This fuse box is usually located behind a small panel, often on the driver's side near the steering column or under the glove box on the passenger side. Consult your owner's manual for the exact location.
What to Look For: Again, check the diagram on the fuse box cover. You're looking for anything related to the A/C system, climate control, or blower motor. This relay might control auxiliary functions like the blower motor speed or the A/C amplifier.
Identifying the A/C Relay: Visual Inspection & Testing
Okay, so you've located the fuse boxes and (hopefully) identified the A/C relay according to the diagrams. Before you go replacing anything, let's do some basic checks:
- Visual Inspection: Remove the relay. Carefully examine it. Look for any signs of damage:
- Cracks in the casing: These indicate physical stress and possible internal damage.
- Burn marks or melting: Sign of overheating and likely failure.
- Corrosion on the pins: This can prevent proper electrical contact.
- Relay Swapping (The "Good Neighbor" Test): This is a very common and effective DIY troubleshooting method. Remember how I mentioned that the A/C relay is often interchangeable with other relays? Here's how to use that:
- Find a "Good Neighbor" Relay: Identify a relay that's *identical* to the A/C relay in terms of pin configuration and amperage rating. The horn relay is often a safe bet because you can easily test whether it's working. The rear defogger relay is another possibility. Never use a relay with a different amperage rating; you could damage the system.
- Swap the Relays: Carefully remove the "good neighbor" relay and plug it into the A/C relay's socket. Put the A/C relay where the "good neighbor" relay used to be.
- Test the A/C: Start the car and turn on the A/C. If the A/C now works, you've confirmed that the original A/C relay was faulty.
- Test the "Good Neighbor" Function: Now test the system that used the "good neighbor" relay. For example, if you used the horn relay, try honking the horn. If the horn doesn't work, you've confirmed that the original A/C relay is bad.
- Multimeter Testing (For the More Advanced DIYer): If you're comfortable using a multimeter, you can perform a more definitive test. You'll need to test for both continuity and coil resistance.
- Continuity Test: With the relay *unpowered*, check for continuity between the coil terminals (usually pins 85 and 86). A lack of continuity indicates a broken coil.
- Coil Resistance Test: Measure the resistance across the coil terminals. A healthy coil will typically have a resistance value between 70 and 120 ohms. An open circuit (infinite resistance) or very low resistance indicates a faulty coil. Refer to the relay specifications if available.
- Actuation Test: Apply 12V DC power to the coil terminals (85 and 86). You should hear a distinct "click" as the relay switches. Then, test for continuity between the normally open (NO) terminals (usually 30 and 87). When the relay is *not* powered, there should be *no* continuity. When the relay *is* powered, there *should* be continuity.
Beyond the Relay: Other Potential Issues
Even if you've confirmed that the A/C relay is functioning correctly, there could be other problems causing your A/C issues. Here are some common culprits:
- Blown Fuse: Always check the A/C-related fuses in *both* fuse boxes. A blown fuse is a common and easily fixable problem. Use a test light or multimeter to check each fuse.
- Low Refrigerant: The A/C system relies on refrigerant to cool the air. If the refrigerant level is too low, the compressor won't engage. You'll need to have a qualified technician check and recharge the system. Low refrigerant often indicates a leak.
- Faulty A/C Compressor: The compressor is the heart of the A/C system. If it's failing, it won't be able to compress the refrigerant properly. Common symptoms include a noisy compressor, a lack of cold air, or the compressor not engaging at all.
- Bad A/C Clutch: The A/C clutch engages and disengages the compressor. If the clutch is worn or damaged, it might not engage properly, preventing the compressor from working.
- Pressure Sensors: The A/C system has pressure sensors that monitor the refrigerant pressure. If these sensors are faulty, they can prevent the compressor from engaging.
- Wiring Issues: Damaged or corroded wiring can also cause A/C problems. Inspect the wiring harness and connectors associated with the A/C system.
- Cabin Air Filter: A clogged cabin air filter restricts airflow to the A/C evaporator, causing poor cooling performance.
Final Thoughts
Locating and testing the A/C relay is a great starting point for diagnosing A/C problems on your 2017 Nissan Altima. Remember to consult your owner's manual for specific locations and diagrams. If you're not comfortable working with electrical systems, it's always best to take your car to a qualified mechanic. Good luck!