2017 Nissan Altima Driver Side Mirror
Alright, let's talk about the driver's side mirror on your 2017 Nissan Altima. We're going to dive into the nitty-gritty of its construction, common problems, removal, and replacement. This guide assumes you're comfortable working on your car, know your way around basic tools, and understand safety precautions like disconnecting the battery when dealing with electrical components. We're aiming for a repair or replacement, not just a casual glance.
Understanding the 2017 Altima Driver's Side Mirror
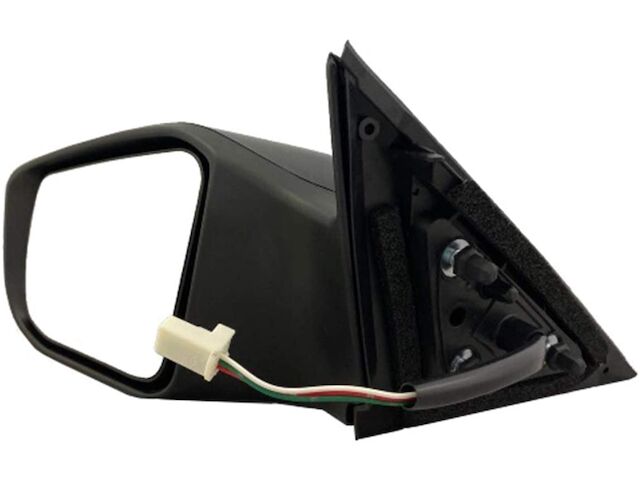
The driver's side mirror on the 2017 Altima is more than just a reflective surface. It's typically a composite unit consisting of several key components:
- Mirror Glass: This is the actual reflective part, often featuring heating elements for defrosting in colder climates.
- Mirror Housing: The plastic shell that encapsulates and protects the internal components. This housing is often painted to match the vehicle's color.
- Mirror Adjustment Motors: Small electric motors responsible for moving the mirror glass vertically and horizontally. These are controlled by switches inside the cabin.
- Wiring Harness: Connects the mirror's electrical components (motors, heating element, turn signal if equipped) to the car's electrical system. This harness usually includes a multi-pin connector.
- Mounting Base: The part that attaches the entire mirror assembly to the car door. This is usually secured with bolts or screws.
- (Optional) Turn Signal Indicator: Some Altimas feature turn signal indicators integrated into the mirror housing for enhanced visibility. This adds additional wiring and an LED light assembly.
- (Optional) Blind Spot Monitoring (BSM) System: Higher trim levels might include a BSM system, adding sensors and associated electronics within the mirror assembly. This significantly complicates repair and replacement.
Common Problems with the Mirror
Several issues can plague your Altima's driver's side mirror. Here are some of the most common:
- Broken Mirror Glass: Impact from road debris, accidents, or even just accidental bumps can crack or shatter the mirror glass.
- Malfunctioning Adjustment Motors: The motors may fail, causing the mirror to become stuck in one position or not respond to adjustments. This can be due to motor failure, wiring issues, or switch problems. Voltage testing at the motor connector is crucial for diagnosis.
- Damaged Housing: The plastic housing is susceptible to cracks, scratches, and breaks from impacts.
- Electrical Issues: Problems with the wiring harness, connector, or fuses can cause the heating element or turn signal (if equipped) to malfunction. Check the fuse for the mirrors before proceeding with more complex diagnostics.
- Loose Mounting: The mirror may become loose and vibrate, making it difficult to see clearly. This is often caused by loose mounting bolts or damage to the mounting base.
- Turn Signal Failure: If your mirror has an integrated turn signal, the LED lights can burn out or the wiring can become damaged.
- Blind Spot Monitoring (BSM) Issues: The BSM sensors can malfunction, providing false alerts or failing to detect vehicles in the blind spot. Diagnostics for BSM systems often require specialized scan tools.
Removing the Driver's Side Mirror
Before starting any work, disconnect the negative terminal of your battery. This is crucial to prevent electrical shorts and potential damage to the car's electrical system. Also, gather your tools: A socket set, screwdrivers (Phillips and flathead), plastic trim removal tools, and possibly a multimeter.
- Remove the Interior Door Panel: This is usually held in place by screws (often hidden behind plastic covers) and plastic clips. Use a trim removal tool to carefully pry the panel away from the door, avoiding damage to the clips. Be patient and methodical; broken clips will require replacement.
- Locate the Mirror Wiring Connector: Once the door panel is removed, you'll see the wiring harness for the mirror. Find the multi-pin connector that connects the mirror to the car's wiring.
- Disconnect the Wiring Connector: Carefully disconnect the connector. There may be a locking tab that needs to be depressed before the connector can be separated. Do not pull on the wires.
- Remove the Mirror Mounting Screws/Bolts: Inside the door, you'll find the screws or bolts that secure the mirror to the door frame. These are usually located behind a small access panel. Remove these fasteners.
- Remove the Mirror: With the fasteners removed, carefully pull the mirror assembly away from the door. Be mindful of the wiring harness and any remaining clips or retainers.
Important Considerations During Removal
- Plastic Trim Removal Tools: These are essential for removing the door panel without damaging the plastic clips or the panel itself.
- Wiring Harness: Handle the wiring harness with care to avoid damaging the wires or connectors.
- Hidden Fasteners: Be aware that some fasteners may be hidden behind plastic covers or trim pieces. Take your time and inspect the area carefully before attempting to remove the mirror.
- BSM System: If your car is equipped with BSM, the mirror assembly will have additional wiring and possibly a separate module. Pay close attention to how these components are connected.
Installing a New Driver's Side Mirror
Installation is essentially the reverse of removal. Here's a step-by-step guide:
- Connect the Wiring Harness: Connect the wiring harness of the new mirror to the car's wiring harness. Ensure the connector is fully seated and the locking tab (if present) is engaged.
- Attach the Mirror to the Door: Align the mirror with the mounting holes and secure it with the screws or bolts you removed earlier. Tighten the fasteners to the specified torque (consult a repair manual for the correct torque specifications). Over-tightening can damage the door or the mirror mounting base.
- Test the Mirror Functions: Before reinstalling the door panel, reconnect the battery and test all mirror functions (adjustment, heating, turn signal if equipped, BSM if equipped).
- Reinstall the Interior Door Panel: Align the door panel with the door frame and press it into place, ensuring all the plastic clips are properly engaged. Reinstall the screws and covers.
Important Considerations During Installation
- Torque Specifications: Use a torque wrench to tighten the mounting bolts to the correct specification. This will prevent the mirror from becoming loose or damaged.
- Wiring Harness: Ensure the wiring harness is properly routed and secured to prevent it from being pinched or damaged.
- Testing: Thoroughly test all mirror functions before reinstalling the door panel. This will save you time and effort if there are any problems.
- Quality of Replacement Part: A quality replacement mirror will ensure proper fit and function, as well as better durability. Consider OEM (Original Equipment Manufacturer) or reputable aftermarket brands.
- Calibration (BSM): After replacing a mirror with BSM, the system may require calibration using a specialized scan tool. Consult your owner's manual or a qualified technician for information on calibration procedures. Failure to calibrate the BSM system can result in inaccurate or unreliable blind spot detection.
Troubleshooting Mirror Problems
If you're still having problems after replacing the mirror, or if you suspect the mirror is not the root cause of the issue, here are some troubleshooting tips:
- Check the Fuses: A blown fuse can cause the mirror to malfunction. Consult your owner's manual for the location of the mirror fuse.
- Inspect the Wiring Harness: Look for damaged or corroded wires and connectors. Repair or replace any damaged wiring. Use a multimeter to check for continuity and voltage. A digital multimeter is an invaluable tool for diagnosing electrical problems.
- Test the Mirror Adjustment Switch: The switch itself may be faulty. You can test the switch with a multimeter to see if it's sending the correct signals to the mirror motors.
- Check the Ground Connection: A poor ground connection can cause electrical problems. Ensure the mirror has a good ground connection to the car's chassis.
- Scan for Diagnostic Trouble Codes (DTCs): If your car is equipped with BSM, a scan tool may be able to retrieve DTCs that can help diagnose the problem.
Replacing a driver's side mirror on a 2017 Nissan Altima is a relatively straightforward repair that most experienced DIYers can handle. By following these steps and taking the necessary precautions, you can save money and get your car back on the road quickly. Remember to always prioritize safety and consult a qualified technician if you're unsure about any aspect of the repair. Good luck!