2017 Nissan Rogue Blower Motor Location
Alright, let's talk about the blower motor in your 2017 Nissan Rogue. Figuring out where this component lives and how to access it is essential for diagnosing HVAC problems, replacing a faulty motor, or even just cleaning out debris that might be causing annoying noises. This guide is designed for intermediate DIYers, so we'll get technical, but I'll break everything down as we go.
Understanding the Blower Motor System
Before we dive into the location, it's worth understanding the blower motor's role in your Rogue's HVAC (Heating, Ventilation, and Air Conditioning) system. The blower motor is essentially a fan that forces air through the heater core (for heat) or the evaporator core (for cooling) and then into the cabin via the vents. The speed of the blower motor determines the volume of air being pushed, which is why you have different fan speed settings.
When your blower motor fails or becomes obstructed, you'll likely experience symptoms like:
- No air blowing from the vents, regardless of fan speed setting.
- Weak or inconsistent airflow.
- Unusual noises like squealing, grinding, or clicking coming from behind the dashboard.
- A burning smell (usually indicates a failing motor or wiring).
Now that we know what it does and what goes wrong, let's pinpoint its location.
Location of the Blower Motor in the 2017 Nissan Rogue
The blower motor in the 2017 Nissan Rogue is located behind the glove box, on the passenger side of the vehicle. It's housed within the HVAC system's blower motor housing, which is usually a black plastic assembly. This location is fairly standard for many modern vehicles.
Step-by-Step Access Procedure
Gaining access to the blower motor requires removing the glove box and a few other components. Here's a detailed breakdown of the procedure:
- Prepare the Vehicle: Park the Rogue on a level surface, turn off the engine, and engage the parking brake. It's always a good idea to disconnect the negative (black) battery cable to prevent any electrical shorts or accidental activation of components while you're working.
- Empty the Glove Box: Remove everything from the glove box. You need to have it completely empty to remove it properly.
- Detach the Glove Box Damper: Most Rogues have a damper (a small piston) on the right side of the glove box that controls its opening speed. Gently detach the damper from the glove box. Usually, you can do this by squeezing the end of the damper where it connects to the glove box and sliding it off.
- Release the Glove Box Retainers: Look inside the glove box towards the top. You'll see two plastic retainers or stoppers. These prevent the glove box from swinging down too far. Gently push inward on the sides of the glove box to clear these retainers. You might need to wiggle it a bit.
- Lower and Remove the Glove Box: Once the retainers are clear, the glove box should swing down further than normal. Carefully lift the glove box up and off its hinges. It should detach relatively easily. Set it aside in a safe place.
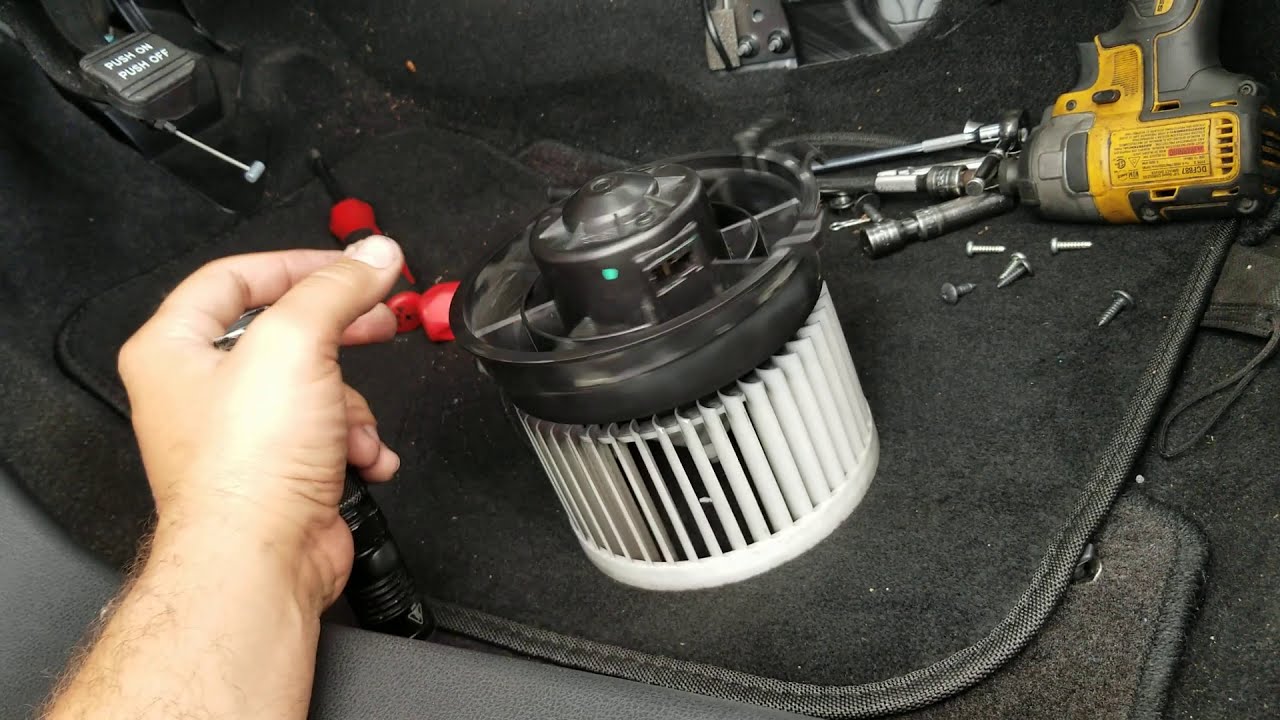
- Locate the Blower Motor Housing: With the glove box removed, you should now have a clear view of the blower motor housing. It's a large, circular plastic assembly, usually black. You'll likely see the blower motor connector (a wiring harness) plugged into it.
- Disconnect the Blower Motor Connector: Before removing the blower motor, disconnect the electrical connector. Press the retaining clip on the connector and gently pull it straight out. Never pull on the wires themselves.
- Remove the Blower Motor: The blower motor is typically held in place by three or four screws or bolts. Use the appropriate screwdriver or socket wrench to remove these fasteners. Keep track of the screws – you'll need them to reinstall the new motor.
- Carefully Detach Blower Motor: After removing the screws, the blower motor should be free. Carefully pull the blower motor assembly straight down out of the housing. It might be a snug fit, so wiggle it gently if needed.
Inspecting and Replacing the Blower Motor
Once you have the blower motor out, inspect it for any signs of damage, such as:
- Burned or melted wires.
- Broken or cracked housing.
- Excessive debris or corrosion.
- A seized or difficult-to-turn fan.
If the motor is visibly damaged or doesn't spin freely, it's time to replace it. Here's how:
- Install the New Blower Motor: Align the new blower motor with the blower motor housing and gently push it into place. Ensure it sits flush against the housing.
- Secure the Blower Motor: Reinstall the screws or bolts that you removed earlier, tightening them securely but not overtightening (which could crack the plastic housing).
- Reconnect the Electrical Connector: Plug the electrical connector back into the blower motor. Make sure it clicks into place securely.
- Reinstall the Glove Box: Reverse the removal procedure to reinstall the glove box.
- Align the glove box hinges with the slots in the dashboard and push it into place.
- Reattach the glove box retainers by pushing the sides of the glove box inward until they clear the retainers.
- Reattach the glove box damper.
- Fill the glove box.
- Reconnect the Battery (if disconnected): Reconnect the negative battery cable.
Testing the New Blower Motor
After reinstalling everything, start the engine and test the blower motor at all fan speed settings. You should have consistent airflow from the vents at all speeds. If the new motor still doesn't work, double-check your connections and make sure the blower motor resistor (we'll discuss this later) is functioning correctly.
The Role of the Blower Motor Resistor
The blower motor resistor controls the speed of the blower motor. It's a series of resistors that reduce the voltage supplied to the motor, resulting in lower fan speeds. If you find that some fan speeds work but others don't, the blower motor resistor is likely the culprit. The resistor is usually located near the blower motor, often mounted on the blower motor housing. Replacing it is a relatively simple process, typically involving removing a few screws and unplugging the electrical connector.
In some Rogues, instead of a traditional resistor, you might find a blower motor control module. This module performs the same function but does it electronically, offering more precise control. Troubleshooting and replacement procedures are similar.
Common Issues and Troubleshooting Tips
- No Air at All: Check the blower motor fuse. It's usually located in the interior fuse box (check your owner's manual for the specific location). If the fuse is blown, replace it with a fuse of the same amperage. If the fuse blows repeatedly, there's likely a short circuit in the blower motor circuit.
- Weak Airflow: Check the cabin air filter. A clogged filter restricts airflow significantly. The cabin air filter is usually located behind the glove box or under the dashboard on the passenger side.
- Noisy Blower Motor: Debris (leaves, twigs, etc.) can get into the blower motor housing and cause noise. Removing the blower motor and cleaning out the housing can often resolve this issue. If the noise persists after cleaning, the motor bearings may be worn, requiring replacement.
- Blower Motor Works Intermittently: This could be a sign of a loose connection or a failing blower motor. Check the wiring connector and the motor itself for any signs of corrosion or damage.
Important Considerations
- Safety First: Always disconnect the negative battery cable before working on electrical components.
- Proper Tools: Use the correct tools for the job. Using the wrong tools can damage components and make the job more difficult.
- Take Pictures: Before disconnecting anything, take pictures to help you remember how everything goes back together.
- Consult a Professional: If you're not comfortable working on your car's electrical system, it's best to consult a qualified mechanic.
- OEM vs. Aftermarket: When replacing the blower motor or resistor, consider using OEM (Original Equipment Manufacturer) parts or reputable aftermarket brands. Cheaper parts may not last as long or perform as well.
By following these steps and tips, you should be able to locate, inspect, and replace the blower motor in your 2017 Nissan Rogue. Remember to take your time, be careful, and consult a professional if you're unsure about any part of the process. Good luck!