2018 Nissan Altima Wont Shift Out Of Park
Alright, let's tackle a common yet frustrating problem with the 2018 Nissan Altima: getting stuck in Park. You're not alone; this issue crops up more often than you might think. While it can sometimes point to a serious transmission problem, more frequently, it's related to simpler, more easily fixable components. I'll walk you through the likely culprits, diagnostic steps, and potential fixes, assuming you have some basic mechanical skills and tools. If anything seems beyond your comfort level, don't hesitate to consult a professional. Safety first!
Understanding the Shift Interlock System
Before we dive into specific components, let's understand the system at play. Modern vehicles, including your 2018 Altima, use a shift interlock system. This system prevents you from shifting out of Park unless certain conditions are met, primarily the brake pedal being depressed. It's a safety feature designed to prevent unintended acceleration. Several components work in concert:
- Brake Pedal Switch: This switch detects when you press the brake pedal. It's typically a dual-circuit switch, meaning it has two separate electrical paths for redundancy.
- Shift Interlock Solenoid: This is an electromagnet that physically blocks the shift lever from moving out of Park. When the brake pedal is pressed, the brake pedal switch signals the solenoid to release the lock.
- Wiring and Connectors: Wires carry the electrical signals between the components. Connectors are where these wires plug into the various modules.
- Transmission Control Module (TCM): While less common, the TCM, which controls the transmission's functions, can also be involved if it's not receiving the correct signals or is malfunctioning.
Common Causes and Troubleshooting Steps
Now, let's get our hands dirty and troubleshoot. Here’s a breakdown of the most common causes and how to check them:
1. The Brake Pedal Switch
This is the most frequent offender. A faulty brake pedal switch won't send the signal to release the shift interlock solenoid. Here's how to check it:
- Check Your Brake Lights: This is the easiest first step. Have someone stand behind the car while you press the brake pedal. Do the brake lights illuminate? If not, the brake pedal switch is highly suspect. A blown fuse (usually related to brake lights) can also cause this. Check your owner's manual for the correct fuse location and rating.
- Locate the Switch: The brake pedal switch is typically located near the top of the brake pedal arm, often mounted on a bracket. You'll likely need to get on the floor of the driver's side to see it.
- Inspect the Switch: Look for any obvious damage, loose wiring, or corrosion. Unplug the connector and inspect the pins for corrosion. Clean them with electrical contact cleaner if necessary.
- Test the Switch with a Multimeter: This requires a multimeter and some knowledge of basic electrical testing. Set your multimeter to the continuity setting (usually indicated by a diode symbol or a sound when the probes are touched together). You'll need a wiring diagram for your 2018 Altima (easily found online with a quick search) to identify the correct terminals to test. With the brake pedal released, one set of terminals should be open (no continuity), and the other closed (continuity). When you press the brake pedal, the states should reverse. If the switch doesn't behave as expected, it's faulty and needs to be replaced.
- Brake Pedal Switch Adjustment: Some brake pedal switches are adjustable. Check to ensure the switch plunger is properly contacting the brake pedal arm when released. If there's too much play, the switch might not be activating fully when the pedal is pressed. Adjust as needed, following the repair manual procedure.
2. The Shift Interlock Solenoid
If the brake pedal switch is working correctly, the next suspect is the shift interlock solenoid itself. This solenoid is usually located near the shifter assembly.
- Locate the Solenoid: You may need to remove some trim panels around the shifter to access the solenoid. Consult your repair manual for specific instructions.
- Listen for the Click: With the ignition on and the brake pedal depressed, listen for a faint "click" sound coming from the solenoid when you press the brake pedal. This click indicates the solenoid is receiving power and attempting to actuate. If you hear the click, but the shifter is still locked, the solenoid might be mechanically jammed.
- Test the Solenoid with a Multimeter: With the connector unplugged from the solenoid, use your multimeter to measure the resistance across the solenoid terminals. The resistance should be within a specific range (typically a few ohms to a few hundred ohms). A reading of zero ohms (short circuit) or infinite ohms (open circuit) indicates a faulty solenoid.
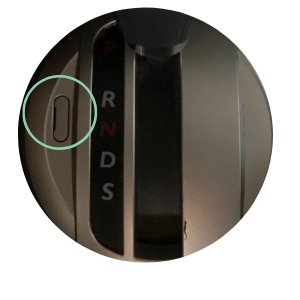
- Manual Override (Emergency Release): Almost all cars have a manual override to release the shift interlock. This is usually a small button or slot near the shifter. Consult your owner's manual for the exact location and procedure for your 2018 Altima. Using the override will allow you to shift out of Park, but it's only a temporary solution. You still need to diagnose and fix the underlying problem. Note that some Nissans may require inserting a key or screwdriver into a small access hole.
3. Wiring and Connectors
Faulty wiring or corroded connectors can interrupt the signals between the brake pedal switch, the solenoid, and the TCM.
- Visual Inspection: Carefully inspect the wiring harness and connectors associated with the brake pedal switch and the shift interlock solenoid. Look for any signs of damage, such as frayed wires, melted insulation, or corroded connectors.
- Continuity Testing: Using your multimeter, perform continuity tests on the wires between the brake pedal switch and the solenoid. Refer to your wiring diagram to identify the correct wires. You should have a low resistance (close to zero ohms) between the terminals. High resistance or no continuity indicates a broken or damaged wire.
- Connector Cleaning: Clean all connectors with electrical contact cleaner. Apply dielectric grease to the connectors before reassembling them to prevent corrosion.
4. Transmission Control Module (TCM)
While less common, a malfunctioning TCM can prevent the shift interlock system from working correctly.
- Check for Diagnostic Trouble Codes (DTCs): Use an OBD-II scanner to check for any DTCs related to the transmission or shift interlock system. Codes like P0705 (Transmission Range Sensor Circuit Malfunction) or P0719 (Brake Switch Circuit Low) can provide valuable clues.
- TCM Power and Ground: Verify that the TCM is receiving proper power and ground. Consult your wiring diagram for the correct power and ground locations. Use your multimeter to check the voltage at the power terminals and the continuity to ground at the ground terminals.
- TCM Communication: Check if the TCM is communicating with other modules on the vehicle's network (CAN bus). This requires a more advanced scan tool that can monitor CAN bus communication.
- Professional Diagnosis: If you suspect a TCM problem, it's best to consult a qualified technician. TCM diagnostics and programming often require specialized equipment and knowledge. Replacing a TCM usually requires programming it to match your vehicle's VIN.
5. Other Potential Causes
- Low Battery Voltage: A weak battery can sometimes cause intermittent electrical problems, including issues with the shift interlock system. Ensure your battery is fully charged and in good condition.
- Shifter Cable Adjustment: In rare cases, a misadjusted shifter cable can prevent the system from engaging correctly. This typically results in other shifting problems as well.
Tools You'll Need
To tackle this project, you'll likely need the following tools:
- Multimeter: Essential for electrical testing.
- OBD-II Scanner: To read diagnostic trouble codes.
- Socket Set and Wrenches: For removing trim panels and components.
- Screwdrivers (Phillips and Flathead): For various screws and fasteners.
- Electrical Contact Cleaner: To clean corroded connectors.
- Dielectric Grease: To protect connectors from corrosion.
- Wiring Diagram: Crucial for identifying the correct wires to test.
- Repair Manual: Provides detailed instructions and torque specifications.
Important Safety Precautions
- Disconnect the Battery: Before working on any electrical components, disconnect the negative battery terminal to prevent accidental shorts.
- Wear Safety Glasses: Protect your eyes from debris and fluids.
- Use Jack Stands: If you need to lift the vehicle, always use jack stands to support it securely. Never work under a vehicle supported only by a jack.
Final Thoughts
Getting stuck in Park can be a real headache, but with a systematic approach, you can often diagnose and fix the problem yourself. Remember to start with the easiest and most common causes, like the brake pedal switch and wiring issues. If you're uncomfortable with any of the steps or if the problem persists, don't hesitate to seek professional help. Good luck, and happy wrenching!