2018 Nissan Rogue Radiator Fan Replacement
The 2018 Nissan Rogue, a popular compact SUV, relies on a complex cooling system to maintain optimal engine temperature. A critical component of this system is the radiator fan, responsible for drawing air across the radiator core, dissipating heat, and preventing overheating, especially during low-speed driving or when idling. Failure of the radiator fan can lead to serious engine damage, so understanding its function and the replacement process is crucial for any Rogue owner or aspiring mechanic. This guide provides an in-depth look at replacing the radiator fan assembly on a 2018 Nissan Rogue, focusing on the technical aspects and potential challenges.
Understanding the Radiator Fan System
Before diving into the replacement procedure, it's essential to understand the overall system. The 2018 Rogue typically employs an electric radiator fan, controlled by the Engine Control Module (ECM) based on inputs from various sensors, primarily the engine coolant temperature sensor. When the coolant temperature exceeds a pre-defined threshold, the ECM signals a relay to energize, supplying power to the fan motor. The fan then spins, drawing air through the radiator, which contains engine coolant circulated by the water pump. This process removes heat from the coolant, which is then returned to the engine block. Efficient operation of this cycle is paramount for engine longevity and performance.
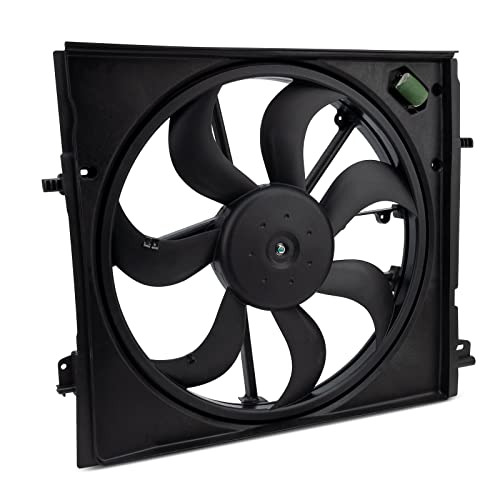
The radiator fan assembly usually consists of several key parts:
- Fan Shroud: A plastic housing that surrounds the fan, directing airflow and improving cooling efficiency.
- Fan Motor: The electric motor that drives the fan blades.
- Fan Blades: The rotating blades that draw air across the radiator.
- Electrical Connector: Connects the fan motor to the vehicle's electrical system.
- Mounting Brackets: Secure the fan assembly to the radiator support or surrounding structure.
A malfunctioning radiator fan can manifest in several ways: the engine overheating, the air conditioning system not functioning correctly at idle, or diagnostic trouble codes (DTCs) being stored in the ECM. It's crucial to diagnose the issue correctly before assuming the fan is the culprit. Check the fan relay, the coolant temperature sensor, and the wiring harness for any faults.
Tools and Materials Required
To successfully replace the radiator fan assembly, you'll need the following tools and materials:
- New Radiator Fan Assembly (ensure it's the correct part number for your vehicle)
- Socket Set (metric sizes, typically 10mm, 12mm, 13mm)
- Wrench Set (metric sizes)
- Screwdrivers (Phillips head and flathead)
- Pliers (needle-nose and regular)
- Multimeter (for electrical testing)
- Jack and Jack Stands (for safety)
- Wheel Chocks (for added safety)
- Drain Pan (for coolant if necessary)
- Gloves and Safety Glasses (essential for personal protection)
Safety First: Always disconnect the negative battery terminal before starting any electrical work on your vehicle. This prevents accidental shorts and potential injury.
Step-by-Step Replacement Procedure
The following steps outline the procedure for replacing the radiator fan assembly on a 2018 Nissan Rogue. Remember to consult your vehicle's service manual for specific torque specifications and any vehicle-specific nuances.
Step 1: Preparation and Access
1. Park the vehicle on a level surface and engage the parking brake. Secure the rear wheels with wheel chocks. 2. Allow the engine to cool completely before starting. Working on a hot engine can cause burns. 3. Open the hood and locate the radiator fan assembly. It's typically positioned behind the radiator, close to the engine.
Step 2: Disconnecting the Electrical Connector
1. Carefully disconnect the electrical connector from the radiator fan motor. Most connectors have a locking tab that needs to be depressed before the connector can be pulled apart. Use a small screwdriver or your fingers to gently release the tab. 2. Inspect the connector for any signs of corrosion or damage. If present, clean or repair the connector as needed. A damaged connector can cause intermittent fan operation.
Step 3: Removing the Fan Shroud (If Necessary)
1. Depending on the Rogue's configuration, the fan shroud may need to be removed separately or as part of the fan assembly. 2. If removable, look for bolts or clips securing the shroud to the radiator or surrounding structure. Use the appropriate socket or screwdriver to remove them. 3. Gently detach the shroud, taking care not to damage any surrounding components.
Step 4: Removing the Radiator Fan Assembly
1. Identify the mounting bolts or screws that secure the fan assembly to the radiator support or frame. These are typically located around the perimeter of the fan shroud or on the fan motor housing. 2. Use the appropriate socket or wrench to remove the mounting hardware. 3. Support the fan assembly with one hand while removing the last mounting bolt to prevent it from falling. 4. Carefully lift the fan assembly out of the engine compartment.
Step 5: Inspection and Comparison
1. Once the old fan assembly is removed, compare it to the new one. Ensure they are the same size, shape, and have the same electrical connector. 2. Inspect the radiator for any debris or damage. Clean the radiator fins with a soft brush if necessary. Clogged radiator fins reduce cooling efficiency. 3. Inspect the fan shroud (if reused) for any cracks or damage. Replace if necessary.
Step 6: Installing the New Radiator Fan Assembly
1. Carefully lower the new fan assembly into the engine compartment, aligning it with the mounting points. 2. Install the mounting bolts or screws, tightening them to the manufacturer's specified torque. Do not overtighten, as this can damage the plastic housing. 3. If applicable, reattach the fan shroud, securing it with the bolts or clips you removed earlier.
Step 7: Reconnecting the Electrical Connector
1. Plug the electrical connector into the fan motor. Ensure the connector clicks into place and is securely locked. 2. Double-check the wiring to ensure it is not pinched or routed in a way that could cause damage.
Step 8: Final Checks and Testing
1. Reconnect the negative battery terminal. 2. Start the engine and let it idle. 3. Monitor the engine coolant temperature gauge. The fan should cycle on and off as the engine temperature rises. 4. Turn on the air conditioning. The radiator fan should also engage when the air conditioning is activated. 5. Check for any leaks or unusual noises. 6. If the fan does not operate correctly, recheck the electrical connections, the fan relay, and the coolant temperature sensor. Use a multimeter to test for voltage at the fan motor connector when the fan should be running.
Troubleshooting and Considerations
While this guide provides a comprehensive overview of the radiator fan replacement process, some challenges may arise:
- Stuck Bolts: Corrosion can cause mounting bolts to seize. Use penetrating oil and a breaker bar to loosen them. If necessary, apply heat with a torch (exercise extreme caution).
- Damaged Connectors: Old or brittle connectors can break during removal. Replacement connectors are available at most auto parts stores.
- Air in the Cooling System: If coolant was lost during the process, air pockets may form in the cooling system. Burp the system by running the engine with the radiator cap off (exercise caution as the coolant can be hot) or by using a vacuum coolant filler.
- ECM Issues: In rare cases, the ECM itself may be faulty, preventing the fan from operating correctly. This requires advanced diagnostic testing.
Replacing the radiator fan assembly on a 2018 Nissan Rogue is a manageable task for those with basic mechanical skills and the right tools. However, always prioritize safety and consult your vehicle's service manual for specific instructions and torque specifications. Proper diagnosis and attention to detail will ensure a successful repair and prevent future engine problems.