2019 Nissan Altima Fuse Box Location
Alright, let's dive into the fuse box locations on the 2019 Nissan Altima. Knowing where these vital electrical nerve centers are is crucial for troubleshooting issues, replacing blown fuses, and even tapping into power for aftermarket modifications. Unlike some cars that hide these things in seemingly random places, the Altima's fuse box locations are relatively straightforward.
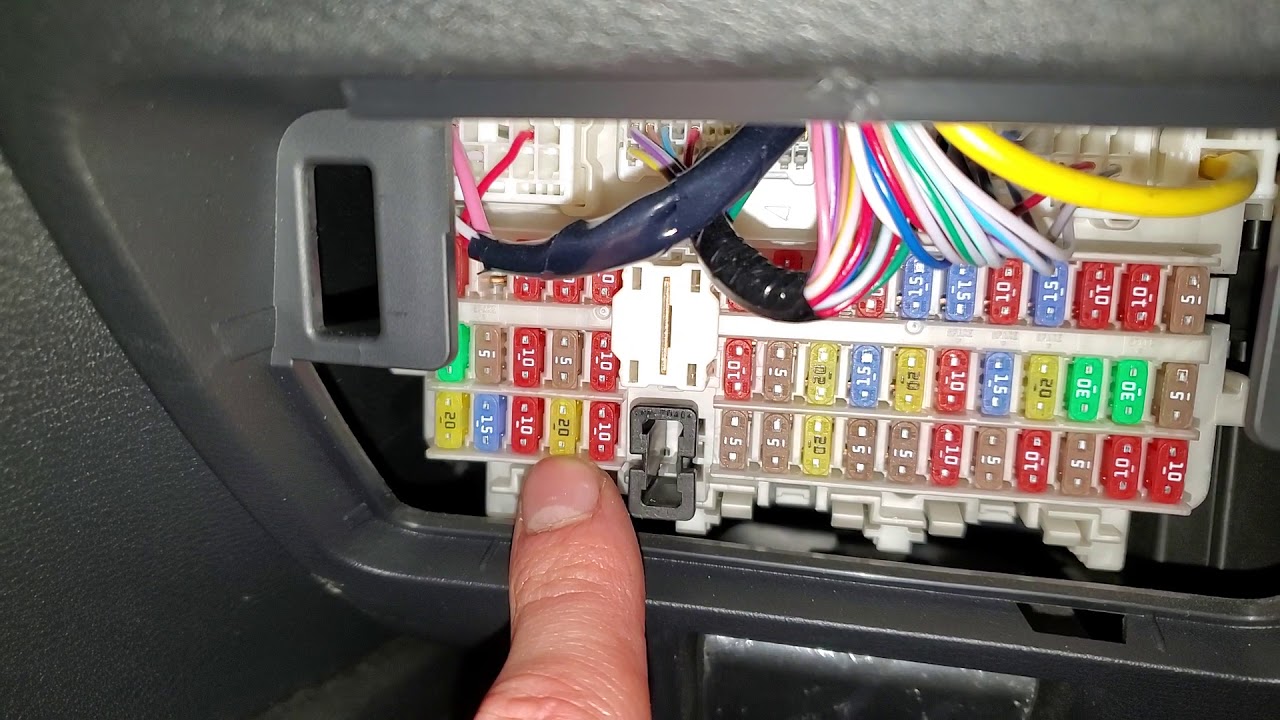
Primary Fuse Box Location: Inside the Cabin
The main fuse box, the one you'll likely be interacting with most often, is located inside the cabin, on the driver's side. Specifically, it's positioned below the dashboard, near the steering column. You'll need to crouch down and look up to spot it. It's usually covered by a small access panel that’s either hinged or completely removable.
Accessing the Fuse Box:
- Clear the Area: Make sure you have enough room to comfortably crouch and work. Move any floor mats or obstructions that might get in your way.
- Locate the Access Panel: It's a rectangular plastic cover, usually dark colored (black or gray), that blends in with the surrounding trim.
- Release the Panel: How you release the panel depends slightly on the specific trim level of your Altima, but typically it's one of the following:
- Hinged Panel: This type usually has a small tab or indent at the top or bottom. Gently press or pull on the tab, and the panel will swing downwards, revealing the fuses behind it.
- Removable Panel: This type usually snaps into place. You'll need to gently pry it off using your fingers or a plastic trim tool. Avoid using metal tools like screwdrivers, as you could damage the surrounding plastic.
- Secure the Panel: If the panel is hinged, make sure it stays open while you’re working. If it's removable, put it in a safe place where you won't lose it.
What You'll Find Inside:
Once the access panel is open, you'll see a cluster of fuses, each with a different amperage rating (measured in amps). These fuses protect various circuits throughout the car, from the headlights to the radio to the engine control unit (ECU). Next to the fuses, or sometimes on the inside of the access panel, you should find a fuse diagram. This diagram is essential for identifying which fuse controls which circuit. The diagram will be a printed or labeled chart that maps each fuse to its corresponding component (e.g., "Headlights - 15A," "Radio - 10A," etc.). Without this diagram, you're essentially working blind.
Secondary Fuse Box Location: Under the Hood
The 2019 Altima also has a secondary fuse box located under the hood. This fuse box typically houses the larger amperage fuses and relays that protect critical engine and drivetrain components. Finding this fuse box is usually easier than the interior one.
Location:
The under-hood fuse box is typically located in the engine bay, near the battery. Look for a black plastic box with a removable lid. It's often labeled with a fuse symbol or some other indication of its purpose.
Accessing the Fuse Box:
- Safety First: Before working under the hood, make sure the engine is off and the parking brake is engaged.
- Locate the Box: Find the black plastic fuse box near the battery.
- Open the Lid: The lid usually has one or two latches or clips that you need to release. Some lids require you to press down on the latch while simultaneously lifting the lid. Others might have a simple clip that you can pry open with your finger.
What You'll Find Inside:
Similar to the interior fuse box, the under-hood fuse box will contain a collection of fuses and relays. Relays are electrically operated switches that control higher-current circuits, such as the starter motor or the fuel pump. You'll also find a fuse diagram, usually printed on the underside of the lid. This diagram is just as important as the one in the interior fuse box. Pay close attention to the diagram, as some of the fuses and relays may look similar. Incorrectly replacing a relay or fuse can cause serious problems.
Important Considerations and Best Practices
Using the Fuse Diagram:
As mentioned earlier, the fuse diagram is your bible. Before you start pulling fuses, consult the diagram to identify the correct fuse for the circuit you're troubleshooting. Never replace a fuse with one that has a higher amperage rating. Doing so could overload the circuit and cause a fire. Always use a fuse with the same amperage rating as the original.
Testing Fuses:
Visually inspecting a fuse can sometimes reveal if it's blown. A blown fuse will usually have a broken filament inside. However, visual inspection isn't always reliable. The best way to test a fuse is with a multimeter. A multimeter is an electronic measuring instrument that can measure voltage, current, and resistance. To test a fuse with a multimeter:
- Set the Multimeter: Set the multimeter to the continuity setting (usually indicated by a diode symbol or a speaker symbol).
- Test the Fuse: Touch the multimeter probes to the two metal contacts on the fuse.
- Interpret the Results: If the multimeter beeps or shows a reading of 0 ohms (or very close to 0), the fuse is good. If the multimeter shows no continuity (an open circuit), the fuse is blown.
Replacing Fuses:
Once you've identified a blown fuse, replace it with a new fuse of the same amperage rating. Use a fuse puller (a small plastic tool designed for removing fuses) to avoid damaging the fuse box or the fuses themselves. These are very inexpensive and readily available at any auto parts store. After replacing the fuse, test the circuit to make sure it's working properly. If the fuse blows again immediately, there's likely a more serious problem in the circuit that needs to be investigated. This could be a short circuit, a faulty component, or an overloaded circuit.
Common Problems and Troubleshooting Tips:
- Fuse Keeps Blowing: If a fuse repeatedly blows, don't just keep replacing it. There's a problem in the circuit that needs to be addressed. Common causes include short circuits (wires touching each other), faulty components (e.g., a bad light bulb or motor), or an overloaded circuit (too many devices drawing power from the same circuit).
- No Fuse Diagram: If you're missing the fuse diagram, you can usually find it online or in the owner's manual. You can also consult a repair manual specific to the 2019 Nissan Altima.
- Difficulty Removing Fuses: If you're having trouble removing a fuse, make sure you're using a fuse puller. If you don't have one, you can try using a pair of needle-nose pliers, but be very careful not to damage the fuse or the fuse box.
- Incorrect Fuse Replacement: Always double-check the amperage rating of the replacement fuse before installing it. Using a fuse with a higher amperage rating can be dangerous and could damage your car's electrical system.
Modifications and Aftermarket Accessories:
If you're planning on installing aftermarket accessories, such as a new stereo, amplifier, or lights, it's important to properly fuse the new circuits. Tap into existing circuits carefully and ensure you're not overloading them. Use a fuse tap (also called an add-a-circuit) to safely tap into an existing fuse slot. Always consult the manufacturer's instructions for the accessory and use the recommended fuse size. Improperly fused accessories can cause electrical problems and even fires.
Final Thoughts:
Understanding the fuse box locations and how to properly troubleshoot and replace fuses is a valuable skill for any car owner. By following these tips and guidelines, you can save yourself time, money, and potential headaches. Always prioritize safety when working with your car's electrical system. If you're not comfortable working on your car's electrical system, it's best to consult a qualified mechanic.
Disclaimer: This information is for general guidance only. Always consult your vehicle's owner's manual and a qualified mechanic for specific instructions and safety precautions.