2019 Nissan Sentra Brake Pad Replacement
The 2019 Nissan Sentra, while a reliable and fuel-efficient compact sedan, requires routine maintenance to ensure safe operation. Among the most crucial of these tasks is brake pad replacement. Understanding the process, and the underlying principles, empowers owners to make informed decisions about their vehicle's upkeep, whether they choose to tackle the job themselves or entrust it to a professional. This guide provides an in-depth look at replacing the front brake pads on a 2019 Nissan Sentra, focusing on the "why" as much as the "how."
Understanding the Braking System
Before diving into the procedure, it's essential to grasp the fundamental components of the braking system and their roles. The Sentra, like most modern vehicles, utilizes a hydraulic braking system. When the driver presses the brake pedal, it actuates the master cylinder, which in turn pressurizes the brake fluid. This pressurized fluid travels through brake lines to the calipers at each wheel.
The calipers are essentially clamps that house the brake pads. These pads are made of a friction material designed to create resistance against the rotor (also known as a brake disc) when pressed against it. This friction converts kinetic energy (the energy of motion) into heat, slowing the vehicle down. Over time, the friction material on the brake pads wears down, reducing their effectiveness and necessitating replacement.
Warning signs of worn brake pads include a squealing or grinding noise when braking, a pulsating brake pedal, increased stopping distance, and a visual inspection revealing thin or missing pad material. Ignoring these signs can lead to damage to the rotors, requiring more extensive and costly repairs.
Tools and Materials Required
Having the right tools and materials on hand is crucial for a successful brake pad replacement. Here's a comprehensive list:
- New brake pads (specifically for a 2019 Nissan Sentra front brakes)
- Brake cleaner spray
- C-clamp or brake caliper compressor tool
- Socket set (including the correct sizes for the caliper bolts and lug nuts)
- Wrench set (may be needed for certain caliper bolts)
- Torque wrench
- Jack and jack stands (never work under a vehicle supported only by a jack)
- Wheel chocks
- Gloves
- Safety glasses
- Brake fluid (DOT 3 or DOT 4, consult your owner's manual) – for topping off the reservoir
- Penetrating oil (optional, for loosening stubborn bolts)
- Shop towels or rags
- Wire brush
Step-by-Step Brake Pad Replacement Procedure
Safety First: Always prioritize safety when working on your vehicle. Wear safety glasses and gloves to protect your eyes and skin. Ensure the vehicle is parked on a level surface, the parking brake is engaged, and the wheels are chocked to prevent movement.
1. Loosening the Lug Nuts
Before lifting the vehicle, use the appropriate socket to loosen the lug nuts on the wheel where you'll be replacing the brake pads. Do not remove them completely at this stage. Loosening them while the wheel is on the ground provides better leverage.
2. Lifting and Supporting the Vehicle
Consult your owner's manual for the proper jacking points on your 2019 Nissan Sentra. Position the jack securely under the designated jacking point and raise the vehicle until the tire is off the ground. Then, immediately place a jack stand under the vehicle's frame, near the jacking point, for secure support. Lower the vehicle onto the jack stand before proceeding. Repeat this process for the other side if you're replacing both front brake pads simultaneously.
3. Removing the Wheel
Now, completely remove the lug nuts and carefully take the wheel off the hub. Set the wheel aside in a safe location.
4. Inspecting the Brake Caliper Assembly
With the wheel removed, you'll have a clear view of the brake caliper assembly. Take a moment to visually inspect the components: the caliper, brake pads, rotor, and brake lines. Look for any signs of damage, leaks, or excessive wear. Note the arrangement of the caliper and its mounting hardware.
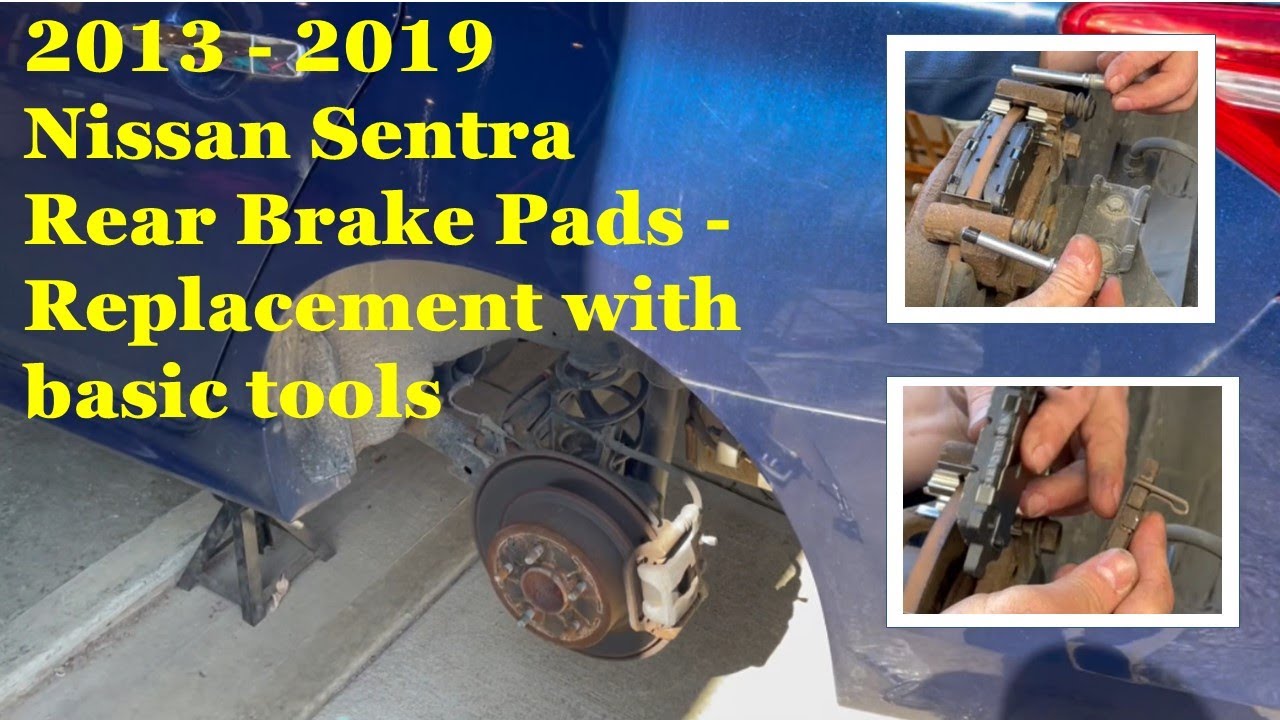
5. Removing the Caliper
The caliper is typically held in place by two bolts, often located on the back of the caliper. Use the appropriate socket or wrench to remove these bolts. You may need to apply penetrating oil if they are particularly stubborn. Once the bolts are removed, the caliper should be free to slide off the rotor. If it's stuck, gently wiggle it or use a rubber mallet to tap it loose. Be careful not to damage the brake lines.
Once the caliper is free, do not let it hang by the brake line. This can damage the line. Instead, use a bungee cord or wire to suspend the caliper from the suspension or another nearby component.
6. Removing the Old Brake Pads
With the caliper removed, the old brake pads should be easily accessible. They are usually held in place by clips or slides within the caliper bracket. Carefully remove the old pads, noting their orientation for reference when installing the new pads.
7. Compressing the Caliper Piston
Before installing the new brake pads, you need to compress the caliper piston back into its bore. This creates enough space for the thicker new pads. Use a C-clamp or a specialized brake caliper compressor tool for this task. Place the old brake pad against the piston to protect it. Slowly and evenly compress the piston until it is fully retracted. Be careful not to damage the piston or the caliper bore.
Important: As you compress the piston, the brake fluid level in the master cylinder reservoir will rise. Keep an eye on the reservoir and remove any excess fluid to prevent it from overflowing. Use a clean turkey baster or syringe to remove the fluid. Dispose of the used brake fluid properly – it is hazardous waste.
8. Cleaning and Lubricating
Before installing the new pads, clean the caliper bracket and any sliding surfaces with a wire brush and brake cleaner. This removes any rust, dirt, or debris that could hinder the movement of the pads. Apply a thin layer of brake lubricant to the sliding surfaces of the caliper bracket and the backs of the new brake pads (where they contact the caliper piston and bracket). This helps prevent squealing and ensures smooth operation.
9. Installing the New Brake Pads
Install the new brake pads into the caliper bracket, making sure they are seated correctly and aligned with the clips or slides. Refer to your notes or the orientation of the old pads if needed.
10. Reinstalling the Caliper
Carefully slide the caliper back over the rotor and the new brake pads. Align the caliper with the mounting holes and reinstall the caliper bolts. Tighten the bolts to the manufacturer's specified torque using a torque wrench. Refer to your vehicle's repair manual for the correct torque specifications. Over-tightening can damage the bolts or the caliper, while under-tightening can lead to brake failure.
11. Reinstalling the Wheel
Carefully reinstall the wheel onto the hub, aligning the lug holes with the studs. Hand-tighten the lug nuts in a star pattern (opposite nuts) to ensure even pressure. Lower the vehicle back to the ground and fully tighten the lug nuts to the manufacturer's specified torque using a torque wrench. Again, consult your owner's manual for the correct torque specifications.
12. Repeating the Process
Repeat steps 1-11 for the other front wheel if you are replacing both front brake pads.
13. Bedding In the Brakes
After replacing the brake pads, it's crucial to "bed in" the new pads to the rotors. This process transfers a layer of friction material from the pads to the rotors, optimizing braking performance and extending pad life. To bed in the brakes, perform several moderate stops from 30 mph to 10 mph, followed by a cool-down period with light braking. Avoid hard braking during the initial bedding-in period.
14. Final Inspection
After bedding in the brakes, perform a final inspection. Check the brake fluid level in the master cylinder reservoir and top it off if necessary. Ensure there are no leaks around the calipers or brake lines. Listen for any unusual noises when braking. If you notice any problems, have the vehicle inspected by a qualified mechanic.
Conclusion
Replacing the brake pads on a 2019 Nissan Sentra is a manageable task for the reasonably skilled DIY enthusiast. By understanding the braking system, using the correct tools, following the step-by-step procedure, and prioritizing safety, you can save money and gain a greater appreciation for the inner workings of your vehicle. However, if you are not comfortable performing this task, it's always best to consult with a qualified mechanic. Proper brake maintenance is essential for safe driving, and ensuring the job is done correctly is paramount.