240sx 300zx Brake Master Cylinder Upgrade
Alright, let's talk about upgrading the brake master cylinder (BMC) on your Nissan 240SX. It's a popular modification, and for good reason. Whether you've upgraded your calipers, rotors, or just want a more responsive brake pedal, swapping in a BMC from a Z32 300ZX can offer a noticeable improvement. This isn't a simple bolt-on in most cases, so it's important to understand the nuances before diving in. We'll cover the pros, cons, what you'll need, and walk you through the process. This guide assumes you have intermediate-level mechanical skills, are comfortable working with brake systems, and understand the importance of bleeding brakes thoroughly.
Why Upgrade? The Benefits Explained
Before we get into the how-to, let's discuss why you might want to do this. The stock 240SX brake master cylinder, while adequate for the factory setup, can become a limiting factor when you start improving other components. Here's the breakdown:
- Increased Brake Pedal Firmness: This is the most common reason. A larger bore master cylinder pushes more fluid with the same amount of pedal travel. This translates to a firmer, more responsive pedal feel, especially after installing larger calipers that require more fluid.
- Improved Braking Performance: A firmer pedal allows for more precise modulation and control, leading to shorter stopping distances and better overall braking performance, particularly during aggressive driving or on the track.
- Compensating for Upgraded Calipers: Larger calipers, especially those with multiple pistons, require more fluid volume to operate effectively. The stock master cylinder may not be able to supply enough fluid quickly enough, resulting in a spongy pedal and reduced braking power.
- Addressing Brake Fade: While a BMC upgrade won't directly eliminate brake fade caused by overheating brake pads, it can help maintain consistent pedal feel and braking performance even as the pads get hot.
In short, upgrading your BMC ensures that your braking system is operating at its full potential, especially after other upgrades. The 300ZX (Z32) BMC is a popular choice because it's a relatively straightforward swap that offers a significant improvement.
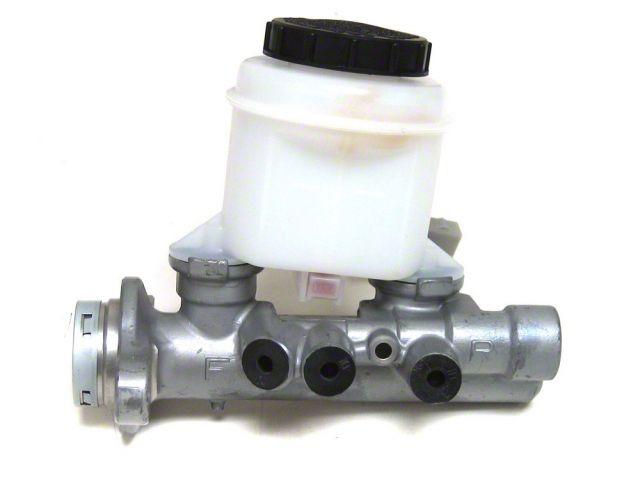
The Z32 Brake Master Cylinder: What to Know
The Z32 300ZX brake master cylinder typically comes in two bore sizes, 1" and 1 1/16". The 1" is generally recommended for 240SX applications, as it provides a good balance of improved pedal feel and braking power without making the pedal too stiff. The larger 1 1/16" bore will provide a firmer pedal but may also require more effort to achieve the same braking force.
Here's what you should look for:
- Bore Size: As mentioned, the 1" bore is the most popular. Confirm the bore size before purchasing.
- Condition: Opt for a rebuilt or new unit whenever possible. Used master cylinders can have internal wear or corrosion, leading to leaks or reduced performance. If you do buy used, seriously consider a rebuild kit.
- Reservoir: The 300ZX reservoir may or may not be compatible with your 240SX. You may need to use your stock 240SX reservoir or purchase a new one that fits the Z32 BMC.
- Part Number: While sourcing a Z32 BMC, knowing the part number can help ensure you are getting the correct unit. Consult online resources for the specific part number.
What You'll Need: Parts, Tools, and Materials
Before you start, gather all the necessary components and tools. This will save you time and frustration later on.
- Z32 300ZX Brake Master Cylinder: (1" bore recommended)
- Brake Fluid: DOT 4 brake fluid is recommended for most performance applications. Have at least 1 liter on hand. Do not reuse old brake fluid!
- Flare Nut Wrenches: Essential for loosening and tightening brake lines without damaging the fittings. Get a set that includes the sizes needed for your brake lines.
- Line Wrenches These are specifically designed for brake lines to prevent rounding or damage during removal and installation.
- Open-End Wrenches: For general tightening and loosening of nuts and bolts.
- Sockets and Ratchet: For removing and installing the BMC mounting bolts.
- Screwdrivers: Various sizes, both Phillips and flathead.
- Pliers: For hose clamps and other miscellaneous tasks.
- Brake Bleeder Kit: A pressure bleeder or vacuum bleeder will make the bleeding process much easier and more efficient. You can also use the traditional two-person method, but it's less reliable.
- Catch Bottle and Tubing: For collecting old brake fluid during bleeding.
- Shop Rags: Lots of them. Brake fluid is corrosive and messy.
- Threadlocker: (Loctite Blue) For securing the mounting bolts.
- Adapter Fittings (If Necessary): Depending on the year and model of your 240SX and the specific Z32 BMC you're using, you may need adapter fittings to connect the brake lines. Research this beforehand!
- New Copper Washers: For the banjo bolts (if applicable) to ensure a leak-free seal.
- Bench Bleeder Kit (Optional but Recommended): Bench bleeding the master cylinder before installing it in the car will remove air bubbles and make the final bleeding process much easier.
The Installation Process: Step-by-Step
Safety First! Disconnect the negative battery cable before starting any work on the brake system. Brake fluid is corrosive and can damage paint, so protect any painted surfaces. Work in a well-ventilated area.
- Prepare the New Master Cylinder: If you have a bench bleeder kit, use it to bleed the new Z32 master cylinder. This involves filling the reservoir with brake fluid and using the bleeder kit to pump fluid through the cylinder until all air bubbles are removed. This is much easier to do on the workbench than in the car.
- Remove the Old Master Cylinder:
- Start by siphoning as much brake fluid as possible out of the old master cylinder reservoir.
- Carefully disconnect the brake lines from the master cylinder. Use flare nut wrenches to prevent damage to the fittings. Be prepared for some brake fluid to spill. Immediately cap or plug the brake lines to prevent fluid from draining and air from entering the system.
- Disconnect the brake fluid level sensor (if equipped).
- Remove the nuts or bolts that secure the master cylinder to the brake booster.
- Carefully remove the old master cylinder from the car.
- Install the New Master Cylinder:
- Install the new Z32 master cylinder onto the brake booster, ensuring it sits flush and is properly aligned.
- Secure the master cylinder with the nuts or bolts, using threadlocker (Loctite Blue) on the threads. Tighten to the manufacturer's specified torque.
- Reconnect the brake fluid level sensor (if applicable).
- This is where things may require some modification depending on the BMC you've chosen.
- Carefully connect the brake lines to the new master cylinder. Use new copper crush washers for banjo fittings if equipped. Make sure you have the correct fitting adapters to mate the lines up. Tighten the fittings to the manufacturer's specified torque. Do not overtighten!
- Bleed the Brakes:
- This is the most crucial step. Start with the brake caliper furthest from the master cylinder (usually the right rear) and work your way closer (left rear, right front, left front).
- Use your chosen bleeding method (pressure bleeder, vacuum bleeder, or two-person method) to bleed each brake caliper until clear, bubble-free fluid comes out.
- Make sure to keep the master cylinder reservoir filled with brake fluid during the bleeding process to prevent air from entering the system.
- Double-check all fittings for leaks.
- Test and Verify:
- Reconnect the negative battery cable.
- Start the engine and check the brake pedal feel. It should be firm and responsive.
- Pump the brakes several times to build pressure and check for leaks.
- Take the car for a short test drive in a safe area. Gradually increase your braking force to ensure the brakes are working properly.
- If the pedal feels spongy or you notice any leaks, re-bleed the brakes and/or tighten the fittings.
Important Considerations and Potential Issues
While the Z32 BMC upgrade is generally straightforward, there are a few things to keep in mind:
- Brake Line Adapters: As mentioned earlier, you may need adapter fittings to connect the brake lines. The thread size and pitch on the Z32 BMC may be different from your 240SX. Research this carefully and purchase the correct adapters before starting the project.
- Reservoir Compatibility: The Z32 reservoir may not fit properly on your 240SX. You may need to use your stock 240SX reservoir or purchase a new aftermarket reservoir that is compatible with the Z32 BMC.
- Brake Booster Compatibility: While unlikely, some aftermarket brake boosters may not be compatible with the Z32 BMC. Verify compatibility before proceeding.
- ABS Issues: If your 240SX has ABS, the BMC upgrade may affect its performance. In some cases, the ABS system may need to be recalibrated or modified to work properly with the new master cylinder. This is rare but worth noting.
- Proper Bleeding: This is non-negotiable. A properly bled brake system is crucial for safety and performance. Take your time and ensure all air is removed from the lines.
- Master Cylinder Size: Choosing the wrong bore size can negatively impact your braking feel and performance. It's far better to start with the 1" bore size and adjust from there.
Conclusion
The Z32 brake master cylinder upgrade is a worthwhile modification for any 240SX owner looking to improve their braking performance, particularly after upgrading other components like calipers and rotors. By carefully following these steps, understanding the potential issues, and taking your time, you can successfully complete this upgrade and enjoy a firmer, more responsive brake pedal. Remember to always prioritize safety and consult with a qualified mechanic if you're unsure about any aspect of the process. Brakes are critical, so if in doubt, seek professional help! Happy wrenching!