240sx 6.5" Speaker Adapter Fabrication And Installation
Upgrading Your 240SX Sound: A Guide to Fabricating and Installing 6.5" Speaker Adapters
The Nissan 240SX, a beloved icon of the 90s, is often praised for its handling and potential for modification. However, the factory audio system is often one of the first things enthusiasts look to upgrade. One common modification is replacing the stock speakers with larger, more modern 6.5" speakers. Since the original speaker openings are typically smaller, installing these requires either modifying the existing mounting points or fabricating custom speaker adapters. This article provides a comprehensive guide to fabricating and installing 6.5" speaker adapters for your 240SX, ensuring a clean, professional, and acoustically sound upgrade.
Why Upgrade Your 240SX Speakers?
Before diving into the fabrication process, let's consider the benefits of upgrading your 240SX speakers:
- Improved Sound Quality: Modern 6.5" speakers offer superior sound clarity, frequency response, and bass reproduction compared to the factory speakers.
- Higher Power Handling: Upgraded speakers can handle more power from aftermarket amplifiers, allowing for louder and cleaner audio.
- Wider Selection: The 6.5" speaker size is a widely available and popular standard, offering a vast selection of options to suit different budgets and sound preferences.
- Modernization: Updating your audio system is a great way to modernize your classic 240SX and enhance your driving experience.
Materials and Tools Required
To successfully fabricate and install your 6.5" speaker adapters, you'll need the following materials and tools:
- 6.5" Speakers: Choose speakers that fit your budget and desired sound characteristics. Consider the mounting depth to ensure they clear any obstructions behind the door panel.
- Speaker Adapter Material: Common materials include MDF (Medium-Density Fiberboard), ABS plastic, or even Baltic birch plywood. MDF is generally easy to work with but can be susceptible to moisture. ABS plastic is more durable and water-resistant but may require specialized adhesives. Baltic birch plywood offers a good balance of strength, water resistance, and workability.
- Measuring Tools: A measuring tape, ruler, and calipers will be essential for accurate measurements.
- Cutting Tools: A jigsaw, rotary tool (Dremel), or bandsaw can be used to cut the adapter rings. A utility knife is useful for trimming edges.
- Drilling Tools: A drill with various drill bits is necessary for creating mounting holes.
- Fasteners: Screws or bolts to secure the adapter to the door and the speaker to the adapter. Consider using T-nuts for a more secure speaker mount.
- Speaker Wire: Ensure you have enough speaker wire to connect the new speakers to your existing wiring.
- Wire Connectors: Crimp connectors or soldering equipment for connecting the speaker wire.
- Sound Dampening Material (Optional): Applying sound dampening material to the inner door skin can significantly improve sound quality by reducing vibrations and unwanted noise.
- Safety Gear: Safety glasses, gloves, and a dust mask are crucial for protecting yourself during the fabrication process.
Step-by-Step Fabrication and Installation Guide
Follow these steps to fabricate and install your 6.5" speaker adapters:
1. Measuring and Template Creation
Accurate measurements are critical for a successful installation. Begin by:
- Removing the Door Panel: Carefully remove the door panel to access the factory speaker. Refer to your 240SX service manual or online resources for specific instructions.
- Measuring the Factory Speaker Opening: Measure the diameter of the existing speaker opening and the bolt pattern of the factory speaker. This will determine the inner diameter of your adapter ring and the location of the mounting holes.
- Measuring the 6.5" Speaker: Measure the outer diameter of the 6.5" speaker and the bolt pattern. This will determine the outer diameter of your adapter ring and the speaker mounting hole locations. Also, measure the mounting depth of the new speaker to ensure it will clear the window mechanism and other components inside the door.
- Creating a Template: Using your measurements, create a template for your adapter ring. You can use cardboard or paper to make a prototype. Ensure the template accurately reflects the inner and outer diameters, mounting hole locations, and overall shape of the adapter.
2. Cutting the Adapter Rings
Once you have a template, you can begin cutting the adapter rings from your chosen material:
- Transferring the Template: Place the template onto your chosen material and trace the outline. Use a sharp pencil or marker for accurate tracing.
- Cutting the Rings: Use a jigsaw, rotary tool, or bandsaw to carefully cut out the adapter rings. Take your time and follow the traced lines closely. If using a jigsaw, clamp the material securely to prevent it from vibrating.
- Creating Multiple Rings (Optional): For added strength or to achieve a specific mounting depth, you can cut multiple rings and glue them together. This is particularly useful if your chosen 6.5" speaker has a significant mounting depth.
- Sanding and Finishing: Sand the edges of the adapter rings to smooth them out and remove any rough edges or splinters. If using MDF, consider sealing it with a primer or paint to protect it from moisture.
3. Drilling Mounting Holes
Drill the necessary mounting holes for attaching the adapter to the door and the speaker to the adapter:
- Marking Hole Locations: Using your template or the factory speaker as a guide, mark the locations for the mounting holes on the adapter ring.
- Drilling Pilot Holes: Drill pilot holes at the marked locations. This will help prevent the screws from wandering when you install them.
- Drilling Mounting Holes: Drill the mounting holes to the appropriate size for your chosen screws or bolts.
- Countersinking (Optional): Countersinking the screw holes will allow the screws to sit flush with the surface of the adapter ring.
4. Test Fitting and Adjustments
Before permanently installing the adapters, test fit them in the door and with the speakers:
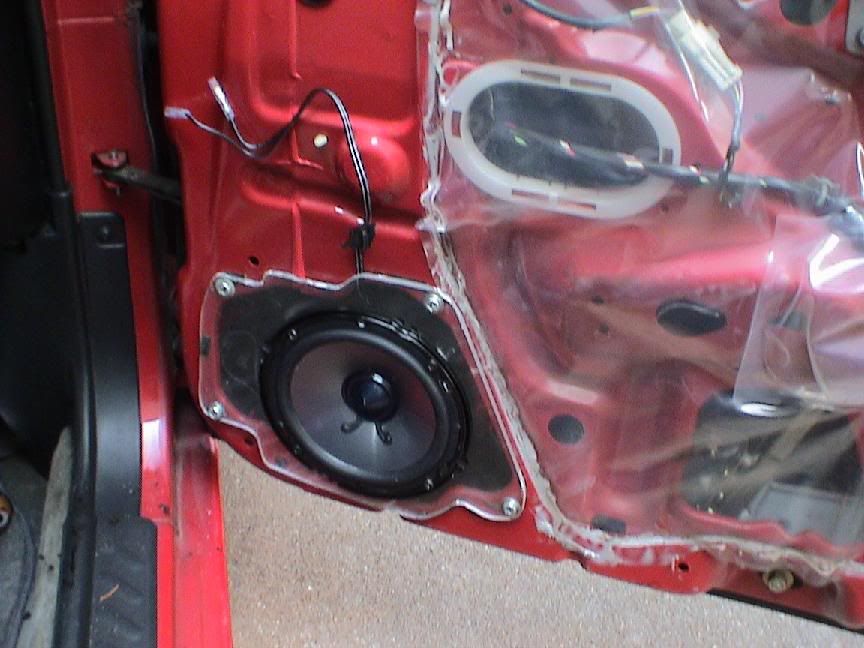
- Test Fit in Door: Attach the adapter ring to the door using the factory speaker mounting points. Ensure it fits snugly and securely. Make any necessary adjustments if the holes don't line up perfectly.
- Test Fit Speaker: Attach the speaker to the adapter ring. Verify that the speaker sits flush against the adapter and that the mounting holes align correctly. Check for clearance between the speaker and the door panel.
- Adjustments: Make any necessary adjustments to the adapter ring or mounting holes to ensure a perfect fit.
5. Wiring and Connections
Connect the speaker wire to the new speakers:
- Connecting Speaker Wire: Use crimp connectors or soldering equipment to connect the speaker wire to the speaker terminals. Ensure you maintain the correct polarity (positive to positive, negative to negative).
- Routing the Wire: Carefully route the speaker wire through the door and connect it to the existing speaker wiring harness. You may need to use a speaker adapter harness to avoid cutting the factory wiring.
- Securing the Wire: Secure the speaker wire to the door using zip ties or electrical tape to prevent it from interfering with the window mechanism or other components.
6. Installing the Speakers and Adapters
Now you can permanently install the speakers and adapters:
- Attaching the Adapter to the Door: Attach the adapter ring to the door using screws or bolts. Ensure the adapter is securely mounted.
- Attaching the Speaker to the Adapter: Attach the speaker to the adapter ring using screws or bolts. Tighten the screws evenly to prevent distortion.
- Sound Dampening (Optional): Before reinstalling the door panel, consider applying sound dampening material to the inner door skin. This will reduce vibrations and improve sound quality.
7. Reinstalling the Door Panel
Carefully reinstall the door panel:
- Aligning the Panel: Align the door panel with the door and snap it into place. Ensure all clips and fasteners are properly engaged.
- Testing the System: Test the new speakers to ensure they are working correctly. Check the sound quality and adjust the volume and balance settings as needed.
Tips and Considerations
- Accuracy is Key: Precise measurements and careful cutting are crucial for a successful installation.
- Material Choice: Choose a speaker adapter material that is durable, water-resistant, and easy to work with.
- Mounting Depth: Always verify the mounting depth of your chosen speakers to ensure they will clear any obstructions inside the door.
- Wiring: Ensure you use high-quality speaker wire and connectors for optimal sound quality.
- Sound Dampening: Consider applying sound dampening material to the inner door skin to improve sound quality.
- Consult a Professional: If you are not comfortable with any of these steps, consider consulting a professional car audio installer.
Conclusion
Fabricating and installing 6.5" speaker adapters in your 240SX can significantly improve your audio experience. By following these steps and taking your time, you can achieve a clean, professional, and acoustically sound upgrade. Remember to prioritize safety and accuracy throughout the process. With a little patience and effort, you can enjoy enhanced sound quality in your classic 240SX.
By following this guide, you should now be more confident in your ability to upgrade your 240SX audio. Remember, the improvement in sound quality will be well worth the effort. Good luck, and enjoy your new sound system!