240sx Alternator Replacement: A Step-by-step Diy Guide
So, your 240SX's charging system is acting up, and you suspect the alternator. You're probably seeing a dimming headlight, a battery light illuminated on the dash, or perhaps even experiencing complete battery drain. Replacing the alternator on a 240SX is a fairly straightforward job, even for those with intermediate mechanical skills. This guide will walk you through the process, step-by-step, ensuring you get the job done right. Remember, safety first! Disconnect the negative battery terminal before starting any electrical work.
Tools and Materials You'll Need
Before diving in, make sure you have all the necessary tools and materials. This will save you time and frustration.
- New or rebuilt alternator: Ensure it's the correct one for your specific 240SX model year (S13 or S14) and engine (KA24E or KA24DE). Double-check the amperage rating to ensure it matches the original.
- Socket set: Metric sizes, including 10mm, 12mm, 14mm, and possibly 17mm. Both standard and deep sockets will be helpful.
- Wrench set: Metric sizes, mirroring your socket set.
- Screwdrivers: Phillips head and flathead.
- Pliers: Needle-nose and regular pliers.
- Multimeter: For testing the old and new alternators (optional but recommended). This is crucial for diagnosing the initial problem and verifying the new alternator is functioning correctly.
- Battery terminal cleaner: To clean the battery posts and terminals while you're at it.
- Penetrating oil: Like PB Blaster or Liquid Wrench, for loosening stubborn bolts.
- Gloves and safety glasses: Safety first!
- Shop towels or rags: For wiping up grease and oil.
- Jack and jack stands (optional, but highly recommended): For easier access, you may want to lift the front of the car. Never work under a car supported only by a jack.
Step-by-Step Alternator Replacement
1. Disconnect the Battery
This is the most important first step! Locate the negative (-) terminal on your battery. Use a wrench (usually a 10mm) to loosen the nut securing the terminal clamp. Carefully remove the clamp from the negative battery post. Tuck the cable away from the battery to prevent accidental contact. This prevents short circuits and potential damage to your electrical system.
2. Locate the Alternator
The alternator is typically located on the front of the engine, usually on the driver's side for a 240SX. It's a cylindrical component with a pulley on the front and electrical connections on the back. It's driven by a belt connected to the crankshaft pulley (harmonic balancer). Take a moment to familiarize yourself with its location and the surrounding components.
3. Disconnect the Electrical Connections
There are usually two electrical connections to the alternator: a large B+ terminal (the main power wire) and a smaller connector (often with one or two wires, sometimes referred to as the "S" and "L" terminals).
Important: Before disconnecting any wires, label them with tape to ensure you reconnect them correctly later. A simple "B+" and "Connector" label will suffice.
- B+ Terminal: Remove the rubber boot covering the terminal. Use a wrench to loosen and remove the nut securing the B+ wire. Carefully detach the wire from the terminal.
- Connector: Locate the locking mechanism on the connector (usually a small clip or button). Depress or lift the locking mechanism and gently pull the connector away from the alternator. Do not force it; ensure the locking mechanism is fully released.
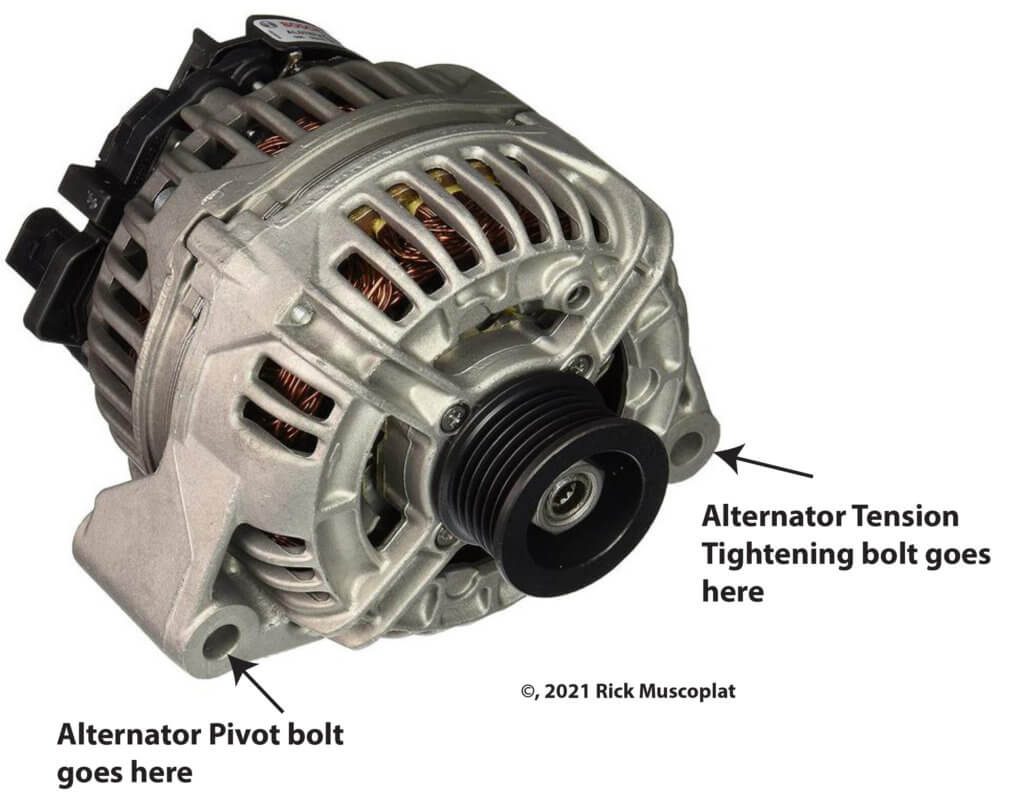
4. Loosen the Alternator Belt Tension
The alternator belt is tensioned by either an adjustable bracket on the alternator itself or an idler pulley. You need to loosen this tension to remove the belt. On most 240SX models, you'll find an adjustment bolt and a locking bolt.
- Locate the Adjustment and Locking Bolts: These are typically located on the alternator bracket. The adjustment bolt is often a long bolt that moves the alternator, while the locking bolt secures the alternator in its adjusted position.
- Loosen the Locking Bolt: Use a wrench to loosen the locking bolt. This will allow you to adjust the position of the alternator. Don't remove it completely, just loosen it enough to allow movement.
- Adjust the Tension: Use a wrench or socket to turn the adjustment bolt. Turning it in one direction will tighten the belt, and turning it in the other direction will loosen it. You want to loosen the belt enough so that you can easily remove it from the alternator pulley.
5. Remove the Alternator Belt
Once the belt tension is sufficiently loose, you can remove the belt from the alternator pulley. You may need to maneuver the belt around other pulleys to get it off completely. Take note of the belt's routing around all the pulleys so you can reinstall it correctly later. A diagram or photo can be helpful.
6. Remove the Alternator Mounting Bolts
The alternator is held in place by two or three mounting bolts. These bolts pass through the alternator housing and into the engine block or mounting bracket. Use a socket and wrench to remove these bolts. Be prepared for the alternator to be a bit heavy, so support it as you remove the last bolt.
7. Remove the Old Alternator
With all the bolts and connections removed, carefully remove the alternator from the engine bay. You may need to wiggle it and maneuver it around other components to get it out. Don't force it; take your time and find the best angle for removal.
8. Install the New Alternator
Installation is essentially the reverse of removal.
- Position the New Alternator: Carefully maneuver the new alternator into the engine bay and align it with the mounting holes.
- Install the Mounting Bolts: Install the mounting bolts and tighten them securely. Don't overtighten them; just snug them up.
- Reinstall the Alternator Belt: Route the belt around all the pulleys, ensuring it's properly seated in the grooves. Refer to your diagram or photo if needed.
- Tension the Alternator Belt: Using the adjustment bolt, adjust the belt tension until it feels firm but not overly tight. You should be able to deflect the belt about 1/4 to 1/2 inch in the middle of its longest span. Once the tension is correct, tighten the locking bolt to secure the alternator in its adjusted position.
- Reconnect the Electrical Connections: Reconnect the B+ wire to the terminal and tighten the nut securely. Replace the rubber boot. Reconnect the smaller connector, ensuring it clicks into place. Double-check that you've reconnected the wires to the correct terminals based on your labels.
9. Reconnect the Battery
Clean the battery posts and terminals with a battery terminal cleaner. Reattach the negative battery cable to the negative battery post and tighten the nut securely.
10. Start the Engine and Test the Charging System
Start the engine and let it idle. Check the voltage at the battery terminals with a multimeter. You should see a voltage between 13.5 and 14.5 volts. If the voltage is significantly lower or higher, there may be a problem with the new alternator or the wiring.
11. Final Checks
Inspect the alternator belt for proper alignment and tension. Listen for any unusual noises coming from the alternator. Check for any loose connections or leaks. Take the car for a short test drive and monitor the battery light on the dashboard. It should remain off, indicating that the charging system is functioning properly.
Troubleshooting
No Charging:
- Check the belt: Make sure the belt is properly tensioned and not slipping.
- Check the wiring: Ensure all electrical connections are clean and secure.
- Check the fuses: Inspect the fuses related to the charging system.
- Suspect a faulty new alternator: It happens. Take the new alternator to an auto parts store for testing.
Overcharging:
- Suspect a faulty voltage regulator: The voltage regulator is often integrated into the alternator. If it's malfunctioning, it can cause overcharging.
- Check for a short circuit: A short circuit in the wiring can also cause overcharging.
Noisy Alternator:
- Check the bearings: A noisy alternator may have worn-out bearings.
- Check for loose components: Ensure all the alternator's components are securely fastened.
Final Thoughts
Replacing the alternator on your 240SX is a manageable DIY project that can save you money and give you a sense of accomplishment. By following these steps carefully and taking your time, you can get your charging system back in top shape. Remember to always prioritize safety and double-check your work. Good luck, and happy wrenching!