240sx Battery Relocation Kit: Improving Weight Distribution
Alright, let's talk about battery relocation in your 240SX. If you're serious about improving your car's handling and overall performance, moving that hefty battery from the front to the back is a mod worth considering. This isn't just for show; it's about strategically shifting weight to enhance balance and optimize your car's center of gravity.
Why Relocate Your Battery?
The primary reason for a battery relocation is, quite simply, weight distribution. The 240SX, like many front-engine, rear-wheel-drive (FR) cars, suffers from a front-heavy bias. This means a significant portion of the car's weight is concentrated over the front axle, which can lead to understeer, particularly when entering corners. Understeer, if you're unfamiliar, is when the front tires lose grip before the rear, causing the car to push wide in a turn. Not ideal.
By moving the battery to the trunk, you're effectively transferring weight from the front to the rear. This shifts the center of gravity (CG) rearward. A more rearward CG improves the car's rotational inertia, making it more responsive to steering inputs and easier to rotate through corners. In practical terms, you'll experience less understeer, improved turn-in, and a more balanced handling feel.
Beyond handling improvements, there are a few other benefits to consider:
- Improved Engine Bay Space: Moving the battery frees up valuable space in the engine bay. This can be useful for larger intakes, turbocharger setups, or simply improving access for maintenance.
- Cleaner Engine Bay Aesthetics: Let's be honest, a cluttered engine bay isn't visually appealing. Relocating the battery contributes to a cleaner, more organized look.
- Potential for Weight Reduction: While relocating the battery itself doesn't inherently reduce weight (you're just moving it), some kits utilize lighter-weight batteries or allow for the removal of some unnecessary front-end bracing due to the weight shift.
Choosing the Right Battery Relocation Kit
There are numerous 240SX battery relocation kits available on the market, ranging in price and complexity. When selecting a kit, consider the following factors:
Cable Quality and Gauge
This is arguably the most critical aspect. A battery relocation kit involves running a long length of power cable from the battery in the trunk to the engine bay. The cable gauge (thickness) is crucial. A cable that's too thin will result in voltage drop, meaning less power available at the starter and other electrical components. This can lead to starting issues and poor performance.
Minimum recommendation is 1/0 AWG (American Wire Gauge) cable. Some kits even use 2/0 AWG for added insurance, especially if you're running high-powered accessories. Look for oxygen-free copper (OFC) cable for the best conductivity and corrosion resistance. Also, make sure the cable is rated for automotive use and can withstand the harsh conditions under the car (heat, moisture, abrasion). Welding cable is a popular and often more affordable option, and is perfectly suitable for this application.
Fuse Protection
A fuse is essential to protect your electrical system in case of a short circuit. The kit should include a high-amperage fuse (typically 200-300 amps) installed as close as possible to the battery in the trunk. This fuse will prevent a catastrophic electrical fire if the power cable gets damaged or shorts to the chassis.
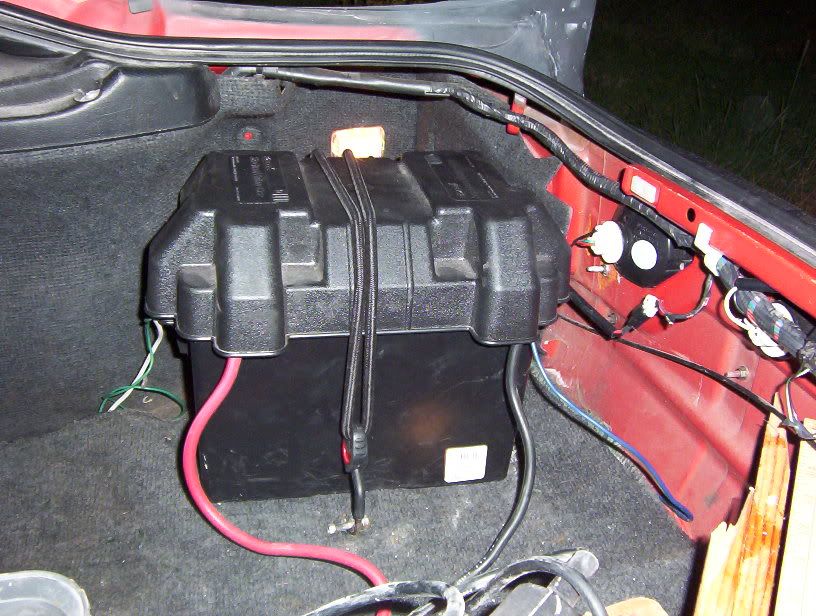
Battery Tray and Mounting Hardware
The battery tray should be sturdy and securely mount the battery in the trunk. Ensure it's designed to prevent the battery from shifting or moving around, especially during aggressive driving. Look for a tray that's compatible with your battery size (standard, Optima, etc.). The mounting hardware should be of good quality and include everything needed to secure the tray to the chassis.
Grounding Points
A good ground is just as important as a good power connection. The kit should provide adequate grounding points in the trunk and engine bay. This ensures a solid electrical connection between the battery and the chassis. Poor grounding can lead to electrical noise, poor sensor readings, and other performance issues.
Ventilation (For Wet Cell Batteries)
If you're using a wet cell battery (the kind with removable caps), it's crucial to provide ventilation. Wet cell batteries vent hydrogen gas, which is flammable. The kit should include a vent tube and a way to route the gas safely outside of the vehicle. Sealed AGM (Absorbent Glass Mat) batteries don't require venting and are a popular choice for relocation kits because of this. Lithium-ion batteries also don't require external venting.
Installation Process: A Step-by-Step Guide
While specific instructions will vary depending on the kit you choose, here's a general overview of the installation process:
- Disconnect the Negative Battery Terminal: This is the first and most important step. Always disconnect the negative terminal before working on any electrical components.
- Remove the Old Battery and Tray: Remove the existing battery and tray from the engine bay. Clean the area thoroughly.
- Run the Power Cable: This is the most time-consuming part. Route the power cable from the trunk to the engine bay, taking care to avoid sharp edges, moving parts, and heat sources. Use grommets to protect the cable where it passes through the firewall or other metal panels. Secure the cable with zip ties or cable clamps along its route.
- Install the Battery Tray and Fuse: Mount the battery tray in the trunk, ensuring it's securely fastened to the chassis. Install the fuse as close as possible to the battery.
- Connect the Power Cable to the Battery and Starter: Connect the power cable to the positive terminal of the battery in the trunk and to the starter in the engine bay. Ensure all connections are clean and tight. Use dielectric grease to prevent corrosion.
- Install the Grounding Cables: Connect the grounding cables to the chassis in the trunk and engine bay. Clean the grounding points thoroughly and use star washers to ensure a good connection.
- Connect the Negative Battery Terminal: Reconnect the negative battery terminal.
- Test the System: Start the car and check for any electrical issues. Verify that all lights and accessories are working correctly.
Important Considerations and Tips
- Safety First: Always wear safety glasses and gloves when working on electrical systems.
- Proper Crimping: Use a proper crimping tool to ensure secure and reliable connections. A loose crimp can lead to voltage drop and overheating.
- Cable Routing: Take your time and plan the cable routing carefully. Avoid sharp bends and chafing.
- Heat Shielding: If the power cable runs near the exhaust system, use heat shielding to protect it from excessive heat.
- Professional Installation: If you're not comfortable performing the installation yourself, consider hiring a qualified mechanic. Electrical work can be dangerous if not done correctly.
- Battery Type: As mentioned earlier, consider using a sealed AGM or Lithium-ion battery to eliminate the need for venting. These batteries are also more resistant to vibration and can be mounted in any orientation.
- Weight Balance: While relocating the battery helps, it's not a magic bullet. Consider other weight reduction measures, such as removing unnecessary components or using lighter-weight wheels and tires, to further improve weight distribution.
- Check Regulations: Be aware of any local regulations regarding battery relocation. Some jurisdictions may have specific requirements for battery mounting and ventilation.
Conclusion
Relocating the battery in your 240SX is a worthwhile modification for improving handling and overall performance. By carefully selecting a quality kit and following proper installation procedures, you can transform your car's balance and enjoy a more responsive and engaging driving experience. Just remember to prioritize safety and take your time to do the job right. Happy wrenching!