240sx Carbon Fiber Body Kit: Installation Guide
So, you've decided to take the plunge and install a carbon fiber body kit on your 240SX. Excellent choice! It's a fantastic way to dramatically improve the look of your ride, shed some weight, and even potentially improve aerodynamics. But let's be clear: this isn't a weekend project for the uninitiated. It requires patience, precision, and a decent understanding of automotive bodywork. This guide will walk you through the process, outlining the key steps and potential pitfalls along the way. We'll assume you're comfortable using basic hand tools and have some experience with car modification.
Preparation is Key
Before you even think about touching your car with a wrench, meticulous preparation is absolutely critical. This stage can make or break the entire project. We're talking about proper planning, meticulous inventory, and creating a clean and organized workspace. Think of it like surgery – you wouldn't go into an operating room without sterilizing everything first, right?
Inventory and Inspection
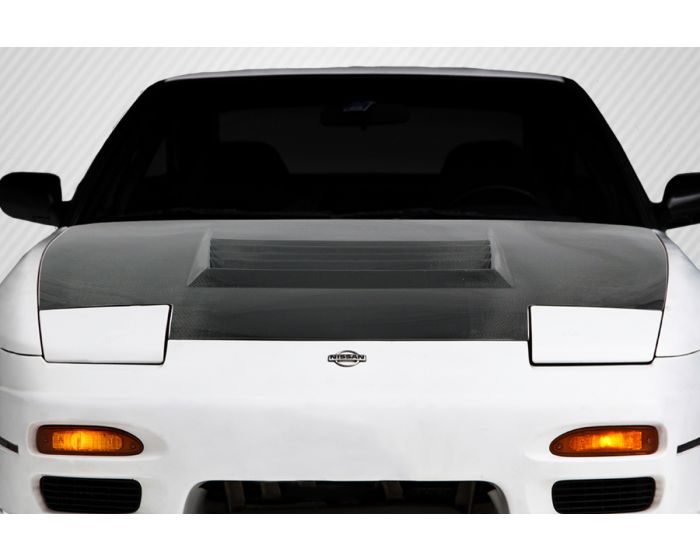
First, unpack your carbon fiber body kit and take a complete inventory. Compare the contents to the parts list provided by the manufacturer. Verify that everything is present and undamaged. Carbon fiber, while strong, is susceptible to cracking, especially during shipping. Look closely for hairline cracks, chips, or any other imperfections. If you find anything, contact the seller immediately before proceeding.
Next, examine each piece for fitment accuracy. Dry-fit each panel onto your car before you start any cutting, drilling, or bonding. This will highlight any discrepancies in manufacturing. Carbon fiber parts, especially aftermarket ones, can sometimes have minor fitment issues. Identify these early so you can plan your approach. You might need to slightly modify mounting points, trim edges, or use shims to achieve a perfect fit.
Workspace and Tools
You'll need a well-lit, clean, and dry workspace. A garage is ideal, but a covered carport can work in a pinch. Make sure you have enough room to move around the car comfortably and lay out all the body panels. A good workbench is also essential for preparing the panels.
Here's a list of essential tools you'll need:
- Socket set and wrenches (metric)
- Screwdrivers (Phillips and flathead)
- Drill with various drill bits
- Cutting tools:
- Rotary tool (Dremel or similar) with cutting discs: For precise trimming and shaping of the carbon fiber. A must-have!
- Body saw: For removing larger sections of the original body panels.
- Sanding supplies:
- Sandpaper (various grits): For smoothing edges and preparing surfaces for bonding.
- Sanding block: To ensure even sanding.
- Clamps: Various sizes for holding panels in place while bonding.
- Masking tape: High-quality automotive masking tape to protect painted surfaces and create clean lines.
- Measuring tape and marking pen
- Safety glasses and a dust mask: Carbon fiber dust is hazardous! Protect yourself.
- Respirator: For protection against fumes when using adhesives and solvents.
- Gloves: Nitrile or latex gloves to protect your hands.
- Body filler (optional): For filling minor imperfections.
- Adhesive: Automotive-grade panel bonding adhesive (e.g., epoxy or polyurethane-based). Choose one specifically designed for bonding carbon fiber to metal.
- Primer and paint (optional): If you plan to paint the carbon fiber panels.
- Cleaning solvents: Wax and grease remover to clean surfaces before bonding.
Removing the Old Body Panels
Now, the fun begins! But remember, patience is a virtue. Take your time and work methodically to avoid damaging the underlying structure of your car.
Before removing anything, carefully study the factory service manual for your 240SX. This will provide valuable information about the location of fasteners, wiring harnesses, and other components that you need to be aware of.
Remove the existing body panels one by one, starting with the ones that are being replaced by the carbon fiber parts. For example, if you're installing a new front bumper, remove the old one first. Be careful when disconnecting wiring harnesses for lights and other accessories. Label everything clearly to avoid confusion later.
When removing rivets or spot welds, use a drill with a spot weld cutter. This will minimize damage to the surrounding metal. After removing a panel, clean the underlying surface thoroughly with a wax and grease remover to remove any dirt, grime, or residue.
Preparing the Carbon Fiber Panels
As mentioned earlier, dry-fitting the panels is crucial. Once you're satisfied with the fit, you'll need to prepare the surfaces for bonding. This involves sanding, cleaning, and potentially modifying the panels. If the body kit came with clear coat, you may wish to consider additional layers of UV protective clear coat to prevent yellowing over time.
Sanding and Trimming
Use sandpaper to smooth the edges of the carbon fiber panels. Start with a coarser grit (e.g., 180-grit) and gradually move to a finer grit (e.g., 400-grit) to achieve a smooth finish. Pay particular attention to any sharp edges or rough spots. A rotary tool can be useful for precise trimming and shaping. Use a cutting disc designed for carbon fiber to avoid splintering or delamination.
Cleaning and Priming
Thoroughly clean the carbon fiber panels with a wax and grease remover to remove any dirt, oil, or fingerprints. This will ensure proper adhesion of the bonding adhesive. If you plan to paint the carbon fiber panels, you'll need to apply a primer. Use a primer specifically designed for carbon fiber to ensure proper adhesion and prevent the paint from cracking or peeling.
Bonding the Carbon Fiber Panels
This is where the magic happens. Choose a high-quality automotive panel bonding adhesive specifically designed for bonding carbon fiber to metal. Follow the manufacturer's instructions carefully, paying particular attention to the mixing ratio and curing time. Epoxies and Polyurethane-based adhesives are the common choices.
Apply the adhesive to both the carbon fiber panel and the underlying surface on the car. Use enough adhesive to create a strong bond, but avoid applying too much, as this can create a mess. Position the carbon fiber panel carefully and clamp it in place. Use clamps to apply even pressure across the entire surface of the panel. This will ensure a strong and consistent bond. Refer to the adhesive manufacturer's guidelines for specific clamping pressures.
Allow the adhesive to cure completely before removing the clamps. The curing time will vary depending on the type of adhesive used. Do not rush this process, as it can compromise the strength of the bond.
Dealing with Gaps and Imperfections
Even with careful preparation, you may encounter gaps or imperfections in the fit of the carbon fiber panels. These can be filled with body filler. Apply the body filler in thin layers, allowing each layer to dry completely before applying the next. Sand the body filler smooth to match the contour of the surrounding surface. Be patient and take your time to achieve a flawless finish.
Finishing Touches
Once the carbon fiber panels are bonded in place, you can move on to the finishing touches. This may involve painting, clear coating, or adding trim pieces. If you're painting the panels, use a high-quality automotive paint that is compatible with carbon fiber. Apply several coats of paint, allowing each coat to dry completely before applying the next. After the paint has dried, apply a clear coat to protect the paint and add a glossy finish.
Reinstall any wiring harnesses, lights, and other accessories that were removed during the installation process. Double-check all connections to ensure they are secure and functioning properly.
Final Inspection
Finally, give your 240SX a thorough inspection to ensure that everything is installed correctly. Check for any loose fasteners, gaps, or other imperfections. Take the car for a test drive to make sure that everything is working properly. If you encounter any problems, address them immediately.
A Word of Caution
Working with carbon fiber can be hazardous. Carbon fiber dust can irritate the skin and lungs. Always wear safety glasses, a dust mask, and gloves when sanding or cutting carbon fiber. Work in a well-ventilated area to avoid inhaling carbon fiber dust. Dispose of carbon fiber waste properly, as it is not biodegradable.
Installing a carbon fiber body kit is a challenging but rewarding project. With careful preparation, patience, and attention to detail, you can transform the look of your 240SX and create a truly unique and head-turning machine. Good luck, and happy modding!