240sx Control Arm Bushings: Replacement Guide
So, you're thinking about tackling your 240SX control arm bushings? Good choice. Replacing worn-out bushings is a fantastic way to tighten up your car's handling, improve steering response, and get rid of those annoying clunks and creaks. This guide is aimed at the experienced DIYer – someone who's comfortable with basic wrenching, has a decent understanding of suspension components, and isn't afraid to get their hands dirty. We'll walk through the process step-by-step, covering the tools you'll need, the important considerations, and some helpful tips to make the job smoother.
Understanding Control Arm Bushings and Why They Fail
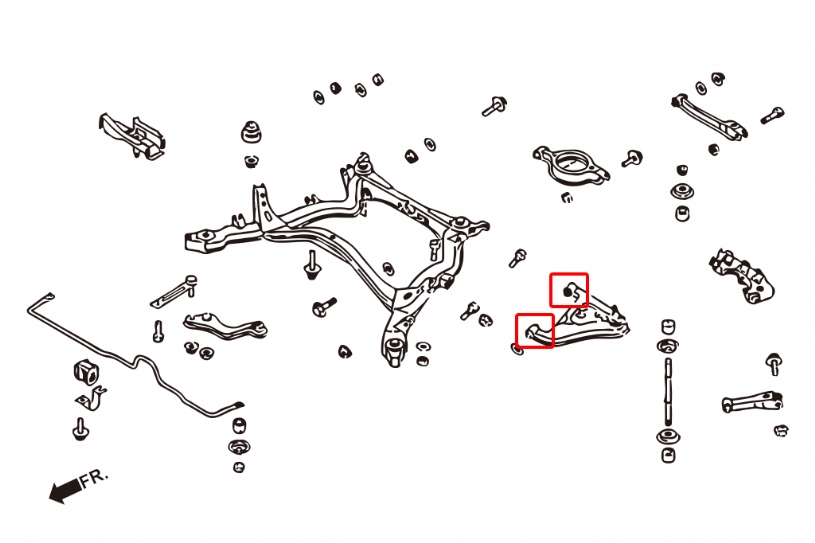
Before we dive in, let's quickly recap what control arm bushings are and why replacing them is necessary. Control arms are vital suspension links that connect the chassis of your 240SX to the wheel hubs. They allow the suspension to move up and down, absorbing bumps and keeping the tires in contact with the road. The bushings, typically made of rubber or polyurethane, are pressed into the control arms and provide a flexible connection point. They absorb vibrations, reduce noise, and allow for a degree of movement without transmitting harsh impacts directly to the chassis.
Over time, these bushings degrade. Rubber bushings dry out, crack, and become brittle due to age, heat, and exposure to the elements. Polyurethane bushings, while more durable, can also wear, particularly if they're not properly lubricated or subjected to extreme conditions. Worn bushings result in:
- Loose handling: The car feels less responsive to steering inputs.
- Increased body roll: The car leans more in corners.
- Uneven tire wear: Misalignment can occur due to excessive play in the suspension.
- Clunking or creaking noises: Especially noticeable over bumps.
- Vibration: Transmitted through the steering wheel or chassis.
Replacing the bushings restores the control arm's ability to properly locate the wheel hub, leading to improved handling, reduced noise, and a more comfortable ride. You'll also notice a significant improvement in steering feel and overall vehicle stability.
Tools and Materials You'll Need
Having the right tools is crucial for a successful bushing replacement. Here's a comprehensive list:
- Jack and Jack Stands: Essential for safely lifting and supporting the vehicle. Never work under a car supported only by a jack.
- Wheel Chocks: To prevent the car from rolling.
- Socket Set: A good selection of metric sockets (10mm, 12mm, 14mm, 17mm, 19mm, 22mm) and ratchets is a must. Consider having both 3/8" and 1/2" drive ratchets.
- Wrench Set: Similar to the socket set, a metric wrench set covering the same sizes.
- Breaker Bar: For loosening stubborn bolts.
- Torque Wrench: Absolutely essential for tightening bolts to the correct specifications.
- Ball Joint Separator (Pickle Fork or Ball Joint Press): Depending on how you choose to disconnect the ball joint. A ball joint press is generally safer.
- Hammer: A dead blow hammer is preferable to avoid damaging components.
- Penetrating Oil: Apply liberally to any rusty or seized bolts well in advance of starting the job. PB Blaster or Kroil are excellent choices.
- Bushing Press Kit (or Hydraulic Press and Appropriate Sockets/Adaptors): This is the most crucial and often the most expensive tool. You can rent these from many auto parts stores. The kit needs to have adaptors that fit the various control arm bushings.
- Bench Vise: To hold the control arm securely while pressing in/out the bushings.
- Safety Glasses: Protect your eyes!
- Gloves: Protect your hands!
- Shop Towels: For cleaning up messes.
- New Control Arm Bushings: Choose quality replacements from a reputable manufacturer. Consider polyurethane bushings for improved performance, but be aware they may transmit more noise and vibration.
- Anti-Seize Compound: Apply to bolt threads to prevent future corrosion.
- Grease (for Polyurethane Bushings, if applicable): Follow the manufacturer's instructions for lubrication.
Step-by-Step Control Arm Bushing Replacement
This guide assumes you are replacing the front lower control arm bushings. The process for other control arms is similar, but there might be slight variations.
1. Preparation
a. Safety First: Park the car on a level surface, engage the parking brake, and chock the rear wheels.
b. Loosen Lug Nuts: Before lifting the car, loosen the lug nuts on the wheel of the side you're working on.
c. Lift and Support: Use the jack to lift the car and securely place jack stands under the frame rails. Double-check that the jack stands are stable before proceeding. Remove the wheel.
d. Apply Penetrating Oil: Generously spray penetrating oil on all bolts and nuts associated with the control arm, including the ball joint, shock absorber mount, and control arm mounting points. Let it soak for at least 30 minutes (or even overnight).
2. Disconnecting the Control Arm
a. Disconnect the Sway Bar Link: If applicable, disconnect the sway bar link from the control arm. Use a wrench to hold the sway bar link stud while loosening the nut.
b. Disconnect the Shock Absorber: Unbolt the shock absorber from the control arm. Support the shock absorber so it doesn't dangle.
c. Disconnect the Ball Joint: This is often the trickiest part. You have two main options:
Option 1: Pickle Fork: Insert the pickle fork between the ball joint and the spindle and strike it firmly with a hammer. This method is effective but can damage the ball joint boot. If you're replacing the ball joint as well, this isn't a major concern. However, proceed with caution, as it can be forceful.
Option 2: Ball Joint Press: This is the preferred method. Use the ball joint press with the correct adaptors to press the ball joint out of the spindle. This is less likely to damage the ball joint boot and allows for more controlled removal.
d. Remove the Control Arm Mounting Bolts: Locate the bolts that secure the control arm to the chassis. Use a breaker bar if necessary to loosen them. Carefully remove the bolts and detach the control arm from the car.
3. Bushing Removal
a. Secure the Control Arm in a Vise: Mount the control arm securely in a bench vise.
b. Press Out the Old Bushings: This is where the bushing press kit (or hydraulic press) comes in. Select the appropriate adaptors that will push the old bushing out of the control arm without damaging the arm itself. Center the control arm in the press and carefully press the bushing out. You may need to apply heat with a heat gun to help loosen stubborn bushings. Work slowly and ensure the bushing is being pressed out straight.
c. Clean the Bushing Bore: Once the old bushings are removed, thoroughly clean the inside of the bushing bore in the control arm. Remove any rust, dirt, or debris that could interfere with the new bushings.
4. Bushing Installation
a. Prepare the New Bushings: If you are installing polyurethane bushings, apply the provided grease to the inner and outer surfaces. For rubber bushings, a light coating of silicone grease can help ease installation.
b. Press in the New Bushings: Using the bushing press and appropriate adaptors, carefully press the new bushings into the control arm. Ensure they are properly aligned and fully seated. Do not use excessive force, as this can damage the bushings or the control arm.
5. Reinstallation
a. Reinstall the Control Arm: Carefully reinstall the control arm onto the chassis, aligning the mounting holes. Install the mounting bolts and tighten them finger-tight for now.
b. Reconnect the Ball Joint: Reinstall the ball joint into the spindle. If you used a pickle fork, you may need to use a hammer to tap the ball joint back into place. If you used a ball joint press, reverse the process to press it back in. Ensure the ball joint is fully seated and secured.
c. Reconnect the Shock Absorber: Bolt the shock absorber back onto the control arm.
d. Reconnect the Sway Bar Link: Reattach the sway bar link to the control arm (if applicable).
e. Tighten the Control Arm Mounting Bolts: This is critical! Lower the car onto ramps or place blocks of wood under the wheels to simulate ride height. This is essential to properly preload the bushings. Then, tighten the control arm mounting bolts to the manufacturer's specified torque using a torque wrench. The torque specifications can usually be found in a service manual or online.
6. Final Steps
a. Reinstall the Wheel: Reinstall the wheel and tighten the lug nuts to the correct torque specifications.
b. Lower the Car: Carefully lower the car back to the ground.
c. Torque Check: Double-check the torque on all bolts after driving a short distance (e.g., 50-100 miles).
d. Alignment: It is highly recommended to get a wheel alignment after replacing control arm bushings. This will ensure proper tire wear and handling.
Important Considerations and Tips
- Rust and Corrosion: Be prepared to deal with rusty or seized bolts. Use plenty of penetrating oil and don't be afraid to use a breaker bar. If a bolt is completely seized, you may need to use a torch to heat it up or even cut it off.
- Service Manual: A service manual is an invaluable resource for torque specifications, diagrams, and other helpful information.
- One Side at a Time: It's generally recommended to work on one side of the car at a time. This allows you to use the other side as a reference if you get stuck or forget how something goes back together.
- Take Pictures: Before disassembling anything, take pictures of the components and their orientation. This will help you remember how everything goes back together.
- Cleanliness: Keep your workspace clean and organized. This will help you avoid losing parts and make the job more enjoyable.
- Patience: Don't rush the job. Take your time and pay attention to detail.
Replacing control arm bushings can be a challenging but rewarding project. By following these steps and taking your time, you can significantly improve the handling and ride quality of your 240SX. Good luck, and happy wrenching!